jQuery pluginウィンドウ、モーダル
- Create a Beautiful Looking Custom Dialog Box With jQuery and CSS3〔CSS3を使用した角丸レイアウトのダイアログボックス〕
- jGrowl〔Mac OS XのGrowl風にメッセージ表示〕
- jQDialog plugin for jQuery〔軽量のダイアログプラグイン〕
- jqModal〔通知ウィンドウ、ダイアログ、モーダルウィンドウを表示〕
- jQuery Alert Dialogs (Alert, Confirm, & Prompt Replacements) 〔アラート、確認ダイアログ、入力プロンプトの作成〕
- jQuery BlockUI Plugin〔ページや要素のブロック、モーダルダイアログ表示〕
- jQuery Tools〔HTMLをオーバーレイ〕
- LeaveNotice jQuery Plugin〔リンク先遷移時に通知アラート表示〕
- maxImage Image Scaler〔ウィンドウサイズに合わせて画像をリサイズ〕
- PopUpWindow〔ポップアップウィンドウ〕
- Simple jQuery Modal Window Tutorial 〔シンプルなモーダルウィンドウ〕
- SimpleModal〔シンプルなモーダルウィンドウを生成する軽量のjQueryプラグイン〕
Create a Beautiful Looking Custom Dialog Box With jQuery and CSS3
CSS3を使用した角丸レイアウトのダイアログボックス
2010/2/7
Create a Beautiful Looking Custom Dialog Box With jQuery and CSS3
CSS3による角丸レイアウトのダイアログをjQueryを使用して表示する方法が掲載されています。 CSS3未対応のIEでは通常の四角いダイアログになります。
※掲載されているセンタリングはドキュメントサイズの計算になっている、画面にスクロールバーが表示されるような長いページだとダイアログボックスが見えません。 長いページにも対応するには、下記のように高さ計算をウィンドウサイズベースに修正する必要があります。
// var dialogTop =  (maskHeight/3) - ($('#dialog-box').height());
var dialogTop =  ($(window).height()/2) - ($('#dialog-box').height());
 設置イメージ
<!DOCTYPE html PUBLIC "-//W3C//DTD XHTML 1.0 Transitional//EN" "http://www.w3.org/TR/xhtml1/DTD/xhtml1-transitional.dtd">
<html xmlns="http://www.w3.org/1999/xhtml" xml:lang="ja" lang="ja">
    <head>
        <meta http-equiv="Content-Type" content="text/html;charset=utf-8" />
        <meta http-equiv="Content-Language" content="ja" />
        <meta http-equiv="Content-Script-Type" content="text/javascript" />
        <meta http-equiv="Content-Style-Type" content="text/css" />
        <meta http-equiv="imagetoolbar" content="no" />
        <title>設置サンプル</title>
        <link rel="stylesheet" type="text/css" href="/content/lib/global.css" />
        <!-- JS -->
        <script type="text/javascript" src="http://ajax.googleapis.com/ajax/libs/jquery/1.3.2/jquery.min.js"></script>
        <script type="text/javascript">
            $(function(){
                // クリックで、オーバーレイ、ダイアログボックス、ボタンを非表示
                $('a.btn-ok, #dialog-overlay, #dialog-box').click(function (){
                    $('#dialog-overlay, #dialog-box').hide();
                    return false;
                });
                // ウィンドウがリサイズされたら、ダイアログボックスをセンタリング表示する関数を呼ぶ
                $(window).resize(function () {
                    // ダイアログボックスが表示されている場合のみ実行
                    if (!$('#dialog-box').is(':hidden')) popup();
                });
                // ダイアログをポップアップする関数
            });
            function popup(message){
                // スクリーンの幅と高さを取得
                var maskHeight = $(document).height();
                var maskWidth = $(window).width();
                // 垂直方法および水平方向にセンタリング表示する位置を計算
//                var dialogTop =  (maskHeight/3) - ($('#dialog-box').height());
                var dialogTop =  ($(window).height()/2) - ($('#dialog-box').height());
                var dialogLeft = (maskWidth/2) - ($('#dialog-box').width()/2);
                // オーバーレイとダイアログボックスを表示
                $('#dialog-overlay').css({height:maskHeight, width:maskWidth}).show();
                $('#dialog-box').css({top:dialogTop, left:dialogLeft}).show();
                // ダイアログボックス内にメッセージを表示
                $('#dialog-message').html(message);
            }
        </script>
        <!-- CSS -->
        <style type="text/css">
            #dialog-overlay {
                /* set it to fill the whil screen */
                width:100%;height:100%;
                /* transparency for different browsers */
                filter:alpha(opacity=50);
                -moz-opacity:0.5;
                -khtml-opacity: 0.5;
                opacity: 0.5;
                background:#000;
                /* make sure it appear behind the dialog box but above everything else */
                position:absolute;
                top:0;left:0;
                z-index:3000;
                /* hide it by default */
                display:none;
            }
            #dialog-box {
                /* css3 drop shadow */
                -webkit-box-shadow: 0px 0px 10px rgba(0, 0, 0, 0.5);
                -moz-box-shadow: 0px 0px 10px rgba(0, 0, 0, 0.5);
                /* css3 border radius */
                -moz-border-radius: 5px;
                -webkit-border-radius: 5px;
                background:#eee;
                /* styling of the dialog box, i have a fixed dimension for this demo */
                width:328px;
                /* make sure it has the highest z-index */
                position:absolute;
                z-index:5000;
                /* hide it by default */
                display:none;
            }
            #dialog-box .dialog-content {
                /* style the content */
                text-align:left;
                margin:13px; padding:10px;
                color:#666;
                font-family:arial;
                font-size:11px;
            }
            a.button {
                /* styles for button */
                margin:10px auto 0 auto; padding: 5px 10px 6px;
                text-align:center;
                display: block;
                width:50px;
                color: #fff;
                text-decoration: none;
                font-weight: bold;
                line-height: 1;
                /* button color */
                background-color: #e33100;
                /* css3 implementation :) */
                /* rounded corner */
                -moz-border-radius: 5px;
                -webkit-border-radius: 5px;
                /* drop shadow */
                -moz-box-shadow: 0 1px 3px rgba(0,0,0,0.5);
                -webkit-box-shadow: 0 1px 3px rgba(0,0,0,0.5);
                /* text shaow */
                text-shadow: 0 -1px 1px rgba(0,0,0,0.25);
                border-bottom: 1px solid rgba(0,0,0,0.25);
                position: relative;
                cursor: pointer;
            }
            a.button:hover {
                background-color: #c33100;
            }
            /* extra styling */
            #dialog-box .dialog-content p {
                font-weight:700;margin:0;
            }
            #dialog-box .dialog-content ul {
                margin:10px 0 10px 20px;
                padding:0;
                height:50px;
            }
        </style>
    </head>
    <body>
        <div id="wrap">
            <h1>設置サンプル</h1>
            <p>【参照】<a href='http://www.queness.com/post/1696/create-a-beautiful-looking-custom-dialog-box-with-jquery-and-css3'>Create a Beautiful Looking Custom Dialog Box With jQuery and CSS3</a></p>
<!-- CODE -->
<p>
    <a href="javascript:popup('ここにエラーメッセージを書きます。ここにエラーメッセージを書きます。ここにエラーメッセージを書きます。ここにエラーメッセージを書きます。ここにエラーメッセージを書きます。')">ポップアップ</a>
</p>
<div id="dialog-overlay"></div>
<div id="dialog-box">
    <div class="dialog-content">
        <div id="dialog-message"></div>
        <a href="#" class="button">Close</a>
    </div>
</div>

<!-- / CODE -->
    </body>
</html>
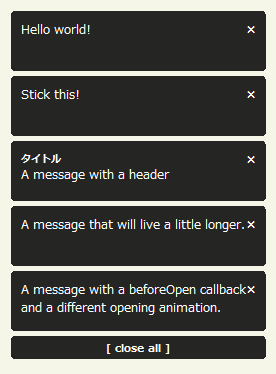
jGrowl
Mac OS XのGrowl風にメッセージ表示
2008/12/20
jGrowl v1.1.2
[JS]jquery.js v1.2.6、jquery.jgrowl.js
Mac OS XのGrowl風に、メッセージを半透明の角丸ボックスに表示するjQueryプラグイン。
メッセージは、一定時間経過するとフェードアウトしながら消えていきます。 2つ以上メッセージを表示した場合は、一括で閉じるリンクが表示されます。
オプションで、メッセージの表示時間(単位:ミリ秒)、ヘッダ付き、閉じるボタンをクリックするまで表示するなどの設定もできます。 メッセージボックスが閉じられようとしている時などのイベントも取得することができます。
 設置イメージ
<!DOCTYPE html PUBLIC "-//W3C//DTD XHTML 1.0 Transitional//EN" "http://www.w3.org/TR/xhtml1/DTD/xhtml1-transitional.dtd">
<html xmlns="http://www.w3.org/1999/xhtml" xml:lang="ja" lang="ja">
    <head>
        <meta http-equiv="Content-Type" content="text/html; charset=utf-8" />
        <meta http-equiv="Content-Language" content="ja" />
        <meta http-equiv="Content-Script-Type" content="text/javascript" />
        <meta http-equiv="Content-Style-Type" content="text/css" />
        <meta http-equiv="imagetoolbar" content="no" />
        <title>jTip - The Jquery Tool Tip | 設置サンプル</title>
        <link rel="stylesheet" type="text/css" href="/content/lib/global.css" />
        <!-- JS -->
        <script src="https://ajax.googleapis.com/ajax/libs/jquery/1.2.6/jquery.min.js"></script>
        <script src="/content/lib/jquery/jquery.jgrowl.js" type="text/javascript"></script>
        <!-- CSS -->
        <link rel="stylesheet" type="text/css" href="/content/lib/jquery/jquery.jgrowl.css" />
    </head>
    <body>
        <div id="wrap">
            <h1><a href='http://stanlemon.net/projects/jgrowl.html'>jGrowl v1.1.2</a> | 設置サンプル</h1>
<!-- CODE -->
            <ul>
                <li><a href="javascript:void(0);" onclick="$.jGrowl('Hello world!');">シンプルなメッセージ表示</a></li>
                <li><a href="javascript:void(0);" onclick="$.jGrowl('Stick this!', { sticky: true });">閉じるボタンをクリックするまで消えないメッセージ</a></li>
                <li><a href="javascript:void(0);" onclick="$.jGrowl('A message with a header', { header: 'タイトル' });">ヘッダ付きのメッセージ</a></li>
                <li><a href="javascript:void(0);" onclick="$.jGrowl('A message that will live a little longer.', { life: 10000 });">メッセージを長めに表示(1秒間)</a></li>
                <li><a href="javascript:void(0);" onclick="$.jGrowl('A message with a beforeOpen callback and a different opening animation.', { beforeClose: function(e,m) { alert('About to close this notification!'); }, animateOpen: { height: 'show' } });">閉じる前にアラート表示</a></li>
            </ul>
<!-- / CODE -->
        </div>
    </body>
</html>
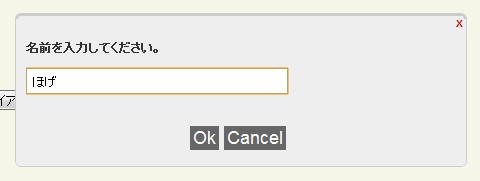
jQDialog plugin for jQuery
軽量のダイアログプラグイン
unknown
jQDialog plugin for jQuery
一定時間後に自動消去する警告、アラート、確認ダイアログ、入力プロンプトなどのダイアログをなめらかにポップアップする軽量のjQueryプラグイン。
ダイアログ内には、HTML文を記述することができるため、ログインフォームなど任意のコンテンツを含めることができます。
 設置イメージ
<!DOCTYPE html PUBLIC "-//W3C//DTD XHTML 1.0 Transitional//EN" "http://www.w3.org/TR/xhtml1/DTD/xhtml1-transitional.dtd">
<html xmlns="http://www.w3.org/1999/xhtml" xml:lang="ja" lang="ja">
    <head>
        <meta http-equiv="Content-Type" content="text/html; charset=utf-8" />
        <meta http-equiv="Content-Language" content="ja" />
        <meta http-equiv="Content-Script-Type" content="text/javascript" />
        <meta http-equiv="Content-Style-Type" content="text/css" />
        <meta http-equiv="imagetoolbar" content="no" />
        <title>設置サンプル</title>
        <link rel="stylesheet" type="text/css" href="/content/lib/global.css" />
        <!-- JS -->
        <script type="text/javascript" src="http://ajax.googleapis.com/ajax/libs/jquery/1.3.2/jquery.min.js"></script>
        <script type="text/javascript" src="/content/lib/jquery/jqdialog.js"></script>
        <script type="text/javascript">
            $(function(){
                /* 警告ダイアログ */
                $('#bt-notify').click( function() { jqDialog.notify("このダイアログは3秒後に自動的に消えます。", 3); } );

                /* アラートダイアログ */
                $('#bt-alert').click(function() {
                    jqDialog.alert("アラートダイアログです。", function() {
                        /* 【OK】ボタンがクリックされた時に呼ばれるコールバック関数 */
                        alert("【OK】ボタンがクリックされました!");
                    });
                } );
                /* 入力プロンプト */
                $('#bt-prompt').click( function() {
                    jqDialog.prompt("名前を入力してください。",
                        'ほげ',
                        /* 【OK】ボタンがクリックされた時に呼ばれるコールバック関数 */
                        function(data) { alert("アナタの名前は「" + data + "」ですね!?"); },
                        /* 【CANCEL】ボタンがクリックされた時に呼ばれるコールバック関数 */
                        function() { alert("【CANCEL】ボタンがクリックされました!"); }
                    );
                } );
                /* 確認ダイアログ */
                $('#bt-confirm').click( function() {
                    jqDialog.confirm("どちらかのボタンをクリックしてください。",
                        /* 【YES】ボタンがクリックされた時に呼ばれるコールバック関数 */
                        function() { alert("【YES】ボタンがクリックされました!"); },
                        /* 【NO】ボタンがクリックされた時に呼ばれるコールバック関数 */
                        function() { alert("【NO】ボタンがクリックされました!"); }
                    );
                } );

                /* カスタムコンテンツダイアログ */
                $('#bt-content').click( function() {
                    jqDialog.content('<p><label for="userid">ユーザーID:</label><input type="text" name="userid" id="userid" /></p><p><label for="userpw">パスワード:</label><input type="password" name="userpw" id="userpw" /></p>');
                } );
            });
        </script>
        <!-- CSS -->
        <style type="text/css">
            #jqDialog_box {
                background: #eee;
                position: absolute;
                width: 450px; height: 150px;
                border-width: 3px 1px 1px 1px;
                border-style: solid;
                border-color: #ccc;
                -moz-border-radius: 6px;
                -webkit-border-radius: 6px;
            }
            #jqDialog_content {
                margin: 10px;
                font-weight: bold;
                font-size: 12px;
                height: 90px;
                overflow: hidden;
            }
            #jqDialog_options {
                margin: 10px;
                text-align: center;
            }
            #jqDialog_options button {
                font-family: Arial;
                margin-right: 5px;
                background: #666;
                border: 0px;
                font-size: 1.5em;
                color: #fff;
                width: auto;
            }
            #jqDialog_input {
                padding: 4px;
                width: 250px;
            }
            #jqDialog_close {
                background: none;
                border: none;
                float: right;
                font-weight: bold;
                font-size: 10px;
                color: #cc0000;
            }
        </style>
    </head>
    <body>
        <div id="wrap">
            <h1>設置サンプル</h1>
            <p>参照: <a href='http://kailashnadh.name/code/jqdialog/'>jQDialog plugin for jQuery</a></p>
<!-- CODE -->
            <p>
                <button id="bt-notify">警告ダイアログ</button>
                <button id="bt-alert">アラートダイアログ</button>
                <button id="bt-confirm">確認ダイアログ</button>
                <button id="bt-prompt">入力プロンプト</button>
                <button id="bt-content">カスタムコンテンツダイアログ</button>
            </p>
<!-- / CODE -->
        </div>
    </body>
</html>
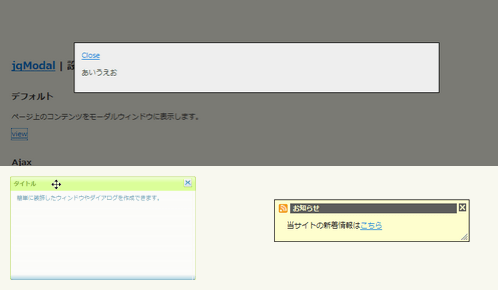
jqModal
通知ウィンドウ、ダイアログ、モーダルウィンドウを表示
2009/3/7
jqModal
通知ウィンドウ、ダイアログ、モーダルウィンドウを表示するjQueryプラグイン。
モーダルウィンドウ内にモーダルウィンドウを表示したり、Ajaxでコンテンツを読込むこともできます。 「jqDnr.js」という要素のドラッグ&ドロップおよびリサイズをする軽量のjQueryプラグインを使用して、リサイズ可能なダイアログやウィンドウを作成することもできます。
 設置イメージ
<!DOCTYPE html PUBLIC "-//W3C//DTD XHTML 1.0 Transitional//EN" "http://www.w3.org/TR/xhtml1/DTD/xhtml1-transitional.dtd">
<html xmlns="http://www.w3.org/1999/xhtml" xml:lang="ja" lang="ja">
    <head>
        <meta http-equiv="Content-Type" content="text/html; charset=utf-8" />
        <meta http-equiv="Content-Language" content="ja" />
        <meta http-equiv="Content-Script-Type" content="text/javascript" />
        <meta http-equiv="Content-Style-Type" content="text/css" />
        <meta http-equiv="imagetoolbar" content="no" />
        <title>jqModal | 設置サンプル</title>
        <link rel="stylesheet" type="text/css" href="/content/lib/global.css" />
        <!-- JS -->
        <script type="text/javascript" src="http://ajax.googleapis.com/ajax/libs/jquery/1.2.6/jquery.min.js"></script>
        <script type="text/javascript" src="/content/lib/jquery/jqModal.js"></script>
        <!-- Optional Javascript for Drag'n'Resize -->
        <script type="text/javascript" src="/content/lib/jquery/jqDnR.js"></script>
        <script type="text/javascript">
            $(function(){
                /* デフォルト */
                $('#dialog').jqm();
                /* Ajax */
                $('#ex2').jqm({ajax: '/content/demo/sample_utf-8.txt', trigger: 'a.ex2trigger'});

                /* スタイリング:アラート */
                $('#ex3a').jqm({
                    trigger: '#ex3aTrigger',
                    overlay: 30,
                    overlayClass: 'whiteOverlay'
                }).jqDrag('.jqDrag');
                $('input.jqmdX')
                .hover(
                    function(){ $(this).addClass('jqmdXFocus'); },
                    function(){ $(this).removeClass('jqmdXFocus'); })
                .focus(
                    function(){ this.hideFocus=true; $(this).addClass('jqmdXFocus'); })
                .blur(
                    function(){ $(this).removeClass('jqmdXFocus'); });

                /* スタイリング:ダイアログ */
                var triggers = $('a.ex3bTrigger')[0];
                $('#ex3b').jqm({
                    trigger: triggers,
                    ajax: '/content/demo/sample_utf-8.txt',
                    target: 'div.jqmAlertContent',
                    overlay: 0
                });
                if($.browser.msie) {
                    $('div.jqmAlert .jqmClose').hover(
                        function(){ $(this).addClass('jqmCloseHover'); },
                        function(){ $(this).removeClass('jqmCloseHover');}
                    );
                }

                /* スタイリング:通知ウィンドウ */
                $('#ex3c')
                    .jqDrag('.jqDrag')
                    .jqResize('.jqResize')
                    .jqm({
                        trigger:'#ex3cTrigger',
                        overlay: 0,
                        onShow: function(h) {
                            /* callback executed when a trigger click. Show notice */
                            h.w.css('opacity',0.92).slideDown();
                            },
                        onHide: function(h) {
                            /* callback executed on window hide. Hide notice, overlay. */
                            h.w.slideUp("slow",function() { if(h.o) h.o.remove(); }); }
                        });
            });
        </script>
        <link rel="stylesheet" type="text/css" href="/content/lib/jquery/jqModal.css" />
    </head>
    <body>
        <div id="wrap">
            <h1><a href='http://dev.iceburg.net/jquery/jqModal/'>jqModal</a> | 設置サンプル</h1>
<!-- CODE -->
            <h2>デフォルト</h2>
            <p>ページ上のコンテンツをモーダルウィンドウに表示します。</p>
            <p><a href="#" class="jqModal">view</a></p>
            <div class="jqmWindow" id="dialog">
                <a href="#" class="jqmClose">Close</a>
                <p>あいうえお</p>
            </div>

            <h2>Ajax</h2>
            <p>外部ファイルを読込んでウィンドウ内に表示します。</p>
            <p><a href="#" class="ex2trigger">view</a></p>
            <div class="jqmWindow" id="ex2">
                Please wait... <img src="/content/img/loading.gif" alt="loading" />
            </div>

            <h2>スタイリング</h2>
            <ul>
                <li>
                    <p><strong>ダイアログ</strong> <a href="#" id="ex3aTrigger">view</a> (dialog)</p>
                    <p>jqDnR.jsを使用した、ドラッグ&ドロップ可能なダイアログ。</p>
                    <div id="ex3a" class="jqmDialog">
                        <div class="jqmdTL">
                            <div class="jqmdTR">
                                <div class="jqmdTC jqDrag">タイトル</div>
                            </div>
                        </div>
                        <div class="jqmdBL">
                            <div class="jqmdBR">
                                <div class="jqmdBC">
                                    <div class="jqmdMSG">
                                        簡単に装飾したウィンドウやダイアログを作成できます。
                                    </div>
                                </div>
                            </div>
                        </div>
                        <input type="image" src="dialog/close.gif" class="jqmdX jqmClose" />
                    </div>
                </li>
                <li>
                    <p><strong>アラート</strong> <a href="#" class="ex3bTrigger">view</a> (alert)</p>
                    <p>jqDnR.js使用。外部ファイルを読込んでアラート内に表示します。</p>
                    <div class="jqmAlert" id="ex3b">
                        <div id="ex3b" class="jqmAlertWindow">
                            <div class="jqmAlertTitle cf">
                                <h1>タイトル</h1><a href="#" class="jqmClose"><em>閉じる</em></a>
                            </div>
                            <div class="jqmAlertContent">
                                <p>Please wait... <img src="/content/img/loading.gif" alt="loading" /></p>
                            </div>
                        </div>
                    </div>
                </li>
                <li>
                    <p><strong>通知ウィンドウ</strong> <a href="#" id="ex3cTrigger">view</a> (notice)</p>
                    <p>jqDnR.js使用した、ドラッグ&ドロップ可能な通知ウィンドウ。開閉時にスライドアニメーションします。</p>
                    <div style="position: absolute; margin: -100px 0 0 100px;">
                        <div id="ex3c" class="jqmNotice">
                            <div class="jqmnTitle jqDrag">
                                <h1>お知らせ</h1>
                            </div>
                            <div class="jqmnContent">
                                <p>当サイトの新着情報は<a href='http://phpjavascriptroom.com/index.xml'>こちら</a></p>
                            </div>
                            <img src="/content/lib/jquery/jqmodal/notice/close_icon.png" alt="close" class="jqmClose" />
                            <img src="/content/lib/jquery/jqmodal/dialog/resize.gif" alt="resize" class="jqResize" />
                        </div>
                    </div>
                </li>
            </ul>
<!-- / CODE -->
    </body>
</html>
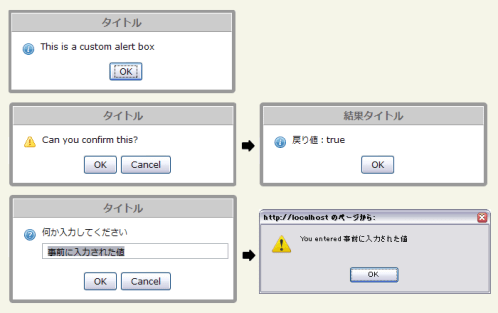
jQuery Alert Dialogs (Alert, Confirm, & Prompt Replacements)
アラート、確認ダイアログ、入力プロンプトの作成
2009/3/28
jQuery Alert Dialogs (Alert, Confirm, & Prompt Replacements)
アラート、確認ダイアログ、入力プロンプトを作成するjQueryプラグイン。
アラートのタイトル、表示するテキスト(HTMLタグ可)を指定することができます。 確認アラートは戻り値、入力プロンプトは、事前に入力された値を取得して表示することができます。 また、アラートに任意のクラス名を指定して、別のスタイルを適用することもできます。
 設置イメージ
<!DOCTYPE html PUBLIC "-//W3C//DTD XHTML 1.0 Transitional//EN" "http://www.w3.org/TR/xhtml1/DTD/xhtml1-transitional.dtd">
<html xmlns="http://www.w3.org/1999/xhtml" xml:lang="ja" lang="ja">
<head>
<meta http-equiv="Content-Type" content="text/html; charset=utf-8" />
<meta http-equiv="Content-Language" content="ja" />
<meta http-equiv="Content-Script-Type" content="text/javascript" />
<meta http-equiv="Content-Style-Type" content="text/css" />
<meta http-equiv="imagetoolbar" content="no" />
<title>jQuery Alert Dialogs (Alert, Confirm, & Prompt Replacements) | 設置サンプル</title>
<link rel="stylesheet" type="text/css" href="/content/lib/global.css" />
<!-- JS -->
<script src="https://ajax.googleapis.com/ajax/libs/jquery/1.3.2/jquery.min.js"></script>
<script type="text/javascript" src="/content/lib/jquery/ui/ui.draggable.js"></script>
<script type="text/javascript" src="/content/lib/jquery/jquery.alerts.js"></script>
<script type="text/javascript">
$(function(){
$("#alert_button").click( function() {
jAlert('This is a custom alert box', 'タイトル');
});
$("#confirm_button").click( function() {
jConfirm('Can you confirm this?', 'タイトル', function(r) {
jAlert('戻り値:' + r, '結果タイトル');
});
});
$("#prompt_button").click( function() {
jPrompt('何か入力してください', '事前に入力された値', 'タイトル', function(r) {
if( r ) alert('You entered ' + r);
});
});
$("#alert_button_with_html").click( function() {
jAlert('<strong>強調</strong>、<a href="#">リンク</a>のように、HTMLタグを使用することができます。');
});
$(".alert_style_example").click( function() {
$.alerts.dialogClass = $(this).attr('id'); // set custom style class
jAlert('アラートに「style_1」というクラスを適用しています', 'タイトル', function() {
$.alerts.dialogClass = null; // reset to default
});
});
});
</script>
<!-- CSS -->
<style type="text/css">
#popup_container {
min-width:300px; /* Dialog will be no smaller than this */
max-width:600px; /* Dialog will wrap after this width */
border:solid 5px #999;
background:#fff;
color:#000;
-moz-border-radius:5px;
-webkit-border-radius:5px;
border-radius:5px;
}
#popup_title {
margin:0; padding:0;
border:solid 1px #fff;
border-bottom:solid 1px #999;
background:#ccc;
color:#666;
font-size:14px;
font-weight:bold;
text-align:center;
line-height:1.75em;
cursor:default;
}
#popup_content { margin:0; padding:1em 1.75em; background:transparent url(/content/img/icon/color/information.png) no-repeat 16px 16px; }
#popup_content.alert { background-image:url(/content/img/icon/color/information.png); }
#popup_content.confirm { background-image:url(/content/img/icon/color/attention.gif); }
#popup_content.prompt { background-image:url(/content/img/icon/color/help.png); }
#popup_message { padding-left:20px; }
#popup_panel { text-align:center; margin:1em 0 0 1em; }
#popup_prompt { margin:.5em 0; }
/* custom dialog styles */
#popup_container.style_1 { color:#a4c6e2; background:#005294; border-color:#113f66; }
#popup_container.style_1 #popup_title { color:#fff; font-weight:normal; text-align:left; background:#76a5cc; border:solid 1px #005294; padding-left:1em; }
#popup_container.style_1 #popup_content { background:none; }
#popup_container.style_1 #popup_message { padding-left:0em; }
#popup_container.style_1 input[type='button'] { border:outset 2px #76a5cc; color:#a4c6e2; background:#3778ae; }
</style>
</head>
<body>
<div id="wrap">
<h1><a href='http://abeautifulsite.net/notebook/87'>jQuery Alert Dialogs (Alert, Confirm, & Prompt Replacements) </a> | 設置サンプル</h1>
<!-- CODE -->
<h2>アラート</h2>
<p><input id="alert_button" type="button" value="アラート表示" /></p>
<pre>jAlert('This is a custom alert box', 'タイトル');</pre>
<h2>確認ダイアログ</h2>
<p><input id="confirm_button" type="button" value="確認ダイアログ表示" /></p>
<pre>jConfirm('Can you confirm this?', 'タイトル', function(r) {
jAlert('戻り値:' + r, '結果タイトル');
});</pre>
<h2>入力プロンプト</h2>
<p><input id="prompt_button" type="button" value="入力プロンプト表示" /></p>
<pre>jPrompt('何か入力してください', '事前に入力された値', 'タイトル', function(r) {
if( r ) alert('You entered ' + r);
});</pre>
<h2>アラート内にHTML文を表示</h2>
<p><input id="alert_button_with_html" type="button" value="Show Alert" /></p>
<pre>jAlert('<strong>強調</strong>、<a href="#">リンク</a>のように、HTMLタグを使用することができます。');</pre>
<h2>アラートに別のスタイルを適用</h2>
<p><input id="style_1" class="alert_style_example" type="button" value="Style 1" /></p>
<p>$.alerts.dialogClassプロパティにクラス名を指定します。</p>
<pre>$.alerts.dialogClass = $(this).attr('id'); // set custom style class
jAlert('アラートに「style_1」というクラスを適用しています', 'タイトル', function() {
$.alerts.dialogClass = null; // reset to default
});</pre>
<!-- / CODE -->
</div>
</body>
</html>
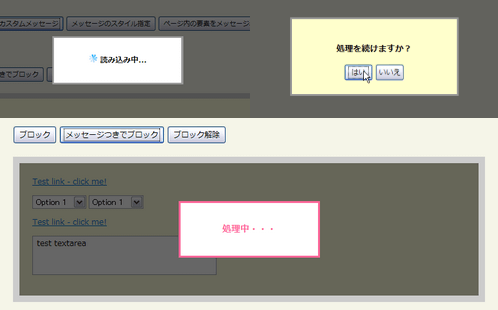
jQuery BlockUI Plugin
ページや要素のブロック、モーダルダイアログ表示
2008/12/20
jQuery BlockUI Plugin v2
実行や読み込みに時間のかかる処理をしている間、ページや要素をブロックしたり、ダイアログを表示するjQueryプラグイン。
処理を実行している間、ページや特定の要素をブロックして、「お待ちください」といった内容のメッセージを表示したり、ダイアログを表示して処理を継続するか確認するなどの実用的な使い方が掲載されています。 メッセージの内容パラメータや、要素で指定可能です。またスタイルもパラメータでカスタマイズできます。
wait.phpには、実際は、時間の処理を記述したプログラムを指定します。
テストなら、<? sleep(2); ?>のようにスリープ処理を入れておけばOK。
 設置イメージ
<!DOCTYPE html PUBLIC "-//W3C//DTD XHTML 1.0 Transitional//EN" "http://www.w3.org/TR/xhtml1/DTD/xhtml1-transitional.dtd">
<html xmlns="http://www.w3.org/1999/xhtml" xml:lang="ja" lang="ja">
    <head>
        <meta http-equiv="Content-Type" content="text/html; charset=utf-8" />
        <meta http-equiv="Content-Language" content="ja" />
        <meta http-equiv="Content-Script-Type" content="text/javascript" />
        <meta http-equiv="Content-Style-Type" content="text/css" />
        <meta http-equiv="imagetoolbar" content="no" />
        <title>jQuery BlockUI Plugin v2 | 設置サンプル</title>
        <link rel="stylesheet" type="text/css" href="/content/lib/global.css" />
        <!-- JS -->
        <script src="https://ajax.googleapis.com/ajax/libs/jquery/1.2.6/jquery.min.js"></script>
        <script type="text/javascript" src="/content/lib/jquery/jquery.blockUI.js"></script>
        <script type="text/javascript">
            $(function($) {
                function test() {
                    $.ajax({ url: '/content/demo/wait.php', cache: false });
                }
                // global hook - unblock UI when ajax request completes
                $().ajaxStop($.unblockUI);

                /* ■ページのブロック
                 *   test()関数の処理が終わるまでページをブロックします。
                 */
                /* デフォルトメッセージ */
                $('#pageDemo1').click(function() {
                    $.blockUI();
                    test();
                });
                /* カスタムメッセージ */
                $('#pageDemo2').click(function() {
                    $.blockUI({ message:'<h1><img src="/content/img/ajax/ajax-loader.gif" /> 読み込み中...</h1>' });
                    test();
                });
                /* メッセージのスタイル指定 */
                $('#pageDemo3').click(function() {
                    $.blockUI({
                        css:{ backgroundColor:'#ff6699', color:'#fff' }
                    });
                    test();
                });
                /* ページ内の要素をメッセージ表示 */
                $('#pageDemo4').click(function() {
                    $.blockUI({ message:$('#domMessage') });
                    test();
                });
                /* ■要素のブロック
                 *
                 */
                /* ブロック */
                $('#blockButton').click(function() {
                    $('div.blockMe').unblock({fadeOut:0}).block({ message: null });
                });
                /* メッセージつきでブロック */
                $('#blockButton2').click(function() {
                    $('div.blockMe').unblock({fadeOut:0}).block({ message: '<h1>処理中・・・</h1>', css: { border:'3px solid #ff6699', color:'#ff6699' } });
                });
                /* ブロック解除 */
                $('#unblockButton').click(function() {
                    $('div.blockMe').unblock();
                });
                $('a.test').click(function() {
                    alert('link clicked');
                    return false;
                });
                /* ■モーダルダイアログ
                 *
                 */
                $('#showDialog').click(function() {
                    $.blockUI({ message: $('#question'), css: { width: '275px' }});
                });
                $('#yes').click(function() {
                    // update the block message
                    $.blockUI({ message: '<h1>処理中・・・</h1>' });

                    $.ajax({
                        url: 'wait.php',
                        cache: false,
                        complete: function() {
                            // unblock when remote call returns
                            $.unblockUI();
                        }
                    });
                });
                $('#no').bind('click', $.unblockUI);
                // wire up all the demo code
                $('#demoTable code').each(function() {
                    eval($(this).text());
                });
            });
        </script>
        <!-- CSS -->
        <style type="text/css">
            /* ページのブロック */
            .blockMsg h1    { margin:0; padding:30px; font-weight:bold; font-size:1.2em; }
            #domMessage        { padding:30px; }
            /* 要素のブロック */
            .blockMe        { padding:20px; margin:20px 0; border:10px solid #ccc; background-color:#ffd }
            /* ダイアログ */
            #question { background-color: #ffc; padding: 10px; }
            #question input { width: 4em }
        </style>
    </head>
    <body>
        <div id="wrap">
            <h1><a href='http://malsup.com/jquery/block/'>jQuery BlockUI Plugin v2</a> | 設置サンプル</h1>
<!-- CODE -->
            <h2>ページのブロック</h2>
            <p>
                <input id="pageDemo1" class="demo" type="submit" value="デフォルトメッセージ" />
                <input id="pageDemo2" class="demo" type="submit" value="カスタムメッセージ" />
                <input id="pageDemo3" class="demo" type="submit" value="メッセージのスタイル指定" />
                <input id="pageDemo4" class="demo" type="submit" value="ページ内の要素をメッセージ表示" />
            </p>
            <div id="domMessage" style="display:none;">
                少々お待ちくださいませ(*・ω・*)
            </div>

            <h2>要素のブロック</h2>
            <p>
                <input id="blockButton"   type="submit" value="ブロック" />
                <input id="blockButton2"  type="submit" value="メッセージつきでブロック" />
                <input id="unblockButton" type="submit" value="ブロック解除" />
            </p>
            <div class="blockMe">
                <p><a href="#" class="test">Test link - click me!</a></p>
                <p>
                    <select><option>Option 1</option><option>Option 2</option></select>
                    <select><option>Option 1</option><option>Option 2</option></select>
                </p>
                <p><a href="#" class="test">Test link - click me!</a></p>
                <p><textarea rows="2" cols="20">test textarea</textarea></p>
            </div>

            <h2>モーダルダイアログ</h2>
            <p><input id="showDialog" type="submit" value="ダイアログ表示" /></p>
            <div id="question" style="display:none; cursor: default">
                <h2>処理を続けますか?</h2>
                <p>
                    <input type="button" id="yes" value="はい" />
                    <input type="button" id="no" value="いいえ" />
                </p>
            </div>
<!-- / CODE -->
        </div>
    </body>
</html>
jQuery Tools
HTMLをオーバーレイ
2010/2/7
jQuery Overlay @ jQuery TOOLS - Overlay your HTML with eyecandy
Webサイトでよく使用されるインタフェースがつまったjQueryプラグインです。 タブ、オーバーレイ、ツールチップ、スクロールラベル、Flash埋込などを簡単に実装することができます。
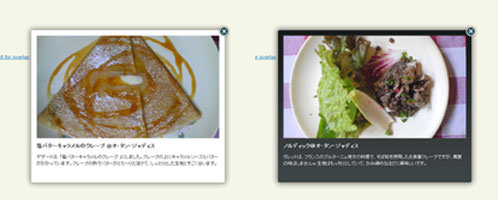
Overlay
オーバーレイは、ページ上にあらかじめオーバーレイ表示する用のHTMLを記述しておき、そのHTMLをCSSでスタイリングしたり、表示時にエフェクト効果をつけてスタイリッシュに見せることができます。 CSSのクラス名で、背景に敷く画像を変えたり、IE6以下のブラウザには透過していない背景画像を指定するように分岐処理されています。
 設置イメージ
<!DOCTYPE html PUBLIC "-//W3C//DTD XHTML 1.0 Transitional//EN" "http://www.w3.org/TR/xhtml1/DTD/xhtml1-transitional.dtd">
<html xmlns="http://www.w3.org/1999/xhtml" xml:lang="ja" lang="ja">
    <head>
        <meta http-equiv="Content-Type" content="text/html; charset=utf-8" />
        <meta http-equiv="Content-Language" content="ja" />
        <meta http-equiv="Content-Script-Type" content="text/javascript" />
        <meta http-equiv="Content-Style-Type" content="text/css" />
        <meta http-equiv="imagetoolbar" content="no" />
        <title>設置サンプル</title>
        <link rel="stylesheet" type="text/css" href="/content/lib/global.css" />
        <!-- JS -->
        <script type="text/javascript" src="http://ajax.googleapis.com/ajax/libs/jquery/1.3.2/jquery.min.js"></script>
        <script type="text/javascript" src="/content/lib/jquery/jquery.tools.min.js"></script>
        <script type="text/javascript">
            $(function(){
                $("#triggers img[rel]").overlay({effect: 'apple'});
            });
        </script>
        <style type="text/css">
            /* 白背景 */
            /* the overlayed element */
            .apple_overlay {
                display:none;
                background-image:url(/content/img/ajax/jquery/white.png);
                width:500px;
                padding:35px;
            }
            /* default close button positioned on upper right corner */
            .apple_overlay div.close {
                background-image:url(/content/img/ajax/jquery/close.png);
                position:absolute; right:5px; top:5px;
                cursor:pointer;
                height:35px;
                width:35px;
            }
            /* 黒背景 */
            div.apple_overlay.black {
                background-image:url(/content/img/ajax/jquery/transparent.png);
                color:#fff;
            }
            /* サムネイル */
            #triggers {
                margin-top:10px;
                text-align:center;
            }
            #triggers img {
                background-color:#fff;
                padding:2px;
                border:1px solid #ccc;
                margin:2px 5px;
                cursor:pointer;
                -moz-border-radius:5px;
                -webkit-border-radius:5px;
            }
            /* ボックス内のタイトルと説明 */
            div.details h2 {
                margin:10px 0; padding:0;
            }
            div.details p {
                margin:10px 0 0 0; padding:0;
            }
            </style>
            <!--[if lt IE 7]>
            <style>
            div.apple_overlay {
                background-image:url(/content/img/ajax/jquery/overlay_IE6.gif");
                color:#fff;
            }
            /* default close button positioned on upper right corner */
            div.apple_overlay div.close {
                background-image:url(/content/img/ajax/jquery/overlay_close_IE6.gif);
            }
            </style>
            <![endif]-->
    </head>
    <body>
        <div id="wrap">
            <h1>設置サンプル</h1>
            <p>【参照】<a href='http://flowplayer.org/tools/demos/overlay/apple.html'>jQuery Tools: The Apple effect for overlay</a></p>
            <p>サムネイル画像をクリックすると、画像と説明文をオーバーレイ表示します。</p>
<!-- CODE -->
            <!-- trigger elements -->
            <div id="triggers">
                <img src="http://farm4.static.flickr.com/3639/3664935712_94ca67b18b_t.jpg" rel="#photo1"/>
                <img src="http://farm4.static.flickr.com/3220/3664935670_b94968ccbc_t.jpg" rel="#photo2"/>
                <img src="http://farm4.static.flickr.com/3611/3664132439_78c681eb6d_t.jpg" rel="#photo3"/>
                <img src="http://farm4.static.flickr.com/3394/3664935528_16fff63afc_t.jpg" rel="#photo4"/>
            </div>
            <!-- overlayed element, which is styled with external stylesheet -->
            <div class="apple_overlay black" id="photo1">
                <img src="http://farm4.static.flickr.com/3639/3664935712_94ca67b18b.jpg" />
                <div class="details">
                    <h2>ノルディック@オ・タン・ジャディス</h2>
                    <p>ガレットは、フランスのブルターニュ地方の料理で、そば粉を使用したお食事クレープですが、蕎麦の味はしませんw 生地はもっちりとしていて、かみ締めるほどに美味しいです。</p>
                </div>
            </div>
            <div class="apple_overlay black" id="photo2">
                <img src="http://farm4.static.flickr.com/3220/3664935670_b94968ccbc.jpg" />
                <div class="details">
                    <h2>ノルディック@オ・タン・ジャディス</h2>
                    <p>ガレットは、フランスのブルターニュ地方の料理で、そば粉を使用したお食事クレープですが、蕎麦の味はしませんw 生地はもっちりとしていて、かみ締めるほどに美味しいです。</p>
                </div>
            </div>
            <div class="apple_overlay" id="photo3">
                <img src="http://farm4.static.flickr.com/3611/3664132439_78c681eb6d.jpg" />
                <div class="details">
                    <h2>ノルディック@オ・タン・ジャディス</h2>
                    <p>ガレットは、スモークサーモンとトマトのガレット『ノルディック』をチョイス!スモークサーモンの中には、クリームチーズがたっぷり♪さっぱりとした夏向きのガレットです。</p>
                </div>
            </div>
            <div class="apple_overlay" id="photo4">
                <img src="http://farm4.static.flickr.com/3394/3664935528_16fff63afc.jpg" />
                <div class="details">
                    <h2>塩バターキャラメルのクレープ @オ・タン・ジャディス</h2>
                    <p>デザートは、「塩バターキャラメルのクレープ 」にしました。クレープの上にキャラメルソースとバターがかかっています。クレープの熱でバターがとろ~りと溶けて、しっとりとした生地とすごく合います。</p>
                </div>
            </div>
<!-- / CODE -->
    </body>
</html>
▼複数の画像をグループ化してギャラリー表示。
 設置イメージ
<!DOCTYPE html PUBLIC "-//W3C//DTD XHTML 1.0 Transitional//EN" "http://www.w3.org/TR/xhtml1/DTD/xhtml1-transitional.dtd">
<html xmlns="http://www.w3.org/1999/xhtml" xml:lang="ja" lang="ja">
<head>
<meta http-equiv="Content-Type" content="text/html;charset=utf-8" />
<meta http-equiv="Content-Language" content="ja" />
<meta http-equiv="Content-Script-Type" content="text/javascript" />
<meta http-equiv="Content-Style-Type" content="text/css" />
<meta http-equiv="imagetoolbar" content="no" />
<title>設置サンプル</title>
<link rel="stylesheet" type="text/css" href="/content/lib/global.css" />
<!-- JS -->
<script type="text/javascript" src="http://ajax.googleapis.com/ajax/libs/jquery/1.3.2/jquery.min.js"></script>
<script type="text/javascript" src="/content/lib/jquery/jquery.tools.min.js"></script>
<script type="text/javascript">
$(function(){
$("#triggers a").overlay({
// トリガーはそれぞれ同じIDとオーバーレイを使用
target: '#gallery',
// エクスポージング効果
expose: '#f1f1f1'
// let the gallery plugin do its magic!
}).gallery({
// 速度
speed: 800
});
});
</script>
<style type="text/css">
/* the overlayed element */
.simple_overlay {
/* must be initially hidden */
display:none;
/* place overlay on top of other elements */
z-index:10000;
/* styling */
background-color:#333;
width:675px;
min-height:200px;
border:1px solid #666;
/* CSS3 styling for latest browsers */
-moz-box-shadow:0 0 90px 5px #000;
-webkit-box-shadow: 0 0 90px #000;
}
/* close button positioned on upper right corner */
.simple_overlay .close {
background-image:url(/content/img/ajax/jquery/close.png);
position:absolute;
right:-15px; top:-15px;
cursor:pointer;
width:35px; height:35px;
}
/* the large image. we use a gray border around it */
#img {
border:1px solid #666;
}
/* "next image" and "prev image" links */
.next, .prev {
/* absolute positioning relative to the overlay */
position:absolute;
top:40%;
border:1px solid #666;
cursor:pointer;
display:block;
padding:10px 20px;
color:#fff;
font-size:11px;
/* upcoming CSS3 features */
-moz-border-radius:5px;
-webkit-border-radius:5px;
}
.prev {
left:0;
border-left:0;
-moz-border-radius-topleft:0;
-moz-border-radius-bottomleft:0;
-webkit-border-bottom-left-radius:0;
-webkit-border-top-left-radius:0;
}
.next {
right:0;
border-right:0;
-moz-border-radius-topright:0;
-moz-border-radius-bottomright:0;
-webkit-border-bottom-right-radius:0;
-webkit-border-top-right-radius:0;
}
.next:hover, .prev:hover {
text-decoration:underline;
background-color:#000;
}
/* when there is no next or previous link available this class is added */
.disabled {
visibility:hidden;
}
/* the "information box" */
.info {
position:absolute;
bottom:0; left:0;
padding:10px 15px;
color:#fff;
font-size:11px;
border-top:1px solid #666;
}
.info strong {
display:block;
}
/* progress indicator (animated gif). should be initially hidden */
.progress {
position:absolute;
top:45%;
left:50%;
display:none;
}
/* everybody should know about RGBA colors. */
.next, .prev, .info {
background:#333 !important;
background:rgba(0, 0, 0, 0.6) url(/content/img/ajax/jquery/h80.png) repeat-x;
}
/* active thumbnail is raised on top of the mask using the z-index property */
/* the thumbnails */
#triggers {
text-align:center;
}
#triggers img {
background-color:#fff;
padding:2px;
border:1px solid #ccc;
margin:15px 2px;
-moz-border-radius:4px;
-webkit-border-radius:4px;
}
/* the active thumbnail */
#triggers a.active img {
outline:1px solid #000;
/* show on top of the expose mask */
z-index:9999;
position:relative;
}
</style>
</head>
<body>
<div id="wrap">
<h1>設置サンプル</h1>
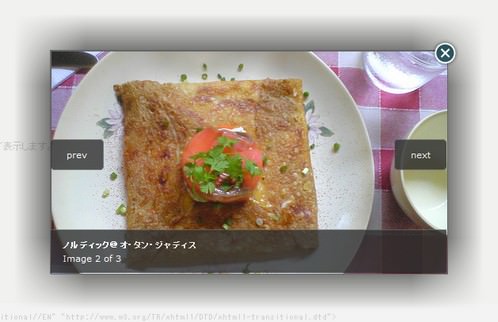
<p>【参照】<a href='http://flowplayer.org/tools/demos/overlay/gallery.html'>jQuery Tools: Using the gallery plugin</a></p>
<p>複数の画像をグループ化してギャラリー表示。サムネイル画像をクリックすると、画像がポップアップ表示されます。</p>
<!-- CODE -->
<!-- trigger elements -->
<div id="triggers">
<a href="http://farm4.static.flickr.com/3639/3664935712_94ca67b18b.jpg" title="サラダ@オ・タン・ジャディス"><img src="http://farm4.static.flickr.com/3639/3664935712_94ca67b18b_s.jpg" /></a>
<a href="http://farm4.static.flickr.com/3220/3664935670_b94968ccbc.jpg" title="ノルディック@オ・タン・ジャディス"><img src="http://farm4.static.flickr.com/3220/3664935670_b94968ccbc_s.jpg" /></a>
<a href="http://farm4.static.flickr.com/3394/3664935528_16fff63afc.jpg" title="塩バターキャラメルのクレープ @オ・タン・ジャディス"><img src="http://farm4.static.flickr.com/3394/3664935528_16fff63afc_s.jpg" /></a>
</div>
<!-- overlay element -->
<div class="simple_overlay" id="gallery">
<!-- "previous image" action -->
<a class="prev">prev</a>
<!-- "next image" action -->
<a class="next">next</a>
<!-- image information -->
<div class="info"></div>
<!-- load indicator (animated gif) -->
<img class="progress" src="/content/img/ajax/loading_black.gif" />
</div>
<!-- / CODE -->
</body>
</html>
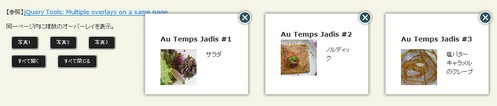
▼同一ページ内に複数のオーバーレイを表示、表示位置は座標で指定可能です。
 設置イメージ
<!DOCTYPE html PUBLIC "-//W3C//DTD XHTML 1.0 Transitional//EN" "http://www.w3.org/TR/xhtml1/DTD/xhtml1-transitional.dtd">
<html xmlns="http://www.w3.org/1999/xhtml" xml:lang="ja" lang="ja">
    <head>
        <meta http-equiv="Content-Type" content="text/html;charset=utf-8" />
        <meta http-equiv="Content-Language" content="ja" />
        <meta http-equiv="Content-Script-Type" content="text/javascript" />
        <meta http-equiv="Content-Style-Type" content="text/css" />
        <meta http-equiv="imagetoolbar" content="no" />
        <title>設置サンプル</title>
        <link rel="stylesheet" type="text/css" href="/content/lib/global.css" />
        <!-- JS -->
        <script type="text/javascript" src="http://ajax.googleapis.com/ajax/libs/jquery/1.3.2/jquery.min.js"></script>
        <script type="text/javascript" src="/content/lib/jquery/jquery.tools.min.js"></script>
        <script type="text/javascript">
            $(function(){
                // オーバーレイの表示位置指定
                var positions = [
                    [150,300],
                    [150,550],
                    [150,800]
                ];
                // setup triggers
                $("button[rel]").each(function(i) {
                    $(this).overlay({
                        // common configuration for each overlay
                        oneInstance: false,
                        closeOnClick: false,
                        // setup custom finish position
                        top: positions[i][0],
                        left: positions[i][1],
                        // use apple effect
                        effect: 'apple'
                    });
                });
            });
            // すべてのオーバーレイを開く
            function openAll() {
                $("button[rel]").each(function() {
                    $(this).overlay().load();
                });
            }

            // すべてのオーバーレイを閉じる
            function closeAll() {
                $("button[rel]").each(function() {
                    $(this).overlay().close();
                });
            }
        </script>
        <style type="text/css">
            /* overlay */
            div.overlay, #overlay {
                padding:40px;
                width:150px;
                display:none;
                background-image:url(/content/img/ajax/jquery/white.png);
            }
            div.overlay div.close,
            #overlay div.close {
                background:url(/content/img/ajax/jquery/close.png) no-repeat;
                position:absolute;
                top:-2px; right:-2px;
                width:35px; height:35px;
                cursor:pointer;
            }
            #overlay_player {
                display:block;
                height:450px;
            }
            /* buttons */
            button {
                outline:1px outset #999;
                border:1px solid #fff;
                background-color:#222;
                color:#fff;
                margin:0 10px; padding:5px 10px;
                -moz-border-radius:5px;
                -moz-outline-radius:5px;
                cursor:pointer;
                font-size:11px;
            }
            .overlay h2 {
                 margin:0; padding:0;
            }
            .overlay p.thumb {
                float:left;
                margin:0px 20px 20px 0; padding:0;
                width:75px; height:75px;
            }
        </style>
    </head>
    <body>
        <div id="wrap">
            <h1>設置サンプル</h1>
            <p>【参照】<a href='http://flowplayer.org/tools/demos/overlay/multiple.html'>jQuery Tools: Multiple overlays on a same page</a></p>
            <p>同一ページ内に複数のオーバーレイを表示。</p>
<!-- CODE -->
            <!-- overlay buttons -->
            <p>
                <button rel="div.overlay:eq(0)" type="button">写真1</button>
                <button rel="div.overlay:eq(1)" type="button">写真2</button>
                <button rel="div.overlay:eq(2)" type="button">写真3</button>
            </p>
            <p>
                <button type="button" onclick="openAll()">すべて開く</button>
                <button type="button" onclick="closeAll()">すべて閉じる</button>
            </p>
            <div class="overlay">
                <h2 style="margin:10px 0">Au Temps Jadis <me>#1</me></h2>
                <p class="thumb"><img src="http://farm4.static.flickr.com/3639/3664935712_94ca67b18b_s.jpg" /></p>
                <p>サラダ</p>
            </div>
            <div class="overlay">
                <h2>Au Temps Jadis <me>#2</me></h2>
                <p class="thumb"><img src="http://farm4.static.flickr.com/3220/3664935670_b94968ccbc_s.jpg" /></p>
                <p>ノルディック</p>
            </div>
            <div class="overlay">
                <h2 style="margin:10px 0">Au Temps Jadis <me>#3</me></h2>
                <p class="thumb"><img src="http://farm4.static.flickr.com/3394/3664935528_16fff63afc_s.jpg" /></p>
                <p>塩バターキャラメルのクレープ</p>
            </div>
<!-- / CODE -->
    </body>
</html>
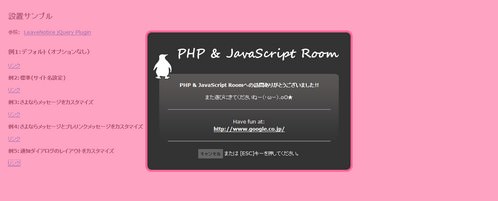
LeaveNotice jQuery Plugin
リンク先遷移時に通知アラート表示
unknown
LeaveNotice jQuery Plugin
リンクをクリックした時に、現在のページからリンク先のページへ移動しようとしていることを、ユーザーに通知するダイアログを表示するjQueryプラグイン。
ダイアログ表示からリンク先へ遷移するまでの時間(timeOut)、現在のサイト名、プレリンクメッセージやさよならメッセージなどの通知ダイアログ内に表示するテキスト名どをカスタマイズすることができます。
通知ウィンドウは画像を使用せず、CSSのみでスタイリングされています。 オーバーレイ、通知ウィンドウのカスタマイズをする場合は、オプションで指定可能です。
- messageBoxId(デフォルトは"ln-messageBox")
- messageHolderId(デフォルトは"n-messageHolder")
- overlayId(デフォルトは"ln-blackout")
- overlayAlpha(デフォルトは0.3)
 設置イメージ
<!DOCTYPE html PUBLIC "-//W3C//DTD XHTML 1.0 Transitional//EN" "http://www.w3.org/TR/xhtml1/DTD/xhtml1-transitional.dtd">
<html xmlns="http://www.w3.org/1999/xhtml" xml:lang="ja" lang="ja">
    <head>
        <meta http-equiv="Content-Type" content="text/html; charset=utf-8" />
        <meta http-equiv="Content-Language" content="ja" />
        <meta http-equiv="Content-Script-Type" content="text/javascript" />
        <meta http-equiv="Content-Style-Type" content="text/css" />
        <meta http-equiv="imagetoolbar" content="no" />
        <title>設置サンプル</title>
        <link rel="stylesheet" type="text/css" href="/content/lib/global.css" />
        <!-- JS -->
        <script type="text/javascript" src="http://ajax.googleapis.com/ajax/libs/jquery/1.3.2/jquery.min.js"></script>
        <script type="text/javascript" src="/content/lib/jquery/jquery.leaveNotice.js"></script>
        <script type="text/javascript">
            $(function(){
                $('a[target=_blank]').leaveNotice({siteName:'PHP & JavaScript Room'});

                //Initiation for example 1
                $('a.ex1').leaveNotice();

                //Initiation for example 1
                $('a.ex2').leaveNotice({
                    siteName:"PHP & JavaScript Room"
                });

                //Initiation for example 1
                $('a.ex3').leaveNotice({
                    siteName:"PHP & JavaScript Room",
                    exitMessage:"<h1> {SITENAME}への訪問ありがとう!</h1><p>またお立ち寄りくださいませー!!</p>"
                });

                //Initiation for example 1
                $('a.ex4').leaveNotice({
                    siteName:"PHP & JavaScript Room",
                    exitMessage:"<h3>{SITENAME}への訪問ありがとう!</h3><p>また遊びに来てねー!!</p>",
                    preLinkMessage:"<hr/><p>Have fun at:<br/><strong>{URL}</strong></p><hr/>",
                    timeOut:6000 /* 6秒後に遷移 */
                });

                //Initiation for example 1
                $('a.ex5').leaveNotice({
                    siteName:"PHP & JavaScript Room",
                    exitMessage:"<h3> {SITENAME}への訪問ありがとうございました!!</h3><p>また遊びにきてくださいねー(・ωー).oO★</p>",
                    preLinkMessage:"<hr/><p>Have fun at:<br/><strong>{URL}</strong></p><hr/>",
                    overlayId:"custom-blackout",
                    messageBoxId:"custom-messageBox",
                    messageBoxHolder:"custom-messageHolder",
                    overlayAlpha:0.6
                });
            });
        </script>
        <!-- CSS -->
        <style type="text/css">
            /* The style for the blackout div that appears when the exit dialog is shown. */
            #ln-blackout {position:fixed; top:0; left:0; width:100%; height:100%; background-color:#000;}
            /* This style is for a container that holds the message dialog box. It has been added primarily to help with positioning. I know some people would complain about this, but it seems more efficient this way even it is isn't semanitc. */
            #ln-messageHolder {position:fixed; top:150px; left:0; width:100%;}
            /* This style is for the div that holds the actual exit dialog. */
            #ln-messageBox {width:460px; margin:0 auto; min-height:200px; background-color:#fff; border:10px solid #e6e6e6; -moz-box-shadow:0 0 20px 10px #666; -webkit-box-shadow:0 0 20px #666; text-align:center; padding:20px;}
            /* This style is applied to the link that closes the dialog. */
            a#ln-cancelLink {background-color:#e6e6e6; font-weight:bold; padding:5px; color:#666; text-decoration:none; text-transform:uppercase; font-size:0.8em;}
            a#ln-cancelLink:hover {background-color:#666; color:#e6e6e6;}
            /* This style is for the box that holds the section that says where the user is being directed to. */
            .setoff {background-color:#f2f2f2; padding:5px; margin:10px 0 20px 0;}

            /* 例5 */
            #custom-blackout {position:fixed; top:0; left:0; width:100%; height:100%; background-color:#ff6699;}
            #custom-messageHolder {position:fixed; top:200px; left:0; width:100%;}
            #custom-messageBox {width:400px; margin:0 auto; padding:120px 50px 20px 50px; background:#333 url(/content/img/ajax/custom-msg-box-bg.png) no-repeat top center; color:#fff; text-align:center; border:5px solid #ff6699; -moz-border-radius:15px; -webkit-border-radius:15px;}
            #custom-messageBox * {color:#fff;}
            #custom-messageBox hr {border-color:#666;}
            #custom-messageBox a#ln-cancelLink {background-color:#666; color:#333;}
         </style>
    </head>
    <body>
        <div id="wrap">
            <h1>設置サンプル</h1>
            <p>参照: <a href='http://rewdy.com/tools/leavenotice-jquery-plugin'>LeaveNotice jQuery Plugin</a></p>
<!-- CODE -->
<h2>例1:デフォルト(オプションなし)</h2>
<p><a href="http://www.google.co.jp/" class="ex1">リンク</a></p>
<h3>例2:標準<span>(サイト名設定)</span></h3>
<p><a href="http://www.google.co.jp/" class="ex2">リンク</a></p>
<h3>例3:さよならメッセージをカスタマイズ</h3>
<p><a href="http://www.google.co.jp/" class="ex3">リンク</a></p>
<h3>例4:さよならメッセージとプレリンクメッセージをカスタマイズ</h3>
<p><a href="http://www.google.co.jp/" class="ex4">リンク</a></p>
<h3>例5:通知ダイアログのレイアウトをカスタマイズ</span></h3>
<p><a href="http://www.google.co.jp/" class="ex5">リンク</a></p>
<!-- / CODE -->
        </div>
    </body>
</html>
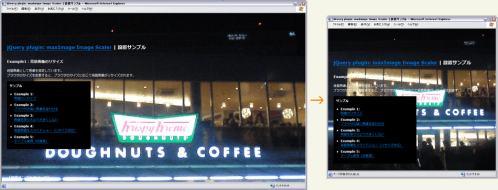
maxImage Image Scaler
ウィンドウサイズに合わせて画像をリサイズ
2009/3/1
jQuery plugin: maxImage Image Scaler
ウィンドウサイズに合わせて画像をリサイズするjQueryプラグイン。
イメージ比率、ブラウザサイズおよびいくつかのオプションにしたがって、画像サイズを最大幅に縮尺表示します。
 設置イメージ
<!DOCTYPE html PUBLIC "-//W3C//DTD XHTML 1.0 Transitional//EN" "http://www.w3.org/TR/xhtml1/DTD/xhtml1-transitional.dtd">
<html xmlns="http://www.w3.org/1999/xhtml" xml:lang="ja" lang="ja">
    <head>
        <meta http-equiv="Content-Type" content="text/html; charset=utf-8" />
        <meta http-equiv="Content-Language" content="ja" />
        <meta http-equiv="Content-Script-Type" content="text/javascript" />
        <meta http-equiv="Content-Style-Type" content="text/css" />
        <meta http-equiv="imagetoolbar" content="no" />
        <title>jQuery plugin: maxImage Image Scaler | 設置サンプル</title>
        <link rel="stylesheet" type="text/css" href="/content/lib/global.css" />
        <!-- JS -->
        <script src="https://ajax.googleapis.com/ajax/libs/jquery/1.3.2/jquery.min.js"></script>
        <script type="text/javascript" src="/content/lib/jquery/jquery.maximage.js"></script>
        <script type="text/javascript">
            $(function(){
                $('img.maximage').maxImage({
                    verticalOffset: 91,
                    horizontalOffset: 520
                });
                $('img.bgmaximage').maxImage({
                      isBackground: true,
                      verticalAlign: 'top'
                 });
            });
        </script>
        <style type="text/css">
            html { overflow-x:hidden;overflow-y:scroll; }
            body { color:#fff; }
            .span-1     { width:300px; background:#000; float:left;margin-right:10px;opacity:.8;padding:10px; }
            .liquid     { margin:0 0 0 300px;position:relative;width:auto; }
        </style>
        <!--[if IE 6]>
        <style>
            body { height:100%; }
        </style>
        <![endif]-->
    </head>
    <body>
        <div id="wrap">
            <img src="http://farm4.static.flickr.com/3113/3142386067_4a9dbc9844_o.jpg" width="640" height="480" alt="" class="bgmaximage" />
            <h1><a href='http://aaronvanderzwan.com/blog/2009/02/jquery-plugin-maximage-image-scaler/'>jQuery plugin: maxImage Image Scaler</a> | 設置サンプル</h1>
            <h2>Example1:背景画像のリサイズ</h2>
            <p>背景画像として画像を指定しています。<br>ブラウザのサイズを変更すると、ブラウザのサイズに応じて背景画像がリサイズされます。</p>
<!-- CODE -->
            <div class="cf">
                <div class="span-1">
                    <h3>サンプル</h3>
                    <ul>
                        <li><strong>Example 1:<br><a href="example3.php?f=include/ajax/jquery_plugin_window/maximage.inc&ttl=jQuery+maxImage+plugin%82%CC%90%DD%92u%83T%83%93%83v%83%8B">画像のリサイズ</a></strong></li>
                        <li>Example 2:<br><a href="example3.php?f=include/ajax/jquery_plugin_window/maximage2.inc&ttl=jQuery+maxImage+plugin%82%CC%90%DD%92u%83T%83%93%83v%83%8B">ブラウザの端に画像を従わせる</a></li>
                        <li>Example 3:<br><a href="example3.php?f=include/ajax/jquery_plugin_window/maximage3.inc&ttl=jQuery+maxImage+plugin%82%CC%90%DD%92u%83T%83%93%83v%83%8B">画像を原寸大より大きくしない</a></li>
                        <li>Example 4:<br><a href="example3.php?f=include/ajax/jquery_plugin_window/maximage4.inc&ttl=jQuery+maxImage+plugin%82%CC%90%DD%92u%83T%83%93%83v%83%8B">背景画像をスライドショー(リサイズ対応)</a></li>
                        <li>Example 5:<br><a href="example3.php?f=include/ajax/jquery_plugin_window/maximage5.inc&ttl=jQuery+maxImage+plugin%82%CC%90%DD%92u%83T%83%93%83v%83%8B">テーブル使用(非推奨)</a></li>
                    </ul>
                </div>
            </div>
        </div>
<!-- / CODE -->
    </body>
</html>
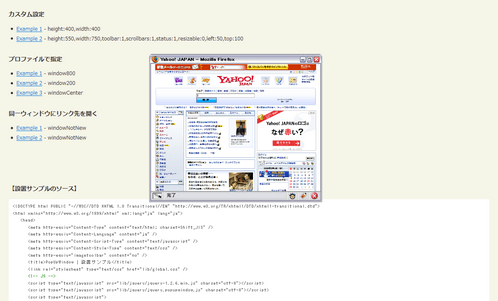
PopUpWindow
ポップアップウィンドウ
2009/3/1
PopUpWindow
リンクを取得し、リンクのhref属性に基づいたポップアップウィンドウを作成するjQueryプラグイン。
リンクのrel属性にカスタム設定またはプロファイル名を渡すことでデフォルトの設定を上書きできます。 カスタム設定では、ウィンドウのサイズ、ツールバー、スクロールバー、ステータスバーの有無、リサイズの有無、ウィンドウを開く位置、リンク先を常に新しいウィンドウで開くかの有無などを指定することができます。
 設置イメージ
<!DOCTYPE html PUBLIC "-//W3C//DTD XHTML 1.0 Transitional//EN" "http://www.w3.org/TR/xhtml1/DTD/xhtml1-transitional.dtd">
<html xmlns="http://www.w3.org/1999/xhtml" xml:lang="ja" lang="ja">
    <head>
        <meta http-equiv="Content-Type" content="text/html; charset=utf-8" />
        <meta http-equiv="Content-Language" content="ja" />
        <meta http-equiv="Content-Script-Type" content="text/javascript" />
        <meta http-equiv="Content-Style-Type" content="text/css" />
        <meta http-equiv="imagetoolbar" content="no" />
        <title>PopUpWindow | 設置サンプル</title>
        <link rel="stylesheet" type="text/css" href="/content/lib/global.css" />
        <!-- JS -->
        <script src="https://ajax.googleapis.com/ajax/libs/jquery/1.2.6/jquery.min.js"></script>
        <script type="text/javascript" src="/content/lib/jquery/jquery.popupwindow.js"></script>
        <script type="text/javascript">
            /* プロファイル */
            var profiles={
                window800:{
                    height:800,
                    width:800,
                    status:1
                },
                window200:{
                    height:200,
                    width:200,
                    status:1,
                    resizable:0
                },
                windowCenter:{
                    height:300,
                    width:400,
                    center:1
                },
                windowNotNew:{
                    height:300,
                    width:400,
                    center:1,
                    createnew:0
                }
            };
            $(function(){
                $(".popupwindow").popupwindow(profiles);
            });
        </script>
        <!-- CSS -->
    </head>
    <body>
        <div id="wrap">
            <h1><a href='http://rip747.github.com/popupwindow/'>PopUpWindow</a> | 設置サンプル</h1>
<!-- CODE -->
<h2>デフォルト設定</h2>
<ul>
    <li><a href="http://headlines.yahoo.co.jp/?popupwindow" class="popupwindow">Example 1</a></dd>
</ul>

<h2>カスタム設定</h2>
<ul>
    <li><a href="http://headlines.yahoo.co.jp/?popupwindow" class="popupwindow" rel="height:400,width:400">Example 1</a> - height:400,width:400</dd>
    <li><a href="http://headlines.yahoo.co.jp/?popupwindow" class="popupwindow" rel="height:550,width:750,toolbar:1,scrollbars:1,status:1,resizable:0,left:50,top:100">Example 2</a> - height:550,width:750,toolbar:1,scrollbars:1,status:1,resizable:0,left:50,top:100</dd>
</ul>

<h2>プロファイルで指定</h2>
<ul>
    <li><a href="http://headlines.yahoo.co.jp/?popupwindow" class="popupwindow" rel="window800">Example 1</a> - window800</dd>
    <li><a href="http://headlines.yahoo.co.jp/?popupwindow" class="popupwindow" rel="window200">Example 2</a> - window200</dd>
    <li><a href="http://headlines.yahoo.co.jp/?popupwindow" class="popupwindow" rel="windowCenter">Example 3</a> - windowCenter</dd>
</ul>

<h2>同一ウィンドウにリンク先を開く</h2>
<ul>
    <li><a href="http://headlines.yahoo.co.jp/?popupwindow" class="popupwindow" rel="windowNotNew">Example 1</a> - windowNotNew</dd>
    <li><a href="http://headlines.yahoo.co.jp/hl" class="popupwindow" rel="windowNotNew">Example 2</a> - windowNotNew</dd>
</ul>
<!-- / CODE -->
        </div>
    </body>
</html>
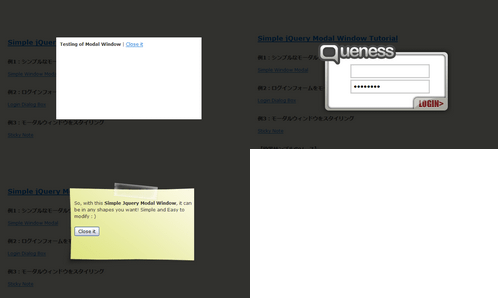
Simple jQuery Modal Window Tutorial
シンプルなモーダルウィンドウ
2009/3/20
Simple jQuery Modal Window Tutorial
jQueryを使用して、シンプルなモーダルウィンドウを作成する方法が掲載されています。
モーダルウィンドウ表示をする一連の処理が理解できます。 リンクをクリックすると、画面全体を覆うオーバーレイ用のマスクをフェード表示し、画面の中央にモーダルウィンドウを表示します。 閉じるボタンやリンクをクリック、またはオーバーレイ部分をクリックすると、モーダルウィンドウが閉じられます。 モーダルウィンドウ内のマークアップとスタイスシートでスタイリングすることができます。
 設置イメージ
<!DOCTYPE html PUBLIC "-//W3C//DTD XHTML 1.0 Transitional//EN" "http://www.w3.org/TR/xhtml1/DTD/xhtml1-transitional.dtd">
<html xmlns="http://www.w3.org/1999/xhtml" xml:lang="ja" lang="ja">
    <head>
        <meta http-equiv="Content-Type" content="text/html; charset=utf-8" />
        <meta http-equiv="Content-Language" content="ja" />
        <meta http-equiv="Content-Script-Type" content="text/javascript" />
        <meta http-equiv="Content-Style-Type" content="text/css" />
        <meta http-equiv="imagetoolbar" content="no" />
        <title>Simple jQuery Modal Window Tutorial | 設置サンプル</title>
        <link rel="stylesheet" type="text/css" href="/content/lib/global.css" />
        <!-- JS -->
        <script src="https://ajax.googleapis.com/ajax/libs/jquery/1.2.6/jquery.min.js"></script>
        <script type="text/javascript">
            $(function(){
                //select all the a tag with name equal to modal
                $('a[name=modal]').click(function(){
                    /* href属性を取得 */
                    var id = $(this).attr('href');
                    /* スクリーンの高さと幅を取得 */
                    var maskHeight = $(document).height();
                    var maskWidth = $(window).width();
                    /* スクリーン全体をおおうマスクの高さと幅を指定 */
                    $('#mask').css({'width':maskWidth,'height':maskHeight});
                    /* フェード効果を付ける */
                    //transition effect
                    $('#mask').fadeIn(1000);
                    $('#mask').fadeTo("slow",0.8);
                    /* ウィンドウの高さと幅を取得 */
                    //Get the window height and width
                    var winH = $(window).height();
                    var winW = $(window).width();
                    /* ウィンドウの中央にポップアップするよう設定 */
                    $(id).css('top',  winH/2-$(id).height()/2);
                    $(id).css('left', winW/2-$(id).width()/2);
                    /* フェード効果を付ける */
                    $(id).fadeIn(2000);
                });
                /* 閉じるボタンがクリックされた時 */
                $('.window .close').click(function(){
                    $('#mask, .window').hide();
                });
                /* マスクがクリックされた時 */
                $('#mask').click(function(){
                    $(this).hide();
                    $('.window').hide();
                });
            });
        </script>
        <style type="text/css">
            /* Z-index of #mask must lower than #boxes .window */
            #mask {
                position:absolute;
                left:0; top:0;
                z-index:9000;
                background-color:#000;
                display:none;
            }
            .window {
                position:absolute;
                left:0; top:0;
                width:440px; height:200px;
                display:none;
                z-index:9999;
                padding:20px;
            }
            #dialog {
                width:375px; height:203px;
                padding:10px;
                background-color:#fff;
            }
            /* 例2 */
            #dialog1 {
                width:375px; height:203px;
            }
            #dialog1 .d-header {
                background:url(/content/img/ajax/simple_jquery_modal_window/login-header.png) no-repeat 0 0 transparent;
                width:375px; height:150px;
            }
            #dialog1 .d-header input {
                position:relative;
                top:60px; left:100px;
                width:200px; height:22px;
                margin:4px 0 0 0; padding:5px;
                border:3px solid #ccc;
                font-size:15px;
            }
            #dialog1 .d-blank {
                float:left;
                background:url(/content/img/ajax/simple_jquery_modal_window/login-blank.png) no-repeat 0 0 transparent;
                width:267px; height:53px;
            }
            #dialog1 .d-login {
                float:left;
                width:108px; height:53px;
                margin:0; padding:0;
            }
            #dialog1 .d-login input {
                margin:0; padding:0;
            }
            /* 例3 */
            #dialog2 {
                background:url(/content/img/ajax/simple_jquery_modal_window/notice.png) no-repeat 0 0 transparent;
                width:326px; height:229px;
                padding:50px 0 20px 25px;
            }
        </style>
    </head>
    <body>
        <div id="wrap">
            <h1><a href='http://www.queness.com/post/77/simple-jquery-modal-window-tutorial'>Simple jQuery Modal Window Tutorial</a></h1>
<!-- CODE -->
            <h2>例1:シンプルなモーダルウィンドウ</h2>
            <!-- #dialog is the id of a DIV defined in the code below -->
            <p><a href="#dialog" name="modal">Simple Window Modal</a></p>
            <!-- #customize your modal window here -->
            <div id="dialog" class="window">
                <b>Testing of Modal Window</b> |
                <!-- close button is defined as close class -->
                <a href="#" class="close">Close it</a>
            </div>
            <!-- Do not remove div#mask, because you'll need it to fill the whole screen -->
            <div id="mask"></div>

            <h2>例2:ログインフォームをモーダル表示</h2>
            <p><a href="#dialog1" name="modal">Login Dialog Box</a></p>
            <!-- Start of Login Dialog -->
            <div id="dialog1" class="window">
                <div class="d-header">
                    <input type="text" value="username" onclick="this.value=''" /><br>
                    <input type="password" value="Password" onclick="this.value=''" />
                </div>
                <div class="d-blank"></div>
                <div class="d-login"><input type="image" alt="Login" title="Login" src="/content/img/ajax/simple_jquery_modal_window/login-button.png"/></div>
            </div>
            <!-- End of Login Dialog -->

            <h2>例3:モーダルウィンドウをスタイリング</h2>
            <p><a href="#dialog2" name="modal">Sticky Note</a></p>
            <!-- Start of Sticky Note -->
            <div id="dialog2" class="window">
                So, with this <b>Simple Jquery Modal Window</b>, it can be in any shapes you want! Simple and Easy to modify : ) <br><br>
                <input type="button" value="Close it" class="close"/>
            </div>
            <!-- End of Sticky Note -->

<!-- / CODE -->
    </body>
</html>
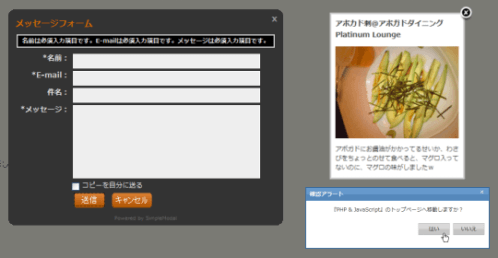
SimpleModal
シンプルなモーダルウィンドウを生成する軽量のjQueryプラグイン
unknown
SimpleModal v1.2.2
[CSS]basic.css、contact.css、confirm.css
基本的なモーダルウィンドウ、メール送信フォーム、確認アラートをモーダル表示するjQueryプラグイン。
ウィンドウのスタイルはCSSで指定しています。 基本的なモーダルウィンドウは、ページ内のHTMLコンテンツをモーダル表示しています。 メール送信フォームのメール送信後の処理は外部PHPファイル(data/contact.php)を使用しています。 確認アラートはJavaScriptのconfirm関数を上書きして、同様の処理を実装しています。
 設置イメージ
<!DOCTYPE html PUBLIC "-//W3C//DTD XHTML 1.0 Transitional//EN" "http://www.w3.org/TR/xhtml1/DTD/xhtml1-transitional.dtd">
<html xmlns="http://www.w3.org/1999/xhtml" xml:lang="ja" lang="ja">
    <head>
        <meta http-equiv="Content-Type" content="text/html; charset=utf-8" />
        <meta http-equiv="Content-Language" content="ja" />
        <meta http-equiv="Content-Script-Type" content="text/javascript" />
        <meta http-equiv="Content-Style-Type" content="text/css" />
        <meta http-equiv="imagetoolbar" content="no" />
        <title>SimpleModal | 設置サンプル</title>
        <link rel="stylesheet" type="text/css" href="/content/lib/global.css" />
        <!-- JS -->
        <script src="https://ajax.googleapis.com/ajax/libs/jquery/1.2.6/jquery.min.js"></script>
        <script type="text/javascript" src="/content/lib/jquery/simplemodal/jquery.simplemodal.js"></script>
        <script type="text/javascript" src="/content/lib/jquery/simplemodal/basic.js"></script>
        <script type="text/javascript" src="/content/lib/jquery/simplemodal/contact.js"></script>
        <script type="text/javascript" src="/content/lib/jquery/simplemodal/confirm.js"></script>
        <!-- CSS -->
        <link rel="stylesheet" type="text/css" href="/content/lib/jquery/simplemodal/basic.css" />
        <link rel="stylesheet" type="text/css" href="/content/lib/jquery/simplemodal/contact.css" />
        <link rel="stylesheet" type="text/css" href="/content/lib/jquery/simplemodal/confirm.css" />
    </head>
    <body>
        <div id="wrap">
            <h1><a href='http://www.ericmmartin.com/projects/simplemodal/'>SimpleModal v1.2.2</a> | 設置サンプル</h1>
<!-- CODE -->
            <h2>基本的なモーダルダイアログ</h2>
            <p>ページ内のHTML要素をモーダル表示します。</p>
            <div id='basicModal'>
                <input type='button' name='basic' value='Demo' class='basic demo'/>
            </div>
            <div id="basicModalContent" style='display:none'>
                <h1>アボカド刺@アボガドダイニング Platinum Lounge</h1>
                <p><a href="http://www.flickr.com/photos/22559849@N06/3273696567/" title="アボカド刺@アボガドダイニング Platinum Lounge by php_javascript_room, on Flickr"><img src="http://farm4.static.flickr.com/3509/3273696567_ebf4ed4381_m.jpg" width="240" height="180" alt="アボカド刺@アボガドダイニング Platinum Lounge" /></a></p>
                <p>アボガドにお醤油がかかってるせいか、わさびをちょっとのせて食べると、マグロ入ってないのに、マグロの味がしましたw</p>
            </div>

            <h2>確認アラートをモーダル表示</h2>
            <p>JavaScriptのconfirm関数を上書きするモーダルダイアログです。</p>
            <div id='confirmDialog'>
                <input type='button' name='confirm' value='Demo' class='confirm demo'/>
            </div>
            <div id='confirm' style='display:none'>
                <a href='#' title='Close' class='modalCloseX simplemodal-close'>x</a>
                <div class='header'><span>確認アラート</span></div>
                <p class='message'></p>
                <div class='buttons'>
                    <div class='no simplemodal-close'>いいえ</div><div class='yes'>はい</div>
                </div>
            </div>

            <!--h2>お問合せフォームをモーダル表示</h2>
            <p>外部ファイル(/data/contact.php)を読込んでモーダル表示します。</p>
            <div id='contactForm'>
                <input type='button' name='contact' value='Demo' class='contact demo'/>
            </div-->

<!-- / CODE -->
        </div>
    </body>
</html>