jQuery pluginŃé”ŃéŻŃā│ŃāēŃé”ŃĆüŃāóŃā╝ŃāĆŃā½
- Create a Beautiful Looking Custom Dialog Box With jQuery and CSS3ŃĆöCSS3ŃéÆõĮ┐ńö©ŃüŚŃü¤Ķ¦ÆõĖĖŃā¼ŃéżŃéóŃé”ŃāłŃü«ŃāĆŃéżŃéóŃāŁŃé░Ńā£ŃāāŃé»Ńé╣ŃĆĢ
- jGrowlŃĆöMac OS XŃü«Growlķó©Ńü½ŃāĪŃāāŃé╗Ńā╝ŃéĖĶĪ©ńż║ŃĆĢ
- jQDialog plugin for jQueryŃĆöĶ╗ĮķćÅŃü«ŃāĆŃéżŃéóŃāŁŃé░ŃāŚŃā®Ńé░ŃéżŃā│ŃĆĢ
- jqModalŃĆöķĆÜń¤źŃé”ŃéŻŃā│ŃāēŃé”ŃĆüŃāĆŃéżŃéóŃāŁŃé░ŃĆüŃāóŃā╝ŃāĆŃā½Ńé”ŃéŻŃā│ŃāēŃé”ŃéÆĶĪ©ńż║ŃĆĢ
- jQuery Alert Dialogs (Alert, Confirm, & Prompt Replacements) ŃĆöŃéóŃā®Ńā╝ŃāłŃĆüńó║Ķ¬ŹŃāĆŃéżŃéóŃāŁŃé░ŃĆüÕģźÕŖøŃāŚŃāŁŃā│ŃāŚŃāłŃü«õĮ£µłÉŃĆĢ
- jQuery BlockUI PluginŃĆöŃāÜŃā╝ŃéĖŃéäĶ”üń┤ĀŃü«Ńā¢ŃāŁŃāāŃé»ŃĆüŃāóŃā╝ŃāĆŃā½ŃāĆŃéżŃéóŃāŁŃé░ĶĪ©ńż║ŃĆĢ
- jQuery ToolsŃĆöHTMLŃéÆŃé¬Ńā╝ŃāÉŃā╝Ńā¼ŃéżŃĆĢ
- LeaveNotice jQuery PluginŃĆöŃā¬Ńā│Ńé»ÕģłķüĘń¦╗µÖéŃü½ķĆÜń¤źŃéóŃā®Ńā╝ŃāłĶĪ©ńż║ŃĆĢ
- maxImage Image ScalerŃĆöŃé”ŃéŻŃā│ŃāēŃé”ŃéĄŃéżŃé║Ńü½ÕÉłŃéÅŃüøŃü”ńö╗ÕāÅŃéÆŃā¬ŃéĄŃéżŃé║ŃĆĢ
- PopUpWindowŃĆöŃāØŃāāŃāŚŃéóŃāāŃāŚŃé”ŃéŻŃā│ŃāēŃé”ŃĆĢ
- Simple jQuery Modal Window Tutorial ŃĆöŃéĘŃā│ŃāŚŃā½Ńü¬ŃāóŃā╝ŃāĆŃā½Ńé”ŃéŻŃā│ŃāēŃé”ŃĆĢ
- SimpleModalŃĆöŃéĘŃā│ŃāŚŃā½Ńü¬ŃāóŃā╝ŃāĆŃā½Ńé”ŃéŻŃā│ŃāēŃé”ŃéÆńö¤µłÉŃüÖŃéŗĶ╗ĮķćÅŃü«jQueryŃāŚŃā®Ńé░ŃéżŃā│ŃĆĢ
Create a Beautiful Looking Custom Dialog Box With jQuery and CSS3
CSS3ŃéÆõĮ┐ńö©ŃüŚŃü¤Ķ¦ÆõĖĖŃā¼ŃéżŃéóŃé”ŃāłŃü«ŃāĆŃéżŃéóŃāŁŃé░Ńā£ŃāāŃé»Ńé╣
2010/2/7
Create a Beautiful Looking Custom Dialog Box With jQuery and CSS3
CSS3Ńü½ŃéłŃéŗĶ¦ÆõĖĖŃā¼ŃéżŃéóŃé”ŃāłŃü«ŃāĆŃéżŃéóŃāŁŃé░ŃéÆjQueryŃéÆõĮ┐ńö©ŃüŚŃü”ĶĪ©ńż║ŃüÖŃéŗµ¢╣µ│ĢŃüīµÄ▓Ķ╝ēŃüĢŃéīŃü”ŃüäŃüŠŃüÖŃĆé CSS3µ£¬Õ»ŠÕ┐£Ńü«IEŃü¦Ńü»ķĆÜÕĖĖŃü«ÕøøĶ¦ÆŃüäŃāĆŃéżŃéóŃāŁŃé░Ńü½Ńü¬ŃéŖŃüŠŃüÖŃĆé
ŌĆ╗µÄ▓Ķ╝ēŃüĢŃéīŃü”ŃüäŃéŗŃé╗Ńā│Ńé┐Ńā¬Ńā│Ńé░Ńü»ŃāēŃéŁŃāźŃāĪŃā│ŃāłŃéĄŃéżŃé║Ńü«Ķ©łń«ŚŃü½Ńü¬ŃüŻŃü”ŃüäŃéŗŃĆüńö╗ķØóŃü½Ńé╣Ńé»ŃāŁŃā╝Ńā½ŃāÉŃā╝ŃüīĶĪ©ńż║ŃüĢŃéīŃéŗŃéłŃüåŃü¬ķĢĘŃüäŃāÜŃā╝ŃéĖŃüĀŃü©ŃāĆŃéżŃéóŃāŁŃé░Ńā£ŃāāŃé»Ńé╣ŃüīĶ”ŗŃüłŃüŠŃüøŃéōŃĆé ķĢĘŃüäŃāÜŃā╝ŃéĖŃü½ŃééÕ»ŠÕ┐£ŃüÖŃéŗŃü½Ńü»ŃĆüõĖŗĶ©śŃü«ŃéłŃüåŃü½ķ½śŃüĢĶ©łń«ŚŃéÆŃé”ŃéŻŃā│ŃāēŃé”ŃéĄŃéżŃé║ŃāÖŃā╝Ńé╣Ńü½õ┐«µŁŻŃüÖŃéŗÕ┐ģĶ”üŃüīŃüéŃéŖŃüŠŃüÖŃĆé
// var dialogTop =  (maskHeight/3) - ($('#dialog-box').height());
var dialogTop =  ($(window).height()/2) - ($('#dialog-box').height());
 Ķ©ŁńĮ«ŃéżŃāĪŃā╝ŃéĖ
<!DOCTYPE html PUBLIC "-//W3C//DTD XHTML 1.0 Transitional//EN" "http://www.w3.org/TR/xhtml1/DTD/xhtml1-transitional.dtd">
<html xmlns="http://www.w3.org/1999/xhtml" xml:lang="ja" lang="ja">
<head>
<meta http-equiv="Content-Type" content="text/html;charset=utf-8" />
<meta http-equiv="Content-Language" content="ja" />
<meta http-equiv="Content-Script-Type" content="text/javascript" />
<meta http-equiv="Content-Style-Type" content="text/css" />
<meta http-equiv="imagetoolbar" content="no" />
<title>Ķ©ŁńĮ«ŃéĄŃā│ŃāŚŃā½</title>
<link rel="stylesheet" type="text/css" href="/content/lib/global.css" />
<!-- JS -->
<script type="text/javascript" src="http://ajax.googleapis.com/ajax/libs/jquery/1.3.2/jquery.min.js"></script>
<script type="text/javascript">
$(function(){
// Ńé»Ńā¬ŃāāŃé»Ńü¦ŃĆüŃé¬Ńā╝ŃāÉŃā╝Ńā¼ŃéżŃĆüŃāĆŃéżŃéóŃāŁŃé░Ńā£ŃāāŃé»Ńé╣ŃĆüŃā£Ńé┐Ńā│ŃéÆķØ×ĶĪ©ńż║
$('a.btn-ok, #dialog-overlay, #dialog-box').click(function (){
$('#dialog-overlay, #dialog-box').hide();
return false;
});
// Ńé”ŃéŻŃā│ŃāēŃé”ŃüīŃā¬ŃéĄŃéżŃé║ŃüĢŃéīŃü¤ŃéēŃĆüŃāĆŃéżŃéóŃāŁŃé░Ńā£ŃāāŃé»Ńé╣ŃéÆŃé╗Ńā│Ńé┐Ńā¬Ńā│Ńé░ĶĪ©ńż║ŃüÖŃéŗķ¢óµĢ░ŃéÆÕæ╝ŃüČ
$(window).resize(function () {
// ŃāĆŃéżŃéóŃāŁŃé░Ńā£ŃāāŃé»Ńé╣ŃüīĶĪ©ńż║ŃüĢŃéīŃü”ŃüäŃéŗÕĀ┤ÕÉłŃü«Ńü┐Õ«¤ĶĪī
if (!$('#dialog-box').is(':hidden')) popup();
});
// ŃāĆŃéżŃéóŃāŁŃé░ŃéÆŃāØŃāāŃāŚŃéóŃāāŃāŚŃüÖŃéŗķ¢óµĢ░
});
function popup(message){
// Ńé╣Ńé»Ńā¬Ńā╝Ńā│Ńü«Õ╣ģŃü©ķ½śŃüĢŃéÆÕÅ¢ÕŠŚ
var maskHeight = $(document).height();
var maskWidth = $(window).width();
// Õ×éńø┤µ¢╣µ│ĢŃüŖŃéłŃü│µ░┤Õ╣│µ¢╣ÕÉæŃü½Ńé╗Ńā│Ńé┐Ńā¬Ńā│Ńé░ĶĪ©ńż║ŃüÖŃéŗõĮŹńĮ«ŃéÆĶ©łń«Ś
// var dialogTop = (maskHeight/3) - ($('#dialog-box').height());
var dialogTop = ($(window).height()/2) - ($('#dialog-box').height());
var dialogLeft = (maskWidth/2) - ($('#dialog-box').width()/2);
// Ńé¬Ńā╝ŃāÉŃā╝Ńā¼ŃéżŃü©ŃāĆŃéżŃéóŃāŁŃé░Ńā£ŃāāŃé»Ńé╣ŃéÆĶĪ©ńż║
$('#dialog-overlay').css({height:maskHeight, width:maskWidth}).show();
$('#dialog-box').css({top:dialogTop, left:dialogLeft}).show();
// ŃāĆŃéżŃéóŃāŁŃé░Ńā£ŃāāŃé»Ńé╣ÕåģŃü½ŃāĪŃāāŃé╗Ńā╝ŃéĖŃéÆĶĪ©ńż║
$('#dialog-message').html(message);
}
</script>
<!-- CSS -->
<style type="text/css">
#dialog-overlay {
/* set it to fill the whil screen */
width:100%;height:100%;
/* transparency for different browsers */
filter:alpha(opacity=50);
-moz-opacity:0.5;
-khtml-opacity: 0.5;
opacity: 0.5;
background:#000;
/* make sure it appear behind the dialog box but above everything else */
position:absolute;
top:0;left:0;
z-index:3000;
/* hide it by default */
display:none;
}
#dialog-box {
/* css3 drop shadow */
-webkit-box-shadow: 0px 0px 10px rgba(0, 0, 0, 0.5);
-moz-box-shadow: 0px 0px 10px rgba(0, 0, 0, 0.5);
/* css3 border radius */
-moz-border-radius: 5px;
-webkit-border-radius: 5px;
background:#eee;
/* styling of the dialog box, i have a fixed dimension for this demo */
width:328px;
/* make sure it has the highest z-index */
position:absolute;
z-index:5000;
/* hide it by default */
display:none;
}
#dialog-box .dialog-content {
/* style the content */
text-align:left;
margin:13px; padding:10px;
color:#666;
font-family:arial;
font-size:11px;
}
a.button {
/* styles for button */
margin:10px auto 0 auto; padding: 5px 10px 6px;
text-align:center;
display: block;
width:50px;
color: #fff;
text-decoration: none;
font-weight: bold;
line-height: 1;
/* button color */
background-color: #e33100;
/* css3 implementation :) */
/* rounded corner */
-moz-border-radius: 5px;
-webkit-border-radius: 5px;
/* drop shadow */
-moz-box-shadow: 0 1px 3px rgba(0,0,0,0.5);
-webkit-box-shadow: 0 1px 3px rgba(0,0,0,0.5);
/* text shaow */
text-shadow: 0 -1px 1px rgba(0,0,0,0.25);
border-bottom: 1px solid rgba(0,0,0,0.25);
position: relative;
cursor: pointer;
}
a.button:hover {
background-color: #c33100;
}
/* extra styling */
#dialog-box .dialog-content p {
font-weight:700;margin:0;
}
#dialog-box .dialog-content ul {
margin:10px 0 10px 20px;
padding:0;
height:50px;
}
</style>
</head>
<body>
<div id="wrap">
<h1>Ķ©ŁńĮ«ŃéĄŃā│ŃāŚŃā½</h1>
<p>ŃĆÉÕÅéńģ¦ŃĆæ<a href='http://www.queness.com/post/1696/create-a-beautiful-looking-custom-dialog-box-with-jquery-and-css3'>Create a Beautiful Looking Custom Dialog Box With jQuery and CSS3</a></p>
<!-- CODE -->
<p>
<a href="javascript:popup('ŃüōŃüōŃü½Ńé©Ńā®Ńā╝ŃāĪŃāāŃé╗Ńā╝ŃéĖŃéƵøĖŃüŹŃüŠŃüÖŃĆéŃüōŃüōŃü½Ńé©Ńā®Ńā╝ŃāĪŃāāŃé╗Ńā╝ŃéĖŃéƵøĖŃüŹŃüŠŃüÖŃĆéŃüōŃüōŃü½Ńé©Ńā®Ńā╝ŃāĪŃāāŃé╗Ńā╝ŃéĖŃéƵøĖŃüŹŃüŠŃüÖŃĆéŃüōŃüōŃü½Ńé©Ńā®Ńā╝ŃāĪŃāāŃé╗Ńā╝ŃéĖŃéƵøĖŃüŹŃüŠŃüÖŃĆéŃüōŃüōŃü½Ńé©Ńā®Ńā╝ŃāĪŃāāŃé╗Ńā╝ŃéĖŃéƵøĖŃüŹŃüŠŃüÖŃĆé')">ŃāØŃāāŃāŚŃéóŃāāŃāŚ</a>
</p>
<div id="dialog-overlay"></div>
<div id="dialog-box">
<div class="dialog-content">
<div id="dialog-message"></div>
<a href="#" class="button">Close</a>
</div>
</div>
<!-- / CODE -->
</body>
</html>
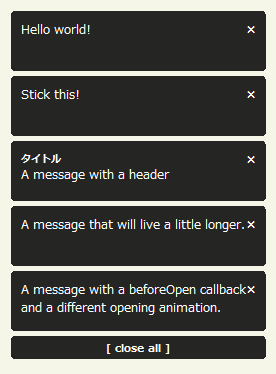
jGrowl
Mac OS XŃü«Growlķó©Ńü½ŃāĪŃāāŃé╗Ńā╝ŃéĖĶĪ©ńż║
2008/12/20
jGrowl v1.1.2
’╝╗JS’╝Įjquery.js v1.2.6ŃĆüjquery.jgrowl.js
Mac OS XŃü«Growlķó©Ńü½ŃĆüŃāĪŃāāŃé╗Ńā╝ŃéĖŃéÆÕŹŖķĆŵśÄŃü«Ķ¦ÆõĖĖŃā£ŃāāŃé»Ńé╣Ńü½ĶĪ©ńż║ŃüÖŃéŗjQueryŃāŚŃā®Ńé░ŃéżŃā│ŃĆé
ŃāĪŃāāŃé╗Ńā╝ŃéĖŃü»ŃĆüõĖĆիܵÖéķ¢ōńĄīķüÄŃüÖŃéŗŃü©ŃāĢŃé¦Ńā╝ŃāēŃéóŃé”ŃāłŃüŚŃü¬ŃüīŃéēµČłŃüłŃü”ŃüäŃüŹŃüŠŃüÖŃĆé 2Ńüżõ╗źõĖŖŃāĪŃāāŃé╗Ńā╝ŃéĖŃéÆĶĪ©ńż║ŃüŚŃü¤ÕĀ┤ÕÉłŃü»ŃĆüõĖƵŗ¼Ńü¦ķ¢ēŃüśŃéŗŃā¬Ńā│Ńé»ŃüīĶĪ©ńż║ŃüĢŃéīŃüŠŃüÖŃĆé
Ńé¬ŃāŚŃéĘŃā¦Ńā│Ńü¦ŃĆüŃāĪŃāāŃé╗Ńā╝ŃéĖŃü«ĶĪ©ńż║µÖéķ¢ō’╝łÕŹśõĮŹ’╝ÜŃā¤Ńā¬ń¦Æ’╝ēŃĆüŃāśŃāāŃāĆõ╗śŃüŹŃĆüķ¢ēŃüśŃéŗŃā£Ńé┐Ńā│ŃéÆŃé»Ńā¬ŃāāŃé»ŃüÖŃéŗŃüŠŃü¦ĶĪ©ńż║ŃüÖŃéŗŃü¬Ńü®Ńü«Ķ©ŁÕ«ÜŃééŃü¦ŃüŹŃüŠŃüÖŃĆé ŃāĪŃāāŃé╗Ńā╝ŃéĖŃā£ŃāāŃé»Ńé╣Ńüīķ¢ēŃüśŃéēŃéīŃéłŃüåŃü©ŃüŚŃü”ŃüäŃéŗµÖéŃü¬Ńü®Ńü«ŃéżŃāÖŃā│ŃāłŃééÕÅ¢ÕŠŚŃüÖŃéŗŃüōŃü©ŃüīŃü¦ŃüŹŃüŠŃüÖŃĆé
 Ķ©ŁńĮ«ŃéżŃāĪŃā╝ŃéĖ
<!DOCTYPE html PUBLIC "-//W3C//DTD XHTML 1.0 Transitional//EN" "http://www.w3.org/TR/xhtml1/DTD/xhtml1-transitional.dtd">
<html xmlns="http://www.w3.org/1999/xhtml" xml:lang="ja" lang="ja">
<head>
<meta http-equiv="Content-Type" content="text/html; charset=utf-8" />
<meta http-equiv="Content-Language" content="ja" />
<meta http-equiv="Content-Script-Type" content="text/javascript" />
<meta http-equiv="Content-Style-Type" content="text/css" />
<meta http-equiv="imagetoolbar" content="no" />
<title>jTip - The Jquery Tool Tip | Ķ©ŁńĮ«ŃéĄŃā│ŃāŚŃā½</title>
<link rel="stylesheet" type="text/css" href="/content/lib/global.css" />
<!-- JS -->
<script src="https://ajax.googleapis.com/ajax/libs/jquery/1.2.6/jquery.min.js"></script>
<script src="/content/lib/jquery/jquery.jgrowl.js" type="text/javascript"></script>
<!-- CSS -->
<link rel="stylesheet" type="text/css" href="/content/lib/jquery/jquery.jgrowl.css" />
</head>
<body>
<div id="wrap">
<h1><a href='http://stanlemon.net/projects/jgrowl.html'>jGrowl v1.1.2</a> | Ķ©ŁńĮ«ŃéĄŃā│ŃāŚŃā½</h1>
<!-- CODE -->
<ul>
<li><a href="javascript:void(0);" onclick="$.jGrowl('Hello world!');">ŃéĘŃā│ŃāŚŃā½Ńü¬ŃāĪŃāāŃé╗Ńā╝ŃéĖĶĪ©ńż║</a></li>
<li><a href="javascript:void(0);" onclick="$.jGrowl('Stick this!', { sticky: true });">ķ¢ēŃüśŃéŗŃā£Ńé┐Ńā│ŃéÆŃé»Ńā¬ŃāāŃé»ŃüÖŃéŗŃüŠŃü¦µČłŃüłŃü¬ŃüäŃāĪŃāāŃé╗Ńā╝ŃéĖ</a></li>
<li><a href="javascript:void(0);" onclick="$.jGrowl('A message with a header', { header: 'Ńé┐ŃéżŃāłŃā½' });">ŃāśŃāāŃāĆõ╗śŃüŹŃü«ŃāĪŃāāŃé╗Ńā╝ŃéĖ</a></li>
<li><a href="javascript:void(0);" onclick="$.jGrowl('A message that will live a little longer.', { life: 10000 });">ŃāĪŃāāŃé╗Ńā╝ŃéĖŃéÆķĢĘŃéüŃü½ĶĪ©ńż║’╝ł1ń¦Æķ¢ō’╝ē</a></li>
<li><a href="javascript:void(0);" onclick="$.jGrowl('A message with a beforeOpen callback and a different opening animation.', { beforeClose: function(e,m) { alert('About to close this notification!'); }, animateOpen: { height: 'show' } });">ķ¢ēŃüśŃéŗÕēŹŃü½ŃéóŃā®Ńā╝ŃāłĶĪ©ńż║</a></li>
</ul>
<!-- / CODE -->
</div>
</body>
</html>
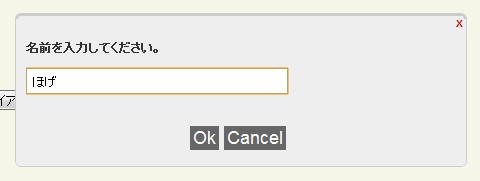
jQDialog plugin for jQuery
Ķ╗ĮķćÅŃü«ŃāĆŃéżŃéóŃāŁŃé░ŃāŚŃā®Ńé░ŃéżŃā│
unknown
jQDialog plugin for jQuery
õĖĆիܵÖéķ¢ōÕŠīŃü½Ķć¬ÕŗĢµČłÕÄ╗ŃüÖŃéŗĶŁ”ÕæŖŃĆüŃéóŃā®Ńā╝ŃāłŃĆüńó║Ķ¬ŹŃāĆŃéżŃéóŃāŁŃé░ŃĆüÕģźÕŖøŃāŚŃāŁŃā│ŃāŚŃāłŃü¬Ńü®Ńü«ŃāĆŃéżŃéóŃāŁŃé░ŃéÆŃü¬ŃéüŃéēŃüŗŃü½ŃāØŃāāŃāŚŃéóŃāāŃāŚŃüÖŃéŗĶ╗ĮķćÅŃü«jQueryŃāŚŃā®Ńé░ŃéżŃā│ŃĆé
ŃāĆŃéżŃéóŃāŁŃé░ÕåģŃü½Ńü»ŃĆüHTMLµ¢ćŃéÆĶ©śĶ┐░ŃüÖŃéŗŃüōŃü©ŃüīŃü¦ŃüŹŃéŗŃü¤ŃéüŃĆüŃāŁŃé░ŃéżŃā│ŃāĢŃé®Ńā╝ŃāĀŃü¬Ńü®õ╗╗µäÅŃü«Ńé│Ńā│ŃāåŃā│ŃāäŃéÆÕɽŃéüŃéŗŃüōŃü©ŃüīŃü¦ŃüŹŃüŠŃüÖŃĆé
 Ķ©ŁńĮ«ŃéżŃāĪŃā╝ŃéĖ
<!DOCTYPE html PUBLIC "-//W3C//DTD XHTML 1.0 Transitional//EN" "http://www.w3.org/TR/xhtml1/DTD/xhtml1-transitional.dtd">
<html xmlns="http://www.w3.org/1999/xhtml" xml:lang="ja" lang="ja">
<head>
<meta http-equiv="Content-Type" content="text/html; charset=utf-8" />
<meta http-equiv="Content-Language" content="ja" />
<meta http-equiv="Content-Script-Type" content="text/javascript" />
<meta http-equiv="Content-Style-Type" content="text/css" />
<meta http-equiv="imagetoolbar" content="no" />
<title>Ķ©ŁńĮ«ŃéĄŃā│ŃāŚŃā½</title>
<link rel="stylesheet" type="text/css" href="/content/lib/global.css" />
<!-- JS -->
<script type="text/javascript" src="http://ajax.googleapis.com/ajax/libs/jquery/1.3.2/jquery.min.js"></script>
<script type="text/javascript" src="/content/lib/jquery/jqdialog.js"></script>
<script type="text/javascript">
$(function(){
/* ĶŁ”ÕæŖŃāĆŃéżŃéóŃāŁŃé░ */
$('#bt-notify').click( function() { jqDialog.notify("ŃüōŃü«ŃāĆŃéżŃéóŃāŁŃé░Ńü»3ń¦ÆÕŠīŃü½Ķć¬ÕŗĢńÜäŃü½µČłŃüłŃüŠŃüÖŃĆé", 3); } );
/* ŃéóŃā®Ńā╝ŃāłŃāĆŃéżŃéóŃāŁŃé░ */
$('#bt-alert').click(function() {
jqDialog.alert("ŃéóŃā®Ńā╝ŃāłŃāĆŃéżŃéóŃāŁŃé░Ńü¦ŃüÖŃĆé", function() {
/* ŃĆÉOKŃĆæŃā£Ńé┐Ńā│ŃüīŃé»Ńā¬ŃāāŃé»ŃüĢŃéīŃü¤µÖéŃü½Õæ╝Ńü░ŃéīŃéŗŃé│Ńā╝Ńā½ŃāÉŃāāŃé»ķ¢óµĢ░ */
alert("ŃĆÉOKŃĆæŃā£Ńé┐Ńā│ŃüīŃé»Ńā¬ŃāāŃé»ŃüĢŃéīŃüŠŃüŚŃü¤’╝ü");
});
} );
/* ÕģźÕŖøŃāŚŃāŁŃā│ŃāŚŃāł */
$('#bt-prompt').click( function() {
jqDialog.prompt("ÕÉŹÕēŹŃéÆÕģźÕŖøŃüŚŃü”ŃüÅŃüĀŃüĢŃüäŃĆé",
'Ńü╗ŃüÆ',
/* ŃĆÉOKŃĆæŃā£Ńé┐Ńā│ŃüīŃé»Ńā¬ŃāāŃé»ŃüĢŃéīŃü¤µÖéŃü½Õæ╝Ńü░ŃéīŃéŗŃé│Ńā╝Ńā½ŃāÉŃāāŃé»ķ¢óµĢ░ */
function(data) { alert("ŃéóŃāŖŃé┐Ńü«ÕÉŹÕēŹŃü»ŃĆī" + data + "ŃĆŹŃü¦ŃüÖŃüŁ’╝ü’╝¤"); },
/* ŃĆÉCANCELŃĆæŃā£Ńé┐Ńā│ŃüīŃé»Ńā¬ŃāāŃé»ŃüĢŃéīŃü¤µÖéŃü½Õæ╝Ńü░ŃéīŃéŗŃé│Ńā╝Ńā½ŃāÉŃāāŃé»ķ¢óµĢ░ */
function() { alert("ŃĆÉCANCELŃĆæŃā£Ńé┐Ńā│ŃüīŃé»Ńā¬ŃāāŃé»ŃüĢŃéīŃüŠŃüŚŃü¤’╝ü"); }
);
} );
/* ńó║Ķ¬ŹŃāĆŃéżŃéóŃāŁŃé░ */
$('#bt-confirm').click( function() {
jqDialog.confirm("Ńü®ŃüĪŃéēŃüŗŃü«Ńā£Ńé┐Ńā│ŃéÆŃé»Ńā¬ŃāāŃé»ŃüŚŃü”ŃüÅŃüĀŃüĢŃüäŃĆé",
/* ŃĆÉYESŃĆæŃā£Ńé┐Ńā│ŃüīŃé»Ńā¬ŃāāŃé»ŃüĢŃéīŃü¤µÖéŃü½Õæ╝Ńü░ŃéīŃéŗŃé│Ńā╝Ńā½ŃāÉŃāāŃé»ķ¢óµĢ░ */
function() { alert("ŃĆÉYESŃĆæŃā£Ńé┐Ńā│ŃüīŃé»Ńā¬ŃāāŃé»ŃüĢŃéīŃüŠŃüŚŃü¤’╝ü"); },
/* ŃĆÉNOŃĆæŃā£Ńé┐Ńā│ŃüīŃé»Ńā¬ŃāāŃé»ŃüĢŃéīŃü¤µÖéŃü½Õæ╝Ńü░ŃéīŃéŗŃé│Ńā╝Ńā½ŃāÉŃāāŃé»ķ¢óµĢ░ */
function() { alert("ŃĆÉNOŃĆæŃā£Ńé┐Ńā│ŃüīŃé»Ńā¬ŃāāŃé»ŃüĢŃéīŃüŠŃüŚŃü¤’╝ü"); }
);
} );
/* Ńé½Ńé╣Ńé┐ŃāĀŃé│Ńā│ŃāåŃā│ŃāäŃāĆŃéżŃéóŃāŁŃé░ */
$('#bt-content').click( function() {
jqDialog.content('<p><label for="userid">Ńā”Ńā╝ŃéČŃā╝ID’╝Ü</label><input type="text" name="userid" id="userid" /></p><p><label for="userpw">ŃāæŃé╣Ńā»Ńā╝Ńāē’╝Ü</label><input type="password" name="userpw" id="userpw" /></p>');
} );
});
</script>
<!-- CSS -->
<style type="text/css">
#jqDialog_box {
background: #eee;
position: absolute;
width: 450px; height: 150px;
border-width: 3px 1px 1px 1px;
border-style: solid;
border-color: #ccc;
-moz-border-radius: 6px;
-webkit-border-radius: 6px;
}
#jqDialog_content {
margin: 10px;
font-weight: bold;
font-size: 12px;
height: 90px;
overflow: hidden;
}
#jqDialog_options {
margin: 10px;
text-align: center;
}
#jqDialog_options button {
font-family: Arial;
margin-right: 5px;
background: #666;
border: 0px;
font-size: 1.5em;
color: #fff;
width: auto;
}
#jqDialog_input {
padding: 4px;
width: 250px;
}
#jqDialog_close {
background: none;
border: none;
float: right;
font-weight: bold;
font-size: 10px;
color: #cc0000;
}
</style>
</head>
<body>
<div id="wrap">
<h1>Ķ©ŁńĮ«ŃéĄŃā│ŃāŚŃā½</h1>
<p>ÕÅéńģ¦’╝ÜŃĆĆ<a href='http://kailashnadh.name/code/jqdialog/'>jQDialog plugin for jQuery</a></p>
<!-- CODE -->
<p>
<button id="bt-notify">ĶŁ”ÕæŖŃāĆŃéżŃéóŃāŁŃé░</button>
<button id="bt-alert">ŃéóŃā®Ńā╝ŃāłŃāĆŃéżŃéóŃāŁŃé░</button>
<button id="bt-confirm">ńó║Ķ¬ŹŃāĆŃéżŃéóŃāŁŃé░</button>
<button id="bt-prompt">ÕģźÕŖøŃāŚŃāŁŃā│ŃāŚŃāł</button>
<button id="bt-content">Ńé½Ńé╣Ńé┐ŃāĀŃé│Ńā│ŃāåŃā│ŃāäŃāĆŃéżŃéóŃāŁŃé░</button>
</p>
<!-- / CODE -->
</div>
</body>
</html>
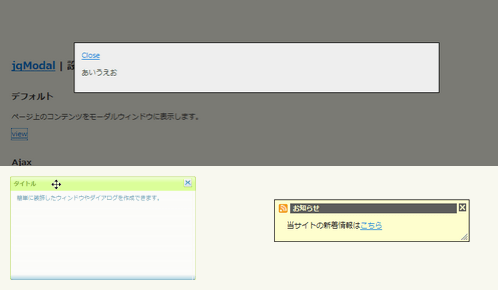
jqModal
ķĆÜń¤źŃé”ŃéŻŃā│ŃāēŃé”ŃĆüŃāĆŃéżŃéóŃāŁŃé░ŃĆüŃāóŃā╝ŃāĆŃā½Ńé”ŃéŻŃā│ŃāēŃé”ŃéÆĶĪ©ńż║
2009/3/7
jqModal
ķĆÜń¤źŃé”ŃéŻŃā│ŃāēŃé”ŃĆüŃāĆŃéżŃéóŃāŁŃé░ŃĆüŃāóŃā╝ŃāĆŃā½Ńé”ŃéŻŃā│ŃāēŃé”ŃéÆĶĪ©ńż║ŃüÖŃéŗjQueryŃāŚŃā®Ńé░ŃéżŃā│ŃĆé
ŃāóŃā╝ŃāĆŃā½Ńé”ŃéŻŃā│ŃāēŃé”ÕåģŃü½ŃāóŃā╝ŃāĆŃā½Ńé”ŃéŻŃā│ŃāēŃé”ŃéÆĶĪ©ńż║ŃüŚŃü¤ŃéŖŃĆüAjaxŃü¦Ńé│Ńā│ŃāåŃā│ŃāäŃéÆĶ¬ŁĶŠ╝ŃéĆŃüōŃü©ŃééŃü¦ŃüŹŃüŠŃüÖŃĆé ŃĆījqDnr.jsŃĆŹŃü©ŃüäŃüåĶ”üń┤ĀŃü«ŃāēŃā®ŃāāŃé░’╝åŃāēŃāŁŃāāŃāŚŃüŖŃéłŃü│Ńā¬ŃéĄŃéżŃé║ŃéÆŃüÖŃéŗĶ╗ĮķćÅŃü«jQueryŃāŚŃā®Ńé░ŃéżŃā│ŃéÆõĮ┐ńö©ŃüŚŃü”ŃĆüŃā¬ŃéĄŃéżŃé║ÕÅ»ĶāĮŃü¬ŃāĆŃéżŃéóŃāŁŃé░ŃéäŃé”ŃéŻŃā│ŃāēŃé”ŃéÆõĮ£µłÉŃüÖŃéŗŃüōŃü©ŃééŃü¦ŃüŹŃüŠŃüÖŃĆé
 Ķ©ŁńĮ«ŃéżŃāĪŃā╝ŃéĖ
<!DOCTYPE html PUBLIC "-//W3C//DTD XHTML 1.0 Transitional//EN" "http://www.w3.org/TR/xhtml1/DTD/xhtml1-transitional.dtd">
<html xmlns="http://www.w3.org/1999/xhtml" xml:lang="ja" lang="ja">
<head>
<meta http-equiv="Content-Type" content="text/html; charset=utf-8" />
<meta http-equiv="Content-Language" content="ja" />
<meta http-equiv="Content-Script-Type" content="text/javascript" />
<meta http-equiv="Content-Style-Type" content="text/css" />
<meta http-equiv="imagetoolbar" content="no" />
<title>jqModal | Ķ©ŁńĮ«ŃéĄŃā│ŃāŚŃā½</title>
<link rel="stylesheet" type="text/css" href="/content/lib/global.css" />
<!-- JS -->
<script type="text/javascript" src="http://ajax.googleapis.com/ajax/libs/jquery/1.2.6/jquery.min.js"></script>
<script type="text/javascript" src="/content/lib/jquery/jqModal.js"></script>
<!-- Optional Javascript for Drag'n'Resize -->
<script type="text/javascript" src="/content/lib/jquery/jqDnR.js"></script>
<script type="text/javascript">
$(function(){
/* ŃāćŃāĢŃé®Ńā½Ńāł */
$('#dialog').jqm();
/* Ajax */
$('#ex2').jqm({ajax: '/content/demo/sample_utf-8.txt', trigger: 'a.ex2trigger'});
/* Ńé╣Ńé┐ŃéżŃā¬Ńā│Ńé░’╝ÜŃéóŃā®Ńā╝Ńāł */
$('#ex3a').jqm({
trigger: '#ex3aTrigger',
overlay: 30,
overlayClass: 'whiteOverlay'
}).jqDrag('.jqDrag');
$('input.jqmdX')
.hover(
function(){ $(this).addClass('jqmdXFocus'); },
function(){ $(this).removeClass('jqmdXFocus'); })
.focus(
function(){ this.hideFocus=true; $(this).addClass('jqmdXFocus'); })
.blur(
function(){ $(this).removeClass('jqmdXFocus'); });
/* Ńé╣Ńé┐ŃéżŃā¬Ńā│Ńé░’╝ÜŃāĆŃéżŃéóŃāŁŃé░ */
var triggers = $('a.ex3bTrigger')[0];
$('#ex3b').jqm({
trigger: triggers,
ajax: '/content/demo/sample_utf-8.txt',
target: 'div.jqmAlertContent',
overlay: 0
});
if($.browser.msie) {
$('div.jqmAlert .jqmClose').hover(
function(){ $(this).addClass('jqmCloseHover'); },
function(){ $(this).removeClass('jqmCloseHover');}
);
}
/* Ńé╣Ńé┐ŃéżŃā¬Ńā│Ńé░’╝ÜķĆÜń¤źŃé”ŃéŻŃā│ŃāēŃé” */
$('#ex3c')
.jqDrag('.jqDrag')
.jqResize('.jqResize')
.jqm({
trigger:'#ex3cTrigger',
overlay: 0,
onShow: function(h) {
/* callback executed when a trigger click. Show notice */
h.w.css('opacity',0.92).slideDown();
},
onHide: function(h) {
/* callback executed on window hide. Hide notice, overlay. */
h.w.slideUp("slow",function() { if(h.o) h.o.remove(); }); }
});
});
</script>
<link rel="stylesheet" type="text/css" href="/content/lib/jquery/jqModal.css" />
</head>
<body>
<div id="wrap">
<h1><a href='http://dev.iceburg.net/jquery/jqModal/'>jqModal</a> | Ķ©ŁńĮ«ŃéĄŃā│ŃāŚŃā½</h1>
<!-- CODE -->
<h2>ŃāćŃāĢŃé®Ńā½Ńāł</h2>
<p>ŃāÜŃā╝ŃéĖõĖŖŃü«Ńé│Ńā│ŃāåŃā│ŃāäŃéÆŃāóŃā╝ŃāĆŃā½Ńé”ŃéŻŃā│ŃāēŃé”Ńü½ĶĪ©ńż║ŃüŚŃüŠŃüÖŃĆé</p>
<p><a href="#" class="jqModal">view</a></p>
<div class="jqmWindow" id="dialog">
<a href="#" class="jqmClose">Close</a>
<p>ŃüéŃüäŃüåŃüłŃüŖ</p>
</div>
<h2>Ajax</h2>
<p>Õż¢ķā©ŃāĢŃéĪŃéżŃā½ŃéÆĶ¬ŁĶŠ╝ŃéōŃü¦Ńé”ŃéŻŃā│ŃāēŃé”ÕåģŃü½ĶĪ©ńż║ŃüŚŃüŠŃüÖŃĆé</p>
<p><a href="#" class="ex2trigger">view</a></p>
<div class="jqmWindow" id="ex2">
Please wait... <img src="/content/img/loading.gif" alt="loading" />
</div>
<h2>Ńé╣Ńé┐ŃéżŃā¬Ńā│Ńé░</h2>
<ul>
<li>
<p><strong>ŃāĆŃéżŃéóŃāŁŃé░</strong>ŃĆĆ<a href="#" id="ex3aTrigger">view</a> (dialog)</p>
<p>jqDnR.jsŃéÆõĮ┐ńö©ŃüŚŃü¤ŃĆüŃāēŃā®ŃāāŃé░’╝åŃāēŃāŁŃāāŃāŚÕÅ»ĶāĮŃü¬ŃāĆŃéżŃéóŃāŁŃé░ŃĆé</p>
<div id="ex3a" class="jqmDialog">
<div class="jqmdTL">
<div class="jqmdTR">
<div class="jqmdTC jqDrag">Ńé┐ŃéżŃāłŃā½</div>
</div>
</div>
<div class="jqmdBL">
<div class="jqmdBR">
<div class="jqmdBC">
<div class="jqmdMSG">
ń░ĪÕŹśŃü½ĶŻģķŻŠŃüŚŃü¤Ńé”ŃéŻŃā│ŃāēŃé”ŃéäŃāĆŃéżŃéóŃāŁŃé░ŃéÆõĮ£µłÉŃü¦ŃüŹŃüŠŃüÖŃĆé
</div>
</div>
</div>
</div>
<input type="image" src="dialog/close.gif" class="jqmdX jqmClose" />
</div>
</li>
<li>
<p><strong>ŃéóŃā®Ńā╝Ńāł</strong>ŃĆĆ<a href="#" class="ex3bTrigger">view</a> (alert)</p>
<p>jqDnR.jsõĮ┐ńö©ŃĆéÕż¢ķā©ŃāĢŃéĪŃéżŃā½ŃéÆĶ¬ŁĶŠ╝ŃéōŃü¦ŃéóŃā®Ńā╝ŃāłÕåģŃü½ĶĪ©ńż║ŃüŚŃüŠŃüÖŃĆé</p>
<div class="jqmAlert" id="ex3b">
<div id="ex3b" class="jqmAlertWindow">
<div class="jqmAlertTitle cf">
<h1>Ńé┐ŃéżŃāłŃā½</h1><a href="#" class="jqmClose"><em>ķ¢ēŃüśŃéŗ</em></a>
</div>
<div class="jqmAlertContent">
<p>Please wait... <img src="/content/img/loading.gif" alt="loading" /></p>
</div>
</div>
</div>
</li>
<li>
<p><strong>ķĆÜń¤źŃé”ŃéŻŃā│ŃāēŃé”</strong>ŃĆĆ<a href="#" id="ex3cTrigger">view</a> (notice)</p>
<p>jqDnR.jsõĮ┐ńö©ŃüŚŃü¤ŃĆüŃāēŃā®ŃāāŃé░&ŃāēŃāŁŃāāŃāŚÕÅ»ĶāĮŃü¬ķĆÜń¤źŃé”ŃéŻŃā│ŃāēŃé”ŃĆéķ¢ŗķ¢ēµÖéŃü½Ńé╣Ńā®ŃéżŃāēŃéóŃāŗŃāĪŃā╝ŃéĘŃā¦Ńā│ŃüŚŃüŠŃüÖŃĆé</p>
<div style="position: absolute; margin: -100px 0 0 100px;">
<div id="ex3c" class="jqmNotice">
<div class="jqmnTitle jqDrag">
<h1>ŃüŖń¤źŃéēŃüø</h1>
</div>
<div class="jqmnContent">
<p>ÕĮōŃéĄŃéżŃāłŃü«µ¢░ńØƵāģÕĀ▒Ńü»<a href='http://phpjavascriptroom.com/index.xml'>ŃüōŃüĪŃéē</a></p>
</div>
<img src="/content/lib/jquery/jqmodal/notice/close_icon.png" alt="close" class="jqmClose" />
<img src="/content/lib/jquery/jqmodal/dialog/resize.gif" alt="resize" class="jqResize" />
</div>
</div>
</li>
</ul>
<!-- / CODE -->
</body>
</html>
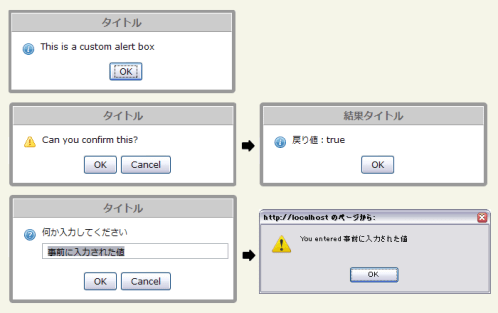
jQuery Alert Dialogs (Alert, Confirm, & Prompt Replacements)
ŃéóŃā®Ńā╝ŃāłŃĆüńó║Ķ¬ŹŃāĆŃéżŃéóŃāŁŃé░ŃĆüÕģźÕŖøŃāŚŃāŁŃā│ŃāŚŃāłŃü«õĮ£µłÉ
2009/3/28
jQuery Alert Dialogs (Alert, Confirm, & Prompt Replacements)
ŃéóŃā®Ńā╝ŃāłŃĆüńó║Ķ¬ŹŃāĆŃéżŃéóŃāŁŃé░ŃĆüÕģźÕŖøŃāŚŃāŁŃā│ŃāŚŃāłŃéÆõĮ£µłÉŃüÖŃéŗjQueryŃāŚŃā®Ńé░ŃéżŃā│ŃĆé
ŃéóŃā®Ńā╝ŃāłŃü«Ńé┐ŃéżŃāłŃā½ŃĆüĶĪ©ńż║ŃüÖŃéŗŃāåŃéŁŃé╣Ńāł’╝łHTMLŃé┐Ńé░ÕÅ»’╝ēŃéƵīćÕ«ÜŃüÖŃéŗŃüōŃü©ŃüīŃü¦ŃüŹŃüŠŃüÖŃĆé ńó║Ķ¬ŹŃéóŃā®Ńā╝ŃāłŃü»µł╗ŃéŖÕĆżŃĆüÕģźÕŖøŃāŚŃāŁŃā│ŃāŚŃāłŃü»ŃĆüõ║ŗÕēŹŃü½ÕģźÕŖøŃüĢŃéīŃü¤ÕĆżŃéÆÕÅ¢ÕŠŚŃüŚŃü”ĶĪ©ńż║ŃüÖŃéŗŃüōŃü©ŃüīŃü¦ŃüŹŃüŠŃüÖŃĆé ŃüŠŃü¤ŃĆüŃéóŃā®Ńā╝ŃāłŃü½õ╗╗µäÅŃü«Ńé»Ńā®Ńé╣ÕÉŹŃéƵīćÕ«ÜŃüŚŃü”ŃĆüÕłźŃü«Ńé╣Ńé┐ŃéżŃā½ŃéÆķü®ńö©ŃüÖŃéŗŃüōŃü©ŃééŃü¦ŃüŹŃüŠŃüÖŃĆé
 Ķ©ŁńĮ«ŃéżŃāĪŃā╝ŃéĖ
<!DOCTYPE html PUBLIC "-//W3C//DTD XHTML 1.0 Transitional//EN" "http://www.w3.org/TR/xhtml1/DTD/xhtml1-transitional.dtd">
<html xmlns="http://www.w3.org/1999/xhtml" xml:lang="ja" lang="ja">
<head>
<meta http-equiv="Content-Type" content="text/html; charset=utf-8" />
<meta http-equiv="Content-Language" content="ja" />
<meta http-equiv="Content-Script-Type" content="text/javascript" />
<meta http-equiv="Content-Style-Type" content="text/css" />
<meta http-equiv="imagetoolbar" content="no" />
<title>jQuery Alert Dialogs (Alert, Confirm, & Prompt Replacements) | Ķ©ŁńĮ«ŃéĄŃā│ŃāŚŃā½</title>
<link rel="stylesheet" type="text/css" href="/content/lib/global.css" />
<!-- JS -->
<script src="https://ajax.googleapis.com/ajax/libs/jquery/1.3.2/jquery.min.js"></script>
<script type="text/javascript" src="/content/lib/jquery/ui/ui.draggable.js"></script>
<script type="text/javascript" src="/content/lib/jquery/jquery.alerts.js"></script>
<script type="text/javascript">
$(function(){
$("#alert_button").click( function() {
jAlert('This is a custom alert box', 'Ńé┐ŃéżŃāłŃā½');
});
$("#confirm_button").click( function() {
jConfirm('Can you confirm this?', 'Ńé┐ŃéżŃāłŃā½', function(r) {
jAlert('µł╗ŃéŖÕĆż’╝Ü' + r, 'ńĄÉµ×£Ńé┐ŃéżŃāłŃā½');
});
});
$("#prompt_button").click( function() {
jPrompt('õĮĢŃüŗÕģźÕŖøŃüŚŃü”ŃüÅŃüĀŃüĢŃüä', 'õ║ŗÕēŹŃü½ÕģźÕŖøŃüĢŃéīŃü¤ÕĆż', 'Ńé┐ŃéżŃāłŃā½', function(r) {
if( r ) alert('You entered ' + r);
});
});
$("#alert_button_with_html").click( function() {
jAlert('<strong>Õ╝ĘĶ¬┐</strong>ŃĆü<a href="#">Ńā¬Ńā│Ńé»</a>Ńü«ŃéłŃüåŃü½ŃĆüHTMLŃé┐Ńé░ŃéÆõĮ┐ńö©ŃüÖŃéŗŃüōŃü©ŃüīŃü¦ŃüŹŃüŠŃüÖŃĆé');
});
$(".alert_style_example").click( function() {
$.alerts.dialogClass = $(this).attr('id'); // set custom style class
jAlert('ŃéóŃā®Ńā╝ŃāłŃü½ŃĆīstyle_1ŃĆŹŃü©ŃüäŃüåŃé»Ńā®Ńé╣ŃéÆķü®ńö©ŃüŚŃü”ŃüäŃüŠŃüÖ', 'Ńé┐ŃéżŃāłŃā½', function() {
$.alerts.dialogClass = null; // reset to default
});
});
});
</script>
<!-- CSS -->
<style type="text/css">
#popup_container {
min-width:300px; /* Dialog will be no smaller than this */
max-width:600px; /* Dialog will wrap after this width */
border:solid 5px #999;
background:#fff;
color:#000;
-moz-border-radius:5px;
-webkit-border-radius:5px;
border-radius:5px;
}
#popup_title {
margin:0; padding:0;
border:solid 1px #fff;
border-bottom:solid 1px #999;
background:#ccc;
color:#666;
font-size:14px;
font-weight:bold;
text-align:center;
line-height:1.75em;
cursor:default;
}
#popup_content { margin:0; padding:1em 1.75em; background:transparent url(/content/img/icon/color/information.png) no-repeat 16px 16px; }
#popup_content.alert { background-image:url(/content/img/icon/color/information.png); }
#popup_content.confirm { background-image:url(/content/img/icon/color/attention.gif); }
#popup_content.prompt { background-image:url(/content/img/icon/color/help.png); }
#popup_message { padding-left:20px; }
#popup_panel { text-align:center; margin:1em 0 0 1em; }
#popup_prompt { margin:.5em 0; }
/* custom dialog styles */
#popup_container.style_1 { color:#a4c6e2; background:#005294; border-color:#113f66; }
#popup_container.style_1 #popup_title { color:#fff; font-weight:normal; text-align:left; background:#76a5cc; border:solid 1px #005294; padding-left:1em; }
#popup_container.style_1 #popup_content { background:none; }
#popup_container.style_1 #popup_message { padding-left:0em; }
#popup_container.style_1 input[type='button'] { border:outset 2px #76a5cc; color:#a4c6e2; background:#3778ae; }
</style>
</head>
<body>
<div id="wrap">
<h1><a href='http://abeautifulsite.net/notebook/87'>jQuery Alert Dialogs (Alert, Confirm, & Prompt Replacements) </a> | Ķ©ŁńĮ«ŃéĄŃā│ŃāŚŃā½</h1>
<!-- CODE -->
<h2>ŃéóŃā®Ńā╝Ńāł</h2>
<p><input id="alert_button" type="button" value="ŃéóŃā®Ńā╝ŃāłĶĪ©ńż║" /></p>
<pre>jAlert('This is a custom alert box', 'Ńé┐ŃéżŃāłŃā½');</pre>
<h2>ńó║Ķ¬ŹŃāĆŃéżŃéóŃāŁŃé░</h2>
<p><input id="confirm_button" type="button" value="ńó║Ķ¬ŹŃāĆŃéżŃéóŃāŁŃé░ĶĪ©ńż║" /></p>
<pre>jConfirm('Can you confirm this?', 'Ńé┐ŃéżŃāłŃā½', function(r) {
jAlert('µł╗ŃéŖÕĆż’╝Ü' + r, 'ńĄÉµ×£Ńé┐ŃéżŃāłŃā½');
});</pre>
<h2>ÕģźÕŖøŃāŚŃāŁŃā│ŃāŚŃāł</h2>
<p><input id="prompt_button" type="button" value="ÕģźÕŖøŃāŚŃāŁŃā│ŃāŚŃāłĶĪ©ńż║" /></p>
<pre>jPrompt('õĮĢŃüŗÕģźÕŖøŃüŚŃü”ŃüÅŃüĀŃüĢŃüä', 'õ║ŗÕēŹŃü½ÕģźÕŖøŃüĢŃéīŃü¤ÕĆż', 'Ńé┐ŃéżŃāłŃā½', function(r) {
if( r ) alert('You entered ' + r);
});</pre>
<h2>ŃéóŃā®Ńā╝ŃāłÕåģŃü½HTMLµ¢ćŃéÆĶĪ©ńż║</h2>
<p><input id="alert_button_with_html" type="button" value="Show Alert" /></p>
<pre>jAlert('<strong>Õ╝ĘĶ¬┐</strong>ŃĆü<a href="#">Ńā¬Ńā│Ńé»</a>Ńü«ŃéłŃüåŃü½ŃĆüHTMLŃé┐Ńé░ŃéÆõĮ┐ńö©ŃüÖŃéŗŃüōŃü©ŃüīŃü¦ŃüŹŃüŠŃüÖŃĆé');</pre>
<h2>ŃéóŃā®Ńā╝ŃāłŃü½ÕłźŃü«Ńé╣Ńé┐ŃéżŃā½ŃéÆķü®ńö©</h2>
<p><input id="style_1" class="alert_style_example" type="button" value="Style 1" /></p>
<p>$.alerts.dialogClassŃāŚŃāŁŃāæŃāåŃéŻŃü½Ńé»Ńā®Ńé╣ÕÉŹŃéƵīćÕ«ÜŃüŚŃüŠŃüÖŃĆé</p>
<pre>$.alerts.dialogClass = $(this).attr('id'); // set custom style class
jAlert('ŃéóŃā®Ńā╝ŃāłŃü½ŃĆīstyle_1ŃĆŹŃü©ŃüäŃüåŃé»Ńā®Ńé╣ŃéÆķü®ńö©ŃüŚŃü”ŃüäŃüŠŃüÖ', 'Ńé┐ŃéżŃāłŃā½', function() {
$.alerts.dialogClass = null; // reset to default
});</pre>
<!-- / CODE -->
</div>
</body>
</html>
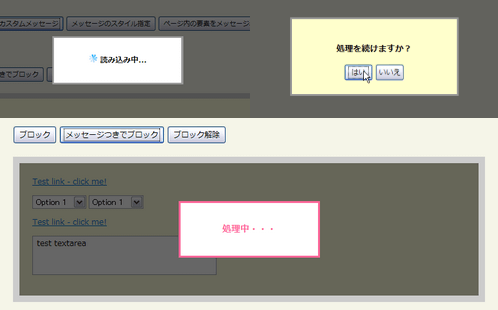
jQuery BlockUI Plugin
ŃāÜŃā╝ŃéĖŃéäĶ”üń┤ĀŃü«Ńā¢ŃāŁŃāāŃé»ŃĆüŃāóŃā╝ŃāĆŃā½ŃāĆŃéżŃéóŃāŁŃé░ĶĪ©ńż║
2008/12/20
jQuery BlockUI Plugin v2
Õ«¤ĶĪīŃéäĶ¬ŁŃü┐ĶŠ╝Ńü┐Ńü½µÖéķ¢ōŃü«ŃüŗŃüŗŃéŗÕć”ńÉåŃéÆŃüŚŃü”ŃüäŃéŗķ¢ōŃĆüŃāÜŃā╝ŃéĖŃéäĶ”üń┤ĀŃéÆŃā¢ŃāŁŃāāŃé»ŃüŚŃü¤ŃéŖŃĆüŃāĆŃéżŃéóŃāŁŃé░ŃéÆĶĪ©ńż║ŃüÖŃéŗjQueryŃāŚŃā®Ńé░ŃéżŃā│ŃĆé
Õć”ńÉåŃéÆÕ«¤ĶĪīŃüŚŃü”ŃüäŃéŗķ¢ōŃĆüŃāÜŃā╝ŃéĖŃéäńē╣Õ«ÜŃü«Ķ”üń┤ĀŃéÆŃā¢ŃāŁŃāāŃé»ŃüŚŃü”ŃĆüŃĆīŃüŖÕŠģŃüĪŃüÅŃüĀŃüĢŃüäŃĆŹŃü©ŃüäŃüŻŃü¤ÕåģÕ«╣Ńü«ŃāĪŃāāŃé╗Ńā╝ŃéĖŃéÆĶĪ©ńż║ŃüŚŃü¤ŃéŖŃĆüŃāĆŃéżŃéóŃāŁŃé░ŃéÆĶĪ©ńż║ŃüŚŃü”Õć”ńÉåŃéÆńČÖńČÜŃüÖŃéŗŃüŗńó║Ķ¬ŹŃüÖŃéŗŃü¬Ńü®Ńü«Õ«¤ńö©ńÜäŃü¬õĮ┐Ńüäµ¢╣ŃüīµÄ▓Ķ╝ēŃüĢŃéīŃü”ŃüäŃüŠŃüÖŃĆé ŃāĪŃāāŃé╗Ńā╝ŃéĖŃü«ÕåģÕ«╣ŃāæŃā®ŃāĪŃā╝Ńé┐ŃéäŃĆüĶ”üń┤ĀŃü¦µīćÕ«ÜÕÅ»ĶāĮŃü¦ŃüÖŃĆéŃüŠŃü¤Ńé╣Ńé┐ŃéżŃā½ŃééŃāæŃā®ŃāĪŃā╝Ńé┐Ńü¦Ńé½Ńé╣Ńé┐Ńā×ŃéżŃé║Ńü¦ŃüŹŃüŠŃüÖŃĆé
wait.phpŃü½Ńü»ŃĆüÕ«¤ķÜøŃü»ŃĆüµÖéķ¢ōŃü«Õć”ńÉåŃéÆĶ©śĶ┐░ŃüŚŃü¤ŃāŚŃāŁŃé░Ńā®ŃāĀŃéƵīćÕ«ÜŃüŚŃüŠŃüÖŃĆé
ŃāåŃé╣ŃāłŃü¬ŃéēŃĆü<? sleep(2); ?>Ńü«ŃéłŃüåŃü½Ńé╣Ńā¬Ńā╝ŃāŚÕć”ńÉåŃéÆÕģźŃéīŃü”ŃüŖŃüæŃü░OKŃĆé
 Ķ©ŁńĮ«ŃéżŃāĪŃā╝ŃéĖ
<!DOCTYPE html PUBLIC "-//W3C//DTD XHTML 1.0 Transitional//EN" "http://www.w3.org/TR/xhtml1/DTD/xhtml1-transitional.dtd">
<html xmlns="http://www.w3.org/1999/xhtml" xml:lang="ja" lang="ja">
<head>
<meta http-equiv="Content-Type" content="text/html; charset=utf-8" />
<meta http-equiv="Content-Language" content="ja" />
<meta http-equiv="Content-Script-Type" content="text/javascript" />
<meta http-equiv="Content-Style-Type" content="text/css" />
<meta http-equiv="imagetoolbar" content="no" />
<title>jQuery BlockUI Plugin v2 | Ķ©ŁńĮ«ŃéĄŃā│ŃāŚŃā½</title>
<link rel="stylesheet" type="text/css" href="/content/lib/global.css" />
<!-- JS -->
<script src="https://ajax.googleapis.com/ajax/libs/jquery/1.2.6/jquery.min.js"></script>
<script type="text/javascript" src="/content/lib/jquery/jquery.blockUI.js"></script>
<script type="text/javascript">
$(function($) {
function test() {
$.ajax({ url: '/content/demo/wait.php', cache: false });
}
// global hook - unblock UI when ajax request completes
$().ajaxStop($.unblockUI);
/* Ō¢ĀŃāÜŃā╝ŃéĖŃü«Ńā¢ŃāŁŃāāŃé»
* test()ķ¢óµĢ░Ńü«Õć”ńÉåŃüīńĄéŃéÅŃéŗŃüŠŃü¦ŃāÜŃā╝ŃéĖŃéÆŃā¢ŃāŁŃāāŃé»ŃüŚŃüŠŃüÖŃĆé
*/
/* ŃāćŃāĢŃé®Ńā½ŃāłŃāĪŃāāŃé╗Ńā╝ŃéĖ */
$('#pageDemo1').click(function() {
$.blockUI();
test();
});
/* Ńé½Ńé╣Ńé┐ŃāĀŃāĪŃāāŃé╗Ńā╝ŃéĖ */
$('#pageDemo2').click(function() {
$.blockUI({ message:'<h1><img src="/content/img/ajax/ajax-loader.gif" /> Ķ¬ŁŃü┐ĶŠ╝Ńü┐õĖŁ...</h1>' });
test();
});
/* ŃāĪŃāāŃé╗Ńā╝ŃéĖŃü«Ńé╣Ńé┐ŃéżŃā½µīćÕ«Ü */
$('#pageDemo3').click(function() {
$.blockUI({
css:{ backgroundColor:'#ff6699', color:'#fff' }
});
test();
});
/* ŃāÜŃā╝ŃéĖÕåģŃü«Ķ”üń┤ĀŃéÆŃāĪŃāāŃé╗Ńā╝ŃéĖĶĪ©ńż║ */
$('#pageDemo4').click(function() {
$.blockUI({ message:$('#domMessage') });
test();
});
/* Ō¢ĀĶ”üń┤ĀŃü«Ńā¢ŃāŁŃāāŃé»
*
*/
/* Ńā¢ŃāŁŃāāŃé» */
$('#blockButton').click(function() {
$('div.blockMe').unblock({fadeOut:0}).block({ message: null });
});
/* ŃāĪŃāāŃé╗Ńā╝ŃéĖŃüżŃüŹŃü¦Ńā¢ŃāŁŃāāŃé» */
$('#blockButton2').click(function() {
$('div.blockMe').unblock({fadeOut:0}).block({ message: '<h1>Õć”ńÉåõĖŁŃā╗Ńā╗Ńā╗</h1>', css: { border:'3px solid #ff6699', color:'#ff6699' } });
});
/* Ńā¢ŃāŁŃāāŃé»Ķ¦ŻķÖż */
$('#unblockButton').click(function() {
$('div.blockMe').unblock();
});
$('a.test').click(function() {
alert('link clicked');
return false;
});
/* Ō¢ĀŃāóŃā╝ŃāĆŃā½ŃāĆŃéżŃéóŃāŁŃé░
*
*/
$('#showDialog').click(function() {
$.blockUI({ message: $('#question'), css: { width: '275px' }});
});
$('#yes').click(function() {
// update the block message
$.blockUI({ message: '<h1>Õć”ńÉåõĖŁŃā╗Ńā╗Ńā╗</h1>' });
$.ajax({
url: 'wait.php',
cache: false,
complete: function() {
// unblock when remote call returns
$.unblockUI();
}
});
});
$('#no').bind('click', $.unblockUI);
// wire up all the demo code
$('#demoTable code').each(function() {
eval($(this).text());
});
});
</script>
<!-- CSS -->
<style type="text/css">
/* ŃāÜŃā╝ŃéĖŃü«Ńā¢ŃāŁŃāāŃé» */
.blockMsg h1 { margin:0; padding:30px; font-weight:bold; font-size:1.2em; }
#domMessage { padding:30px; }
/* Ķ”üń┤ĀŃü«Ńā¢ŃāŁŃāāŃé» */
.blockMe { padding:20px; margin:20px 0; border:10px solid #ccc; background-color:#ffd }
/* ŃāĆŃéżŃéóŃāŁŃé░ */
#question { background-color: #ffc; padding: 10px; }
#question input { width: 4em }
</style>
</head>
<body>
<div id="wrap">
<h1><a href='http://malsup.com/jquery/block/'>jQuery BlockUI Plugin v2</a> | Ķ©ŁńĮ«ŃéĄŃā│ŃāŚŃā½</h1>
<!-- CODE -->
<h2>ŃāÜŃā╝ŃéĖŃü«Ńā¢ŃāŁŃāāŃé»</h2>
<p>
<input id="pageDemo1" class="demo" type="submit" value="ŃāćŃāĢŃé®Ńā½ŃāłŃāĪŃāāŃé╗Ńā╝ŃéĖ" />
<input id="pageDemo2" class="demo" type="submit" value="Ńé½Ńé╣Ńé┐ŃāĀŃāĪŃāāŃé╗Ńā╝ŃéĖ" />
<input id="pageDemo3" class="demo" type="submit" value="ŃāĪŃāāŃé╗Ńā╝ŃéĖŃü«Ńé╣Ńé┐ŃéżŃā½µīćÕ«Ü" />
<input id="pageDemo4" class="demo" type="submit" value="ŃāÜŃā╝ŃéĖÕåģŃü«Ķ”üń┤ĀŃéÆŃāĪŃāāŃé╗Ńā╝ŃéĖĶĪ©ńż║" />
</p>
<div id="domMessage" style="display:none;">
Õ░æŃĆģŃüŖÕŠģŃüĪŃüÅŃüĀŃüĢŃüäŃüŠŃüø’╝ł*Ńā╗ŽēŃā╗*’╝ē
</div>
<h2>Ķ”üń┤ĀŃü«Ńā¢ŃāŁŃāāŃé»</h2>
<p>
<input id="blockButton" type="submit" value="Ńā¢ŃāŁŃāāŃé»" />
<input id="blockButton2" type="submit" value="ŃāĪŃāāŃé╗Ńā╝ŃéĖŃüżŃüŹŃü¦Ńā¢ŃāŁŃāāŃé»" />
<input id="unblockButton" type="submit" value="Ńā¢ŃāŁŃāāŃé»Ķ¦ŻķÖż" />
</p>
<div class="blockMe">
<p><a href="#" class="test">Test link - click me!</a></p>
<p>
<select><option>Option 1</option><option>Option 2</option></select>
<select><option>Option 1</option><option>Option 2</option></select>
</p>
<p><a href="#" class="test">Test link - click me!</a></p>
<p><textarea rows="2" cols="20">test textarea</textarea></p>
</div>
<h2>ŃāóŃā╝ŃāĆŃā½ŃāĆŃéżŃéóŃāŁŃé░</h2>
<p><input id="showDialog" type="submit" value="ŃāĆŃéżŃéóŃāŁŃé░ĶĪ©ńż║" /></p>
<div id="question" style="display:none; cursor: default">
<h2>Õć”ńÉåŃéÆńČÜŃüæŃüŠŃüÖŃüŗ’╝¤</h2>
<p>
<input type="button" id="yes" value="Ńü»Ńüä" />
<input type="button" id="no" value="ŃüäŃüäŃüł" />
</p>
</div>
<!-- / CODE -->
</div>
</body>
</html>
jQuery Tools
HTMLŃéÆŃé¬Ńā╝ŃāÉŃā╝Ńā¼Ńéż
2010/2/7
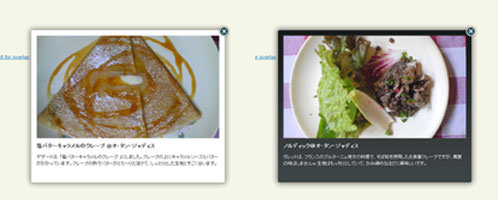
jQuery Overlay @ jQuery TOOLS - Overlay your HTML with eyecandy
WebŃéĄŃéżŃāłŃü¦ŃéłŃüÅõĮ┐ńö©ŃüĢŃéīŃéŗŃéżŃā│Ńé┐ŃāĢŃé¦Ńā╝Ńé╣ŃüīŃüżŃüŠŃüŻŃü¤jQueryŃāŚŃā®Ńé░ŃéżŃā│Ńü¦ŃüÖŃĆé Ńé┐Ńā¢ŃĆüŃé¬Ńā╝ŃāÉŃā╝Ńā¼ŃéżŃĆüŃāäŃā╝Ńā½ŃāüŃāāŃāŚŃĆüŃé╣Ńé»ŃāŁŃā╝Ńā½Ńā®ŃāÖŃā½ŃĆüFlashÕ¤ŗĶŠ╝Ńü¬Ńü®ŃéÆń░ĪÕŹśŃü½Õ«¤ĶŻģŃüÖŃéŗŃüōŃü©ŃüīŃü¦ŃüŹŃüŠŃüÖŃĆé
Overlay
Ńé¬Ńā╝ŃāÉŃā╝Ńā¼ŃéżŃü»ŃĆüŃāÜŃā╝ŃéĖõĖŖŃü½ŃüéŃéēŃüŗŃüśŃéüŃé¬Ńā╝ŃāÉŃā╝Ńā¼ŃéżĶĪ©ńż║ŃüÖŃéŗńö©Ńü«HTMLŃéÆĶ©śĶ┐░ŃüŚŃü”ŃüŖŃüŹŃĆüŃüØŃü«HTMLŃéÆCSSŃü¦Ńé╣Ńé┐ŃéżŃā¬Ńā│Ńé░ŃüŚŃü¤ŃéŖŃĆüĶĪ©ńż║µÖéŃü½Ńé©ŃāĢŃé¦Ńé»ŃāłÕŖ╣µ×£ŃéÆŃüżŃüæŃü”Ńé╣Ńé┐ŃéżŃā¬ŃāāŃéĘŃāźŃü½Ķ”ŗŃüøŃéŗŃüōŃü©ŃüīŃü¦ŃüŹŃüŠŃüÖŃĆé CSSŃü«Ńé»Ńā®Ńé╣ÕÉŹŃü¦ŃĆüĶāīµÖ»Ńü½µĢĘŃüÅńö╗ÕāÅŃéÆÕżēŃüłŃü¤ŃéŖŃĆüIE6õ╗źõĖŗŃü«Ńā¢Ńā®Ńé”ŃéČŃü½Ńü»ķĆÅķüÄŃüŚŃü”ŃüäŃü¬ŃüäĶāīµÖ»ńö╗ÕāÅŃéƵīćÕ«ÜŃüÖŃéŗŃéłŃüåŃü½ÕłåÕ▓ÉÕć”ńÉåŃüĢŃéīŃü”ŃüäŃüŠŃüÖŃĆé
 Ķ©ŁńĮ«ŃéżŃāĪŃā╝ŃéĖ
<!DOCTYPE html PUBLIC "-//W3C//DTD XHTML 1.0 Transitional//EN" "http://www.w3.org/TR/xhtml1/DTD/xhtml1-transitional.dtd">
<html xmlns="http://www.w3.org/1999/xhtml" xml:lang="ja" lang="ja">
<head>
<meta http-equiv="Content-Type" content="text/html; charset=utf-8" />
<meta http-equiv="Content-Language" content="ja" />
<meta http-equiv="Content-Script-Type" content="text/javascript" />
<meta http-equiv="Content-Style-Type" content="text/css" />
<meta http-equiv="imagetoolbar" content="no" />
<title>Ķ©ŁńĮ«ŃéĄŃā│ŃāŚŃā½</title>
<link rel="stylesheet" type="text/css" href="/content/lib/global.css" />
<!-- JS -->
<script type="text/javascript" src="http://ajax.googleapis.com/ajax/libs/jquery/1.3.2/jquery.min.js"></script>
<script type="text/javascript" src="/content/lib/jquery/jquery.tools.min.js"></script>
<script type="text/javascript">
$(function(){
$("#triggers img[rel]").overlay({effect: 'apple'});
});
</script>
<style type="text/css">
/* ńÖĮĶāīµÖ» */
/* the overlayed element */
.apple_overlay {
display:none;
background-image:url(/content/img/ajax/jquery/white.png);
width:500px;
padding:35px;
}
/* default close button positioned on upper right corner */
.apple_overlay div.close {
background-image:url(/content/img/ajax/jquery/close.png);
position:absolute; right:5px; top:5px;
cursor:pointer;
height:35px;
width:35px;
}
/* ķ╗ÆĶāīµÖ» */
div.apple_overlay.black {
background-image:url(/content/img/ajax/jquery/transparent.png);
color:#fff;
}
/* ŃéĄŃāĀŃāŹŃéżŃā½ */
#triggers {
margin-top:10px;
text-align:center;
}
#triggers img {
background-color:#fff;
padding:2px;
border:1px solid #ccc;
margin:2px 5px;
cursor:pointer;
-moz-border-radius:5px;
-webkit-border-radius:5px;
}
/* Ńā£ŃāāŃé»Ńé╣ÕåģŃü«Ńé┐ŃéżŃāłŃā½Ńü©Ķ¬¼µśÄ */
div.details h2 {
margin:10px 0; padding:0;
}
div.details p {
margin:10px 0 0 0; padding:0;
}
</style>
<!--[if lt IE 7]>
<style>
div.apple_overlay {
background-image:url(/content/img/ajax/jquery/overlay_IE6.gif");
color:#fff;
}
/* default close button positioned on upper right corner */
div.apple_overlay div.close {
background-image:url(/content/img/ajax/jquery/overlay_close_IE6.gif);
}
</style>
<![endif]-->
</head>
<body>
<div id="wrap">
<h1>Ķ©ŁńĮ«ŃéĄŃā│ŃāŚŃā½</h1>
<p>ŃĆÉÕÅéńģ¦ŃĆæ<a href='http://flowplayer.org/tools/demos/overlay/apple.html'>jQuery Tools: The Apple effect for overlay</a></p>
<p>ŃéĄŃāĀŃāŹŃéżŃā½ńö╗ÕāÅŃéÆŃé»Ńā¬ŃāāŃé»ŃüÖŃéŗŃü©ŃĆüńö╗ÕāÅŃü©Ķ¬¼µśÄµ¢ćŃéÆŃé¬Ńā╝ŃāÉŃā╝Ńā¼ŃéżĶĪ©ńż║ŃüŚŃüŠŃüÖŃĆé</p>
<!-- CODE -->
<!-- trigger elements -->
<div id="triggers">
<img src="http://farm4.static.flickr.com/3639/3664935712_94ca67b18b_t.jpg" rel="#photo1"/>
<img src="http://farm4.static.flickr.com/3220/3664935670_b94968ccbc_t.jpg" rel="#photo2"/>
<img src="http://farm4.static.flickr.com/3611/3664132439_78c681eb6d_t.jpg" rel="#photo3"/>
<img src="http://farm4.static.flickr.com/3394/3664935528_16fff63afc_t.jpg" rel="#photo4"/>
</div>
<!-- overlayed element, which is styled with external stylesheet -->
<div class="apple_overlay black" id="photo1">
<img src="http://farm4.static.flickr.com/3639/3664935712_94ca67b18b.jpg" />
<div class="details">
<h2>ŃāÄŃā½ŃāćŃéŻŃāāŃé»’╝ĀŃé¬Ńā╗Ńé┐Ńā│Ńā╗ŃéĖŃāŻŃāćŃéŻŃé╣</h2>
<p>Ńé¼Ńā¼ŃāāŃāłŃü»ŃĆüŃāĢŃā®Ńā│Ńé╣Ńü«Ńā¢Ńā½Ńé┐Ńā╝ŃāŗŃāźÕ£░µ¢╣Ńü«µ¢ÖńÉåŃü¦ŃĆüŃüØŃü░ń▓ēŃéÆõĮ┐ńö©ŃüŚŃü¤ŃüŖķŻ¤õ║ŗŃé»Ńā¼Ńā╝ŃāŚŃü¦ŃüÖŃüīŃĆüĶĢÄķ║”Ńü«Õæ│Ńü»ŃüŚŃüŠŃüøŃéō’ĮŚ ńö¤Õ£░Ńü»ŃééŃüŻŃüĪŃéŖŃü©ŃüŚŃü”ŃüäŃü”ŃĆüŃüŗŃü┐ńĘĀŃéüŃéŗŃü╗Ńü®Ńü½ńŠÄÕæ│ŃüŚŃüäŃü¦ŃüÖŃĆé</p>
</div>
</div>
<div class="apple_overlay black" id="photo2">
<img src="http://farm4.static.flickr.com/3220/3664935670_b94968ccbc.jpg" />
<div class="details">
<h2>ŃāÄŃā½ŃāćŃéŻŃāāŃé»’╝ĀŃé¬Ńā╗Ńé┐Ńā│Ńā╗ŃéĖŃāŻŃāćŃéŻŃé╣</h2>
<p>Ńé¼Ńā¼ŃāāŃāłŃü»ŃĆüŃāĢŃā®Ńā│Ńé╣Ńü«Ńā¢Ńā½Ńé┐Ńā╝ŃāŗŃāźÕ£░µ¢╣Ńü«µ¢ÖńÉåŃü¦ŃĆüŃüØŃü░ń▓ēŃéÆõĮ┐ńö©ŃüŚŃü¤ŃüŖķŻ¤õ║ŗŃé»Ńā¼Ńā╝ŃāŚŃü¦ŃüÖŃüīŃĆüĶĢÄķ║”Ńü«Õæ│Ńü»ŃüŚŃüŠŃüøŃéō’ĮŚ ńö¤Õ£░Ńü»ŃééŃüŻŃüĪŃéŖŃü©ŃüŚŃü”ŃüäŃü”ŃĆüŃüŗŃü┐ńĘĀŃéüŃéŗŃü╗Ńü®Ńü½ńŠÄÕæ│ŃüŚŃüäŃü¦ŃüÖŃĆé</p>
</div>
</div>
<div class="apple_overlay" id="photo3">
<img src="http://farm4.static.flickr.com/3611/3664132439_78c681eb6d.jpg" />
<div class="details">
<h2>ŃāÄŃā½ŃāćŃéŻŃāāŃé»’╝ĀŃé¬Ńā╗Ńé┐Ńā│Ńā╗ŃéĖŃāŻŃāćŃéŻŃé╣</h2>
<p>Ńé¼Ńā¼ŃāāŃāłŃü»ŃĆüŃé╣ŃāóŃā╝Ńé»ŃéĄŃā╝ŃāóŃā│Ńü©ŃāłŃā×ŃāłŃü«Ńé¼Ńā¼ŃāāŃāłŃĆÄŃāÄŃā½ŃāćŃéŻŃāāŃé»ŃĆÅŃéÆŃāüŃā¦ŃéżŃé╣’╝üŃé╣ŃāóŃā╝Ńé»ŃéĄŃā╝ŃāóŃā│Ńü«õĖŁŃü½Ńü»ŃĆüŃé»Ńā¬Ńā╝ŃāĀŃāüŃā╝Ńé║ŃüīŃü¤ŃüŻŃüĘŃéŖŌÖ¬ŃüĢŃüŻŃü▒ŃéŖŃü©ŃüŚŃü¤ÕżÅÕÉæŃüŹŃü«Ńé¼Ńā¼ŃāāŃāłŃü¦ŃüÖŃĆé</p>
</div>
</div>
<div class="apple_overlay" id="photo4">
<img src="http://farm4.static.flickr.com/3394/3664935528_16fff63afc.jpg" />
<div class="details">
<h2>ÕĪ®ŃāÉŃé┐Ńā╝ŃéŁŃāŻŃā®ŃāĪŃā½Ńü«Ńé»Ńā¼Ńā╝ŃāŚ @Ńé¬Ńā╗Ńé┐Ńā│Ńā╗ŃéĖŃāŻŃāćŃéŻŃé╣</h2>
<p>ŃāćŃéČŃā╝ŃāłŃü»ŃĆüŃĆīÕĪ®ŃāÉŃé┐Ńā╝ŃéŁŃāŻŃā®ŃāĪŃā½Ńü«Ńé»Ńā¼Ńā╝ŃāŚ ŃĆŹŃü½ŃüŚŃüŠŃüŚŃü¤ŃĆéŃé»Ńā¼Ńā╝ŃāŚŃü«õĖŖŃü½ŃéŁŃāŻŃā®ŃāĪŃā½ŃéĮŃā╝Ńé╣Ńü©ŃāÉŃé┐Ńā╝ŃüīŃüŗŃüŗŃüŻŃü”ŃüäŃüŠŃüÖŃĆéŃé»Ńā¼Ńā╝ŃāŚŃü«ńå▒Ńü¦ŃāÉŃé┐Ńā╝ŃüīŃü©Ń鏒Į×ŃéŖŃü©µ║ČŃüæŃü”ŃĆüŃüŚŃüŻŃü©ŃéŖŃü©ŃüŚŃü¤ńö¤Õ£░Ńü©ŃüÖŃüöŃüÅÕÉłŃüäŃüŠŃüÖŃĆé</p>
</div>
</div>
<!-- / CODE -->
</body>
</html>
Ō¢╝ĶżćµĢ░Ńü«ńö╗ÕāÅŃéÆŃé░Ńā½Ńā╝ŃāŚÕī¢ŃüŚŃü”Ńé«ŃāŻŃā®Ńā¬Ńā╝ĶĪ©ńż║ŃĆé
 Ķ©ŁńĮ«ŃéżŃāĪŃā╝ŃéĖ
<!DOCTYPE html PUBLIC "-//W3C//DTD XHTML 1.0 Transitional//EN" "http://www.w3.org/TR/xhtml1/DTD/xhtml1-transitional.dtd">
<html xmlns="http://www.w3.org/1999/xhtml" xml:lang="ja" lang="ja">
<head>
<meta http-equiv="Content-Type" content="text/html;charset=utf-8" />
<meta http-equiv="Content-Language" content="ja" />
<meta http-equiv="Content-Script-Type" content="text/javascript" />
<meta http-equiv="Content-Style-Type" content="text/css" />
<meta http-equiv="imagetoolbar" content="no" />
<title>Ķ©ŁńĮ«ŃéĄŃā│ŃāŚŃā½</title>
<link rel="stylesheet" type="text/css" href="/content/lib/global.css" />
<!-- JS -->
<script type="text/javascript" src="http://ajax.googleapis.com/ajax/libs/jquery/1.3.2/jquery.min.js"></script>
<script type="text/javascript" src="/content/lib/jquery/jquery.tools.min.js"></script>
<script type="text/javascript">
$(function(){
$("#triggers a").overlay({
// ŃāłŃā¬Ńé¼Ńā╝Ńü»ŃüØŃéīŃü×ŃéīÕÉīŃüśIDŃü©Ńé¬Ńā╝ŃāÉŃā╝Ńā¼ŃéżŃéÆõĮ┐ńö©
target: '#gallery',
// Ńé©Ńé»Ńé╣ŃāØŃā╝ŃéĖŃā│Ńé░ÕŖ╣µ×£
expose: '#f1f1f1'
// let the gallery plugin do its magic!
}).gallery({
// ķƤÕ║”
speed: 800
});
});
</script>
<style type="text/css">
/* the overlayed element */
.simple_overlay {
/* must be initially hidden */
display:none;
/* place overlay on top of other elements */
z-index:10000;
/* styling */
background-color:#333;
width:675px;
min-height:200px;
border:1px solid #666;
/* CSS3 styling for latest browsers */
-moz-box-shadow:0 0 90px 5px #000;
-webkit-box-shadow: 0 0 90px #000;
}
/* close button positioned on upper right corner */
.simple_overlay .close {
background-image:url(/content/img/ajax/jquery/close.png);
position:absolute;
right:-15px; top:-15px;
cursor:pointer;
width:35px; height:35px;
}
/* the large image. we use a gray border around it */
#img {
border:1px solid #666;
}
/* "next image" and "prev image" links */
.next, .prev {
/* absolute positioning relative to the overlay */
position:absolute;
top:40%;
border:1px solid #666;
cursor:pointer;
display:block;
padding:10px 20px;
color:#fff;
font-size:11px;
/* upcoming CSS3 features */
-moz-border-radius:5px;
-webkit-border-radius:5px;
}
.prev {
left:0;
border-left:0;
-moz-border-radius-topleft:0;
-moz-border-radius-bottomleft:0;
-webkit-border-bottom-left-radius:0;
-webkit-border-top-left-radius:0;
}
.next {
right:0;
border-right:0;
-moz-border-radius-topright:0;
-moz-border-radius-bottomright:0;
-webkit-border-bottom-right-radius:0;
-webkit-border-top-right-radius:0;
}
.next:hover, .prev:hover {
text-decoration:underline;
background-color:#000;
}
/* when there is no next or previous link available this class is added */
.disabled {
visibility:hidden;
}
/* the "information box" */
.info {
position:absolute;
bottom:0; left:0;
padding:10px 15px;
color:#fff;
font-size:11px;
border-top:1px solid #666;
}
.info strong {
display:block;
}
/* progress indicator (animated gif). should be initially hidden */
.progress {
position:absolute;
top:45%;
left:50%;
display:none;
}
/* everybody should know about RGBA colors. */
.next, .prev, .info {
background:#333 !important;
background:rgba(0, 0, 0, 0.6) url(/content/img/ajax/jquery/h80.png) repeat-x;
}
/* active thumbnail is raised on top of the mask using the z-index property */
/* the thumbnails */
#triggers {
text-align:center;
}
#triggers img {
background-color:#fff;
padding:2px;
border:1px solid #ccc;
margin:15px 2px;
-moz-border-radius:4px;
-webkit-border-radius:4px;
}
/* the active thumbnail */
#triggers a.active img {
outline:1px solid #000;
/* show on top of the expose mask */
z-index:9999;
position:relative;
}
</style>
</head>
<body>
<div id="wrap">
<h1>Ķ©ŁńĮ«ŃéĄŃā│ŃāŚŃā½</h1>
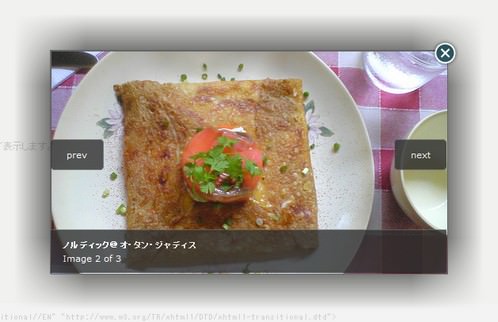
<p>ŃĆÉÕÅéńģ¦ŃĆæ<a href='http://flowplayer.org/tools/demos/overlay/gallery.html'>jQuery Tools: Using the gallery plugin</a></p>
<p>ĶżćµĢ░Ńü«ńö╗ÕāÅŃéÆŃé░Ńā½Ńā╝ŃāŚÕī¢ŃüŚŃü”Ńé«ŃāŻŃā®Ńā¬Ńā╝ĶĪ©ńż║ŃĆéŃéĄŃāĀŃāŹŃéżŃā½ńö╗ÕāÅŃéÆŃé»Ńā¬ŃāāŃé»ŃüÖŃéŗŃü©ŃĆüńö╗ÕāÅŃüīŃāØŃāāŃāŚŃéóŃāāŃāŚĶĪ©ńż║ŃüĢŃéīŃüŠŃüÖŃĆé</p>
<!-- CODE -->
<!-- trigger elements -->
<div id="triggers">
<a href="http://farm4.static.flickr.com/3639/3664935712_94ca67b18b.jpg" title="ŃéĄŃā®ŃāĆ@Ńé¬Ńā╗Ńé┐Ńā│Ńā╗ŃéĖŃāŻŃāćŃéŻŃé╣"><img src="http://farm4.static.flickr.com/3639/3664935712_94ca67b18b_s.jpg" /></a>
<a href="http://farm4.static.flickr.com/3220/3664935670_b94968ccbc.jpg" title="ŃāÄŃā½ŃāćŃéŻŃāāŃé»’╝ĀŃé¬Ńā╗Ńé┐Ńā│Ńā╗ŃéĖŃāŻŃāćŃéŻŃé╣"><img src="http://farm4.static.flickr.com/3220/3664935670_b94968ccbc_s.jpg" /></a>
<a href="http://farm4.static.flickr.com/3394/3664935528_16fff63afc.jpg" title="ÕĪ®ŃāÉŃé┐Ńā╝ŃéŁŃāŻŃā®ŃāĪŃā½Ńü«Ńé»Ńā¼Ńā╝ŃāŚ @Ńé¬Ńā╗Ńé┐Ńā│Ńā╗ŃéĖŃāŻŃāćŃéŻŃé╣"><img src="http://farm4.static.flickr.com/3394/3664935528_16fff63afc_s.jpg" /></a>
</div>
<!-- overlay element -->
<div class="simple_overlay" id="gallery">
<!-- "previous image" action -->
<a class="prev">prev</a>
<!-- "next image" action -->
<a class="next">next</a>
<!-- image information -->
<div class="info"></div>
<!-- load indicator (animated gif) -->
<img class="progress" src="/content/img/ajax/loading_black.gif" />
</div>
<!-- / CODE -->
</body>
</html>
Ō¢╝ÕÉīõĖĆŃāÜŃā╝ŃéĖÕåģŃü½ĶżćµĢ░Ńü«Ńé¬Ńā╝ŃāÉŃā╝Ńā¼ŃéżŃéÆĶĪ©ńż║ŃĆüĶĪ©ńż║õĮŹńĮ«Ńü»Õ║¦µ©ÖŃü¦µīćÕ«ÜÕÅ»ĶāĮŃü¦ŃüÖŃĆé
 Ķ©ŁńĮ«ŃéżŃāĪŃā╝ŃéĖ
<!DOCTYPE html PUBLIC "-//W3C//DTD XHTML 1.0 Transitional//EN" "http://www.w3.org/TR/xhtml1/DTD/xhtml1-transitional.dtd">
<html xmlns="http://www.w3.org/1999/xhtml" xml:lang="ja" lang="ja">
<head>
<meta http-equiv="Content-Type" content="text/html;charset=utf-8" />
<meta http-equiv="Content-Language" content="ja" />
<meta http-equiv="Content-Script-Type" content="text/javascript" />
<meta http-equiv="Content-Style-Type" content="text/css" />
<meta http-equiv="imagetoolbar" content="no" />
<title>Ķ©ŁńĮ«ŃéĄŃā│ŃāŚŃā½</title>
<link rel="stylesheet" type="text/css" href="/content/lib/global.css" />
<!-- JS -->
<script type="text/javascript" src="http://ajax.googleapis.com/ajax/libs/jquery/1.3.2/jquery.min.js"></script>
<script type="text/javascript" src="/content/lib/jquery/jquery.tools.min.js"></script>
<script type="text/javascript">
$(function(){
// Ńé¬Ńā╝ŃāÉŃā╝Ńā¼ŃéżŃü«ĶĪ©ńż║õĮŹńĮ«µīćÕ«Ü
var positions = [
[150,300],
[150,550],
[150,800]
];
// setup triggers
$("button[rel]").each(function(i) {
$(this).overlay({
// common configuration for each overlay
oneInstance: false,
closeOnClick: false,
// setup custom finish position
top: positions[i][0],
left: positions[i][1],
// use apple effect
effect: 'apple'
});
});
});
// ŃüÖŃü╣Ńü”Ńü«Ńé¬Ńā╝ŃāÉŃā╝Ńā¼ŃéżŃéÆķ¢ŗŃüÅ
function openAll() {
$("button[rel]").each(function() {
$(this).overlay().load();
});
}
// ŃüÖŃü╣Ńü”Ńü«Ńé¬Ńā╝ŃāÉŃā╝Ńā¼ŃéżŃéÆķ¢ēŃüśŃéŗ
function closeAll() {
$("button[rel]").each(function() {
$(this).overlay().close();
});
}
</script>
<style type="text/css">
/* overlay */
div.overlay, #overlay {
padding:40px;
width:150px;
display:none;
background-image:url(/content/img/ajax/jquery/white.png);
}
div.overlay div.close,
#overlay div.close {
background:url(/content/img/ajax/jquery/close.png) no-repeat;
position:absolute;
top:-2px; right:-2px;
width:35px; height:35px;
cursor:pointer;
}
#overlay_player {
display:block;
height:450px;
}
/* buttons */
button {
outline:1px outset #999;
border:1px solid #fff;
background-color:#222;
color:#fff;
margin:0 10px; padding:5px 10px;
-moz-border-radius:5px;
-moz-outline-radius:5px;
cursor:pointer;
font-size:11px;
}
.overlay h2 {
margin:0; padding:0;
}
.overlay p.thumb {
float:left;
margin:0px 20px 20px 0; padding:0;
width:75px; height:75px;
}
</style>
</head>
<body>
<div id="wrap">
<h1>Ķ©ŁńĮ«ŃéĄŃā│ŃāŚŃā½</h1>
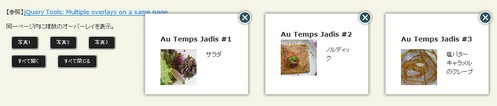
<p>ŃĆÉÕÅéńģ¦ŃĆæ<a href='http://flowplayer.org/tools/demos/overlay/multiple.html'>jQuery Tools: Multiple overlays on a same page</a></p>
<p>ÕÉīõĖĆŃāÜŃā╝ŃéĖÕåģŃü½ĶżćµĢ░Ńü«Ńé¬Ńā╝ŃāÉŃā╝Ńā¼ŃéżŃéÆĶĪ©ńż║ŃĆé</p>
<!-- CODE -->
<!-- overlay buttons -->
<p>
<button rel="div.overlay:eq(0)" type="button">ÕåÖń£¤1</button>
<button rel="div.overlay:eq(1)" type="button">ÕåÖń£¤2</button>
<button rel="div.overlay:eq(2)" type="button">ÕåÖń£¤3</button>
</p>
<p>
<button type="button" onclick="openAll()">ŃüÖŃü╣Ńü”ķ¢ŗŃüÅ</button>
<button type="button" onclick="closeAll()">ŃüÖŃü╣Ńü”ķ¢ēŃüśŃéŗ</button>
</p>
<div class="overlay">
<h2 style="margin:10px 0">Au Temps Jadis <me>#1</me></h2>
<p class="thumb"><img src="http://farm4.static.flickr.com/3639/3664935712_94ca67b18b_s.jpg" /></p>
<p>ŃéĄŃā®ŃāĆ</p>
</div>
<div class="overlay">
<h2>Au Temps Jadis <me>#2</me></h2>
<p class="thumb"><img src="http://farm4.static.flickr.com/3220/3664935670_b94968ccbc_s.jpg" /></p>
<p>ŃāÄŃā½ŃāćŃéŻŃāāŃé»</p>
</div>
<div class="overlay">
<h2 style="margin:10px 0">Au Temps Jadis <me>#3</me></h2>
<p class="thumb"><img src="http://farm4.static.flickr.com/3394/3664935528_16fff63afc_s.jpg" /></p>
<p>ÕĪ®ŃāÉŃé┐Ńā╝ŃéŁŃāŻŃā®ŃāĪŃā½Ńü«Ńé»Ńā¼Ńā╝ŃāŚ</p>
</div>
<!-- / CODE -->
</body>
</html>
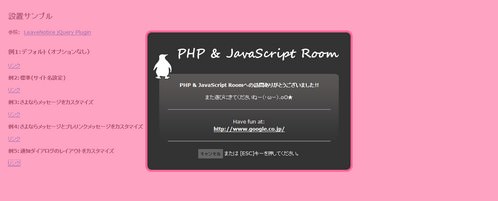
LeaveNotice jQuery Plugin
Ńā¬Ńā│Ńé»ÕģłķüĘń¦╗µÖéŃü½ķĆÜń¤źŃéóŃā®Ńā╝ŃāłĶĪ©ńż║
unknown
LeaveNotice jQuery Plugin
Ńā¬Ńā│Ńé»ŃéÆŃé»Ńā¬ŃāāŃé»ŃüŚŃü¤µÖéŃü½ŃĆüńÅŠÕ£©Ńü«ŃāÜŃā╝ŃéĖŃüŗŃéēŃā¬Ńā│Ńé»ÕģłŃü«ŃāÜŃā╝ŃéĖŃüĖń¦╗ÕŗĢŃüŚŃéłŃüåŃü©ŃüŚŃü”ŃüäŃéŗŃüōŃü©ŃéÆŃĆüŃā”Ńā╝ŃéČŃā╝Ńü½ķĆÜń¤źŃüÖŃéŗŃāĆŃéżŃéóŃāŁŃé░ŃéÆĶĪ©ńż║ŃüÖŃéŗjQueryŃāŚŃā®Ńé░ŃéżŃā│ŃĆé
ŃāĆŃéżŃéóŃāŁŃé░ĶĪ©ńż║ŃüŗŃéēŃā¬Ńā│Ńé»ÕģłŃüĖķüĘń¦╗ŃüÖŃéŗŃüŠŃü¦Ńü«µÖéķ¢ō’╝łtimeOut’╝ēŃĆüńÅŠÕ£©Ńü«ŃéĄŃéżŃāłÕÉŹŃĆüŃāŚŃā¼Ńā¬Ńā│Ńé»ŃāĪŃāāŃé╗Ńā╝ŃéĖŃéäŃüĢŃéłŃü¬ŃéēŃāĪŃāāŃé╗Ńā╝ŃéĖŃü¬Ńü®Ńü«ķĆÜń¤źŃāĆŃéżŃéóŃāŁŃé░ÕåģŃü½ĶĪ©ńż║ŃüÖŃéŗŃāåŃéŁŃé╣ŃāłÕÉŹŃü®ŃéÆŃé½Ńé╣Ńé┐Ńā×ŃéżŃé║ŃüÖŃéŗŃüōŃü©ŃüīŃü¦ŃüŹŃüŠŃüÖŃĆé
ķĆÜń¤źŃé”ŃéŻŃā│ŃāēŃé”Ńü»ńö╗ÕāÅŃéÆõĮ┐ńö©ŃüøŃüÜŃĆüCSSŃü«Ńü┐Ńü¦Ńé╣Ńé┐ŃéżŃā¬Ńā│Ńé░ŃüĢŃéīŃü”ŃüäŃüŠŃüÖŃĆé Ńé¬Ńā╝ŃāÉŃā╝Ńā¼ŃéżŃĆüķĆÜń¤źŃé”ŃéŻŃā│ŃāēŃé”Ńü«Ńé½Ńé╣Ńé┐Ńā×ŃéżŃé║ŃéÆŃüÖŃéŗÕĀ┤ÕÉłŃü»ŃĆüŃé¬ŃāŚŃéĘŃā¦Ńā│Ńü¦µīćÕ«ÜÕÅ»ĶāĮŃü¦ŃüÖŃĆé
- messageBoxId’╝łŃāćŃāĢŃé®Ńā½ŃāłŃü»"ln-messageBox"’╝ē
- messageHolderId’╝łŃāćŃāĢŃé®Ńā½ŃāłŃü»"n-messageHolder"’╝ē
- overlayId’╝łŃāćŃāĢŃé®Ńā½ŃāłŃü»"ln-blackout"’╝ē
- overlayAlpha’╝łŃāćŃāĢŃé®Ńā½ŃāłŃü»0.3’╝ē
 Ķ©ŁńĮ«ŃéżŃāĪŃā╝ŃéĖ
<!DOCTYPE html PUBLIC "-//W3C//DTD XHTML 1.0 Transitional//EN" "http://www.w3.org/TR/xhtml1/DTD/xhtml1-transitional.dtd">
<html xmlns="http://www.w3.org/1999/xhtml" xml:lang="ja" lang="ja">
<head>
<meta http-equiv="Content-Type" content="text/html; charset=utf-8" />
<meta http-equiv="Content-Language" content="ja" />
<meta http-equiv="Content-Script-Type" content="text/javascript" />
<meta http-equiv="Content-Style-Type" content="text/css" />
<meta http-equiv="imagetoolbar" content="no" />
<title>Ķ©ŁńĮ«ŃéĄŃā│ŃāŚŃā½</title>
<link rel="stylesheet" type="text/css" href="/content/lib/global.css" />
<!-- JS -->
<script type="text/javascript" src="http://ajax.googleapis.com/ajax/libs/jquery/1.3.2/jquery.min.js"></script>
<script type="text/javascript" src="/content/lib/jquery/jquery.leaveNotice.js"></script>
<script type="text/javascript">
$(function(){
$('a[target=_blank]').leaveNotice({siteName:'PHP & JavaScript Room'});
//Initiation for example 1
$('a.ex1').leaveNotice();
//Initiation for example 1
$('a.ex2').leaveNotice({
siteName:"PHP & JavaScript Room"
});
//Initiation for example 1
$('a.ex3').leaveNotice({
siteName:"PHP & JavaScript Room",
exitMessage:"<h1> {SITENAME}ŃüĖŃü«Ķ©¬ÕĢÅŃüéŃéŖŃüīŃü©Ńüå!</h1><p>ŃüŠŃü¤ŃüŖń½ŗŃüĪÕ»äŃéŖŃüÅŃüĀŃüĢŃüäŃüŠŃüøŃā╝!!</p>"
});
//Initiation for example 1
$('a.ex4').leaveNotice({
siteName:"PHP & JavaScript Room",
exitMessage:"<h3>{SITENAME}ŃüĖŃü«Ķ©¬ÕĢÅŃüéŃéŖŃüīŃü©Ńüå!</h3><p>ŃüŠŃü¤ķüŖŃü│Ńü½µØźŃü”ŃüŁŃā╝!!</p>",
preLinkMessage:"<hr/><p>Have fun at:<br/><strong>{URL}</strong></p><hr/>",
timeOut:6000 /* 6ń¦ÆÕŠīŃü½ķüĘń¦╗ */
});
//Initiation for example 1
$('a.ex5').leaveNotice({
siteName:"PHP & JavaScript Room",
exitMessage:"<h3> {SITENAME}ŃüĖŃü«Ķ©¬ÕĢÅŃüéŃéŖŃüīŃü©ŃüåŃüöŃü¢ŃüäŃüŠŃüŚŃü¤!!</h3><p>ŃüŠŃü¤ķüŖŃü│Ńü½ŃüŹŃü”ŃüÅŃüĀŃüĢŃüäŃüŁŃā╝’╝łŃā╗ŽēŃā╝’╝ē.oOŌśģ</p>",
preLinkMessage:"<hr/><p>Have fun at:<br/><strong>{URL}</strong></p><hr/>",
overlayId:"custom-blackout",
messageBoxId:"custom-messageBox",
messageBoxHolder:"custom-messageHolder",
overlayAlpha:0.6
});
});
</script>
<!-- CSS -->
<style type="text/css">
/* The style for the blackout div that appears when the exit dialog is shown. */
#ln-blackout {position:fixed; top:0; left:0; width:100%; height:100%; background-color:#000;}
/* This style is for a container that holds the message dialog box. It has been added primarily to help with positioning. I know some people would complain about this, but it seems more efficient this way even it is isn't semanitc. */
#ln-messageHolder {position:fixed; top:150px; left:0; width:100%;}
/* This style is for the div that holds the actual exit dialog. */
#ln-messageBox {width:460px; margin:0 auto; min-height:200px; background-color:#fff; border:10px solid #e6e6e6; -moz-box-shadow:0 0 20px 10px #666; -webkit-box-shadow:0 0 20px #666; text-align:center; padding:20px;}
/* This style is applied to the link that closes the dialog. */
a#ln-cancelLink {background-color:#e6e6e6; font-weight:bold; padding:5px; color:#666; text-decoration:none; text-transform:uppercase; font-size:0.8em;}
a#ln-cancelLink:hover {background-color:#666; color:#e6e6e6;}
/* This style is for the box that holds the section that says where the user is being directed to. */
.setoff {background-color:#f2f2f2; padding:5px; margin:10px 0 20px 0;}
/* õŠŗ5 */
#custom-blackout {position:fixed; top:0; left:0; width:100%; height:100%; background-color:#ff6699;}
#custom-messageHolder {position:fixed; top:200px; left:0; width:100%;}
#custom-messageBox {width:400px; margin:0 auto; padding:120px 50px 20px 50px; background:#333 url(/content/img/ajax/custom-msg-box-bg.png) no-repeat top center; color:#fff; text-align:center; border:5px solid #ff6699; -moz-border-radius:15px; -webkit-border-radius:15px;}
#custom-messageBox * {color:#fff;}
#custom-messageBox hr {border-color:#666;}
#custom-messageBox a#ln-cancelLink {background-color:#666; color:#333;}
</style>
</head>
<body>
<div id="wrap">
<h1>Ķ©ŁńĮ«ŃéĄŃā│ŃāŚŃā½</h1>
<p>ÕÅéńģ¦’╝ÜŃĆĆ<a href='http://rewdy.com/tools/leavenotice-jquery-plugin'>LeaveNotice jQuery Plugin</a></p>
<!-- CODE -->
<h2>õŠŗ1’╝ÜŃāćŃāĢŃé®Ńā½Ńāł’╝łŃé¬ŃāŚŃéĘŃā¦Ńā│Ńü¬ŃüŚ’╝ē</h2>
<p><a href="http://www.google.co.jp/" class="ex1">Ńā¬Ńā│Ńé»</a></p>
<h3>õŠŗ2’╝ܵ©Öµ║¢<span>(ŃéĄŃéżŃāłÕÉŹĶ©ŁÕ«Ü)</span></h3>
<p><a href="http://www.google.co.jp/" class="ex2">Ńā¬Ńā│Ńé»</a></p>
<h3>õŠŗ3’╝ÜŃüĢŃéłŃü¬ŃéēŃāĪŃāāŃé╗Ńā╝ŃéĖŃéÆŃé½Ńé╣Ńé┐Ńā×ŃéżŃé║</h3>
<p><a href="http://www.google.co.jp/" class="ex3">Ńā¬Ńā│Ńé»</a></p>
<h3>õŠŗ4’╝ÜŃüĢŃéłŃü¬ŃéēŃāĪŃāāŃé╗Ńā╝ŃéĖŃü©ŃāŚŃā¼Ńā¬Ńā│Ńé»ŃāĪŃāāŃé╗Ńā╝ŃéĖŃéÆŃé½Ńé╣Ńé┐Ńā×ŃéżŃé║</h3>
<p><a href="http://www.google.co.jp/" class="ex4">Ńā¬Ńā│Ńé»</a></p>
<h3>õŠŗ5’╝ÜķĆÜń¤źŃāĆŃéżŃéóŃāŁŃé░Ńü«Ńā¼ŃéżŃéóŃé”ŃāłŃéÆŃé½Ńé╣Ńé┐Ńā×ŃéżŃé║</span></h3>
<p><a href="http://www.google.co.jp/" class="ex5">Ńā¬Ńā│Ńé»</a></p>
<!-- / CODE -->
</div>
</body>
</html>
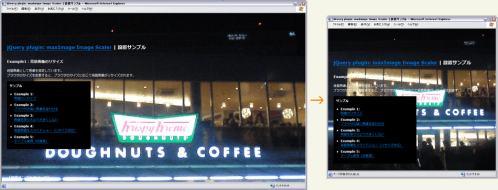
maxImage Image Scaler
Ńé”ŃéŻŃā│ŃāēŃé”ŃéĄŃéżŃé║Ńü½ÕÉłŃéÅŃüøŃü”ńö╗ÕāÅŃéÆŃā¬ŃéĄŃéżŃé║
2009/3/1
jQuery plugin: maxImage Image Scaler
Ńé”ŃéŻŃā│ŃāēŃé”ŃéĄŃéżŃé║Ńü½ÕÉłŃéÅŃüøŃü”ńö╗ÕāÅŃéÆŃā¬ŃéĄŃéżŃé║ŃüÖŃéŗjQueryŃāŚŃā®Ńé░ŃéżŃā│ŃĆé
ŃéżŃāĪŃā╝ŃéĖµ»öńÄćŃĆüŃā¢Ńā®Ńé”ŃéČŃéĄŃéżŃé║ŃüŖŃéłŃü│ŃüäŃüÅŃüżŃüŗŃü«Ńé¬ŃāŚŃéĘŃā¦Ńā│Ńü½ŃüŚŃü¤ŃüīŃüŻŃü”ŃĆüńö╗ÕāÅŃéĄŃéżŃé║ŃéƵ£ĆÕż¦Õ╣ģŃü½ńĖ«Õ░║ĶĪ©ńż║ŃüŚŃüŠŃüÖŃĆé
 Ķ©ŁńĮ«ŃéżŃāĪŃā╝ŃéĖ
<!DOCTYPE html PUBLIC "-//W3C//DTD XHTML 1.0 Transitional//EN" "http://www.w3.org/TR/xhtml1/DTD/xhtml1-transitional.dtd">
<html xmlns="http://www.w3.org/1999/xhtml" xml:lang="ja" lang="ja">
<head>
<meta http-equiv="Content-Type" content="text/html; charset=utf-8" />
<meta http-equiv="Content-Language" content="ja" />
<meta http-equiv="Content-Script-Type" content="text/javascript" />
<meta http-equiv="Content-Style-Type" content="text/css" />
<meta http-equiv="imagetoolbar" content="no" />
<title>jQuery plugin: maxImage Image Scaler | Ķ©ŁńĮ«ŃéĄŃā│ŃāŚŃā½</title>
<link rel="stylesheet" type="text/css" href="/content/lib/global.css" />
<!-- JS -->
<script src="https://ajax.googleapis.com/ajax/libs/jquery/1.3.2/jquery.min.js"></script>
<script type="text/javascript" src="/content/lib/jquery/jquery.maximage.js"></script>
<script type="text/javascript">
$(function(){
$('img.maximage').maxImage({
verticalOffset: 91,
horizontalOffset: 520
});
$('img.bgmaximage').maxImage({
isBackground: true,
verticalAlign: 'top'
});
});
</script>
<style type="text/css">
html { overflow-x:hidden;overflow-y:scroll; }
body { color:#fff; }
.span-1 { width:300px; background:#000; float:left;margin-right:10px;opacity:.8;padding:10px; }
.liquid { margin:0 0 0 300px;position:relative;width:auto; }
</style>
<!--[if IE 6]>
<style>
body { height:100%; }
</style>
<![endif]-->
</head>
<body>
<div id="wrap">
<img src="http://farm4.static.flickr.com/3113/3142386067_4a9dbc9844_o.jpg" width="640" height="480" alt="" class="bgmaximage" />
<h1><a href='http://aaronvanderzwan.com/blog/2009/02/jquery-plugin-maximage-image-scaler/'>jQuery plugin: maxImage Image Scaler</a> | Ķ©ŁńĮ«ŃéĄŃā│ŃāŚŃā½</h1>
<h2>Example1’╝ÜĶāīµÖ»ńö╗ÕāÅŃü«Ńā¬ŃéĄŃéżŃé║</h2>
<p>ĶāīµÖ»ńö╗ÕāÅŃü©ŃüŚŃü”ńö╗ÕāÅŃéƵīćÕ«ÜŃüŚŃü”ŃüäŃüŠŃüÖŃĆé<br>Ńā¢Ńā®Ńé”ŃéČŃü«ŃéĄŃéżŃé║ŃéÆÕżēµø┤ŃüÖŃéŗŃü©ŃĆüŃā¢Ńā®Ńé”ŃéČŃü«ŃéĄŃéżŃé║Ńü½Õ┐£ŃüśŃü”ĶāīµÖ»ńö╗ÕāÅŃüīŃā¬ŃéĄŃéżŃé║ŃüĢŃéīŃüŠŃüÖŃĆé</p>
<!-- CODE -->
<div class="cf">
<div class="span-1">
<h3>ŃéĄŃā│ŃāŚŃā½</h3>
<ul>
<li><strong>Example 1:<br><a href="example3.php?f=include/ajax/jquery_plugin_window/maximage.inc&ttl=jQuery+maxImage+plugin%82%CC%90%DD%92u%83T%83%93%83v%83%8B">ńö╗ÕāÅŃü«Ńā¬ŃéĄŃéżŃé║</a></strong></li>
<li>Example 2:<br><a href="example3.php?f=include/ajax/jquery_plugin_window/maximage2.inc&ttl=jQuery+maxImage+plugin%82%CC%90%DD%92u%83T%83%93%83v%83%8B">Ńā¢Ńā®Ńé”ŃéČŃü«ń½»Ńü½ńö╗ÕāÅŃéÆÕŠōŃéÅŃüøŃéŗ</a></li>
<li>Example 3:<br><a href="example3.php?f=include/ajax/jquery_plugin_window/maximage3.inc&ttl=jQuery+maxImage+plugin%82%CC%90%DD%92u%83T%83%93%83v%83%8B">ńö╗ÕāÅŃéÆÕĤջĖÕż¦ŃéłŃéŖÕż¦ŃüŹŃüÅŃüŚŃü¬Ńüä</a></li>
<li>Example 4:<br><a href="example3.php?f=include/ajax/jquery_plugin_window/maximage4.inc&ttl=jQuery+maxImage+plugin%82%CC%90%DD%92u%83T%83%93%83v%83%8B">ĶāīµÖ»ńö╗ÕāÅŃéÆŃé╣Ńā®ŃéżŃāēŃéĘŃā¦Ńā╝’╝łŃā¬ŃéĄŃéżŃé║Õ»ŠÕ┐£’╝ē</a></li>
<li>Example 5:<br><a href="example3.php?f=include/ajax/jquery_plugin_window/maximage5.inc&ttl=jQuery+maxImage+plugin%82%CC%90%DD%92u%83T%83%93%83v%83%8B">ŃāåŃā╝Ńā¢Ńā½õĮ┐ńö©’╝łķØ×µÄ©Õź©’╝ē</a></li>
</ul>
</div>
</div>
</div>
<!-- / CODE -->
</body>
</html>
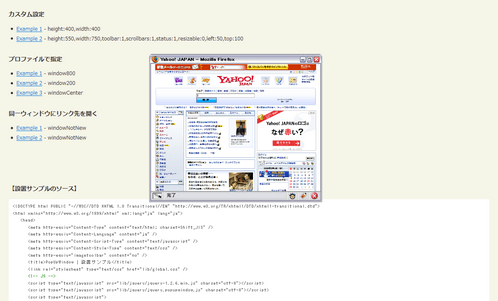
PopUpWindow
ŃāØŃāāŃāŚŃéóŃāāŃāŚŃé”ŃéŻŃā│ŃāēŃé”
2009/3/1
PopUpWindow
Ńā¬Ńā│Ńé»ŃéÆÕÅ¢ÕŠŚŃüŚŃĆüŃā¬Ńā│Ńé»Ńü«hrefÕ▒׵ƦŃü½Õ¤║ŃüźŃüäŃü¤ŃāØŃāāŃāŚŃéóŃāāŃāŚŃé”ŃéŻŃā│ŃāēŃé”ŃéÆõĮ£µłÉŃüÖŃéŗjQueryŃāŚŃā®Ńé░ŃéżŃā│ŃĆé
Ńā¬Ńā│Ńé»Ńü«relÕ▒׵ƦŃü½Ńé½Ńé╣Ńé┐ŃāĀĶ©ŁÕ«ÜŃüŠŃü¤Ńü»ŃāŚŃāŁŃāĢŃéĪŃéżŃā½ÕÉŹŃéƵĖĪŃüÖŃüōŃü©Ńü¦ŃāćŃāĢŃé®Ńā½ŃāłŃü«Ķ©ŁÕ«ÜŃéÆõĖŖµøĖŃüŹŃü¦ŃüŹŃüŠŃüÖŃĆé Ńé½Ńé╣Ńé┐ŃāĀĶ©ŁÕ«ÜŃü¦Ńü»ŃĆüŃé”ŃéŻŃā│ŃāēŃé”Ńü«ŃéĄŃéżŃé║ŃĆüŃāäŃā╝Ńā½ŃāÉŃā╝ŃĆüŃé╣Ńé»ŃāŁŃā╝Ńā½ŃāÉŃā╝ŃĆüŃé╣ŃāåŃā╝Ńé┐Ńé╣ŃāÉŃā╝Ńü«µ£ēńäĪŃĆüŃā¬ŃéĄŃéżŃé║Ńü«µ£ēńäĪŃĆüŃé”ŃéŻŃā│ŃāēŃé”ŃéÆķ¢ŗŃüÅõĮŹńĮ«ŃĆüŃā¬Ńā│Ńé»ÕģłŃéÆÕĖĖŃü½µ¢░ŃüŚŃüäŃé”ŃéŻŃā│ŃāēŃé”Ńü¦ķ¢ŗŃüÅŃüŗŃü«µ£ēńäĪŃü¬Ńü®ŃéƵīćÕ«ÜŃüÖŃéŗŃüōŃü©ŃüīŃü¦ŃüŹŃüŠŃüÖŃĆé
 Ķ©ŁńĮ«ŃéżŃāĪŃā╝ŃéĖ
<!DOCTYPE html PUBLIC "-//W3C//DTD XHTML 1.0 Transitional//EN" "http://www.w3.org/TR/xhtml1/DTD/xhtml1-transitional.dtd">
<html xmlns="http://www.w3.org/1999/xhtml" xml:lang="ja" lang="ja">
<head>
<meta http-equiv="Content-Type" content="text/html; charset=utf-8" />
<meta http-equiv="Content-Language" content="ja" />
<meta http-equiv="Content-Script-Type" content="text/javascript" />
<meta http-equiv="Content-Style-Type" content="text/css" />
<meta http-equiv="imagetoolbar" content="no" />
<title>PopUpWindow | Ķ©ŁńĮ«ŃéĄŃā│ŃāŚŃā½</title>
<link rel="stylesheet" type="text/css" href="/content/lib/global.css" />
<!-- JS -->
<script src="https://ajax.googleapis.com/ajax/libs/jquery/1.2.6/jquery.min.js"></script>
<script type="text/javascript" src="/content/lib/jquery/jquery.popupwindow.js"></script>
<script type="text/javascript">
/* ŃāŚŃāŁŃāĢŃéĪŃéżŃā½ */
var profiles={
window800:{
height:800,
width:800,
status:1
},
window200:{
height:200,
width:200,
status:1,
resizable:0
},
windowCenter:{
height:300,
width:400,
center:1
},
windowNotNew:{
height:300,
width:400,
center:1,
createnew:0
}
};
$(function(){
$(".popupwindow").popupwindow(profiles);
});
</script>
<!-- CSS -->
</head>
<body>
<div id="wrap">
<h1><a href='http://rip747.github.com/popupwindow/'>PopUpWindow</a> | Ķ©ŁńĮ«ŃéĄŃā│ŃāŚŃā½</h1>
<!-- CODE -->
<h2>ŃāćŃāĢŃé®Ńā½ŃāłĶ©ŁÕ«Ü</h2>
<ul>
<li><a href="http://headlines.yahoo.co.jp/?popupwindow" class="popupwindow">Example 1</a></dd>
</ul>
<h2>Ńé½Ńé╣Ńé┐ŃāĀĶ©ŁÕ«Ü</h2>
<ul>
<li><a href="http://headlines.yahoo.co.jp/?popupwindow" class="popupwindow" rel="height:400,width:400">Example 1</a> - height:400,width:400</dd>
<li><a href="http://headlines.yahoo.co.jp/?popupwindow" class="popupwindow" rel="height:550,width:750,toolbar:1,scrollbars:1,status:1,resizable:0,left:50,top:100">Example 2</a> - height:550,width:750,toolbar:1,scrollbars:1,status:1,resizable:0,left:50,top:100</dd>
</ul>
<h2>ŃāŚŃāŁŃāĢŃéĪŃéżŃā½Ńü¦µīćÕ«Ü</h2>
<ul>
<li><a href="http://headlines.yahoo.co.jp/?popupwindow" class="popupwindow" rel="window800">Example 1</a> - window800</dd>
<li><a href="http://headlines.yahoo.co.jp/?popupwindow" class="popupwindow" rel="window200">Example 2</a> - window200</dd>
<li><a href="http://headlines.yahoo.co.jp/?popupwindow" class="popupwindow" rel="windowCenter">Example 3</a> - windowCenter</dd>
</ul>
<h2>ÕÉīõĖĆŃé”ŃéŻŃā│ŃāēŃé”Ńü½Ńā¬Ńā│Ńé»ÕģłŃéÆķ¢ŗŃüÅ</h2>
<ul>
<li><a href="http://headlines.yahoo.co.jp/?popupwindow" class="popupwindow" rel="windowNotNew">Example 1</a> - windowNotNew</dd>
<li><a href="http://headlines.yahoo.co.jp/hl" class="popupwindow" rel="windowNotNew">Example 2</a> - windowNotNew</dd>
</ul>
<!-- / CODE -->
</div>
</body>
</html>
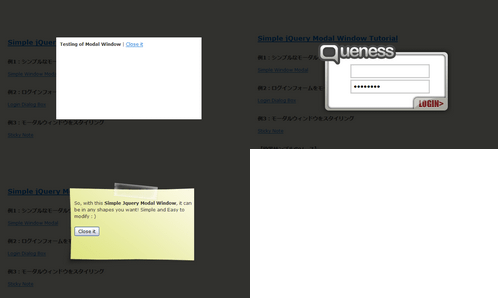
Simple jQuery Modal Window Tutorial
ŃéĘŃā│ŃāŚŃā½Ńü¬ŃāóŃā╝ŃāĆŃā½Ńé”ŃéŻŃā│ŃāēŃé”
2009/3/20
Simple jQuery Modal Window Tutorial
jQueryŃéÆõĮ┐ńö©ŃüŚŃü”ŃĆüŃéĘŃā│ŃāŚŃā½Ńü¬ŃāóŃā╝ŃāĆŃā½Ńé”ŃéŻŃā│ŃāēŃé”ŃéÆõĮ£µłÉŃüÖŃéŗµ¢╣µ│ĢŃüīµÄ▓Ķ╝ēŃüĢŃéīŃü”ŃüäŃüŠŃüÖŃĆé
ŃāóŃā╝ŃāĆŃā½Ńé”ŃéŻŃā│ŃāēŃé”ĶĪ©ńż║ŃéÆŃüÖŃéŗõĖĆķĆŻŃü«Õć”ńÉåŃüīńÉåĶ¦ŻŃü¦ŃüŹŃüŠŃüÖŃĆé Ńā¬Ńā│Ńé»ŃéÆŃé»Ńā¬ŃāāŃé»ŃüÖŃéŗŃü©ŃĆüńö╗ķØóÕģ©õĮōŃéÆĶ”åŃüåŃé¬Ńā╝ŃāÉŃā╝Ńā¼Ńéżńö©Ńü«Ńā×Ńé╣Ńé»ŃéÆŃāĢŃé¦Ńā╝ŃāēĶĪ©ńż║ŃüŚŃĆüńö╗ķØóŃü«õĖŁÕż«Ńü½ŃāóŃā╝ŃāĆŃā½Ńé”ŃéŻŃā│ŃāēŃé”ŃéÆĶĪ©ńż║ŃüŚŃüŠŃüÖŃĆé ķ¢ēŃüśŃéŗŃā£Ńé┐Ńā│ŃéäŃā¬Ńā│Ńé»ŃéÆŃé»Ńā¬ŃāāŃé»ŃĆüŃüŠŃü¤Ńü»Ńé¬Ńā╝ŃāÉŃā╝Ńā¼Ńéżķā©ÕłåŃéÆŃé»Ńā¬ŃāāŃé»ŃüÖŃéŗŃü©ŃĆüŃāóŃā╝ŃāĆŃā½Ńé”ŃéŻŃā│ŃāēŃé”Ńüīķ¢ēŃüśŃéēŃéīŃüŠŃüÖŃĆé ŃāóŃā╝ŃāĆŃā½Ńé”ŃéŻŃā│ŃāēŃé”ÕåģŃü«Ńā×Ńā╝Ńé»ŃéóŃāāŃāŚŃü©Ńé╣Ńé┐ŃéżŃé╣ŃéĘŃā╝ŃāłŃü¦Ńé╣Ńé┐ŃéżŃā¬Ńā│Ńé░ŃüÖŃéŗŃüōŃü©ŃüīŃü¦ŃüŹŃüŠŃüÖŃĆé
 Ķ©ŁńĮ«ŃéżŃāĪŃā╝ŃéĖ
<!DOCTYPE html PUBLIC "-//W3C//DTD XHTML 1.0 Transitional//EN" "http://www.w3.org/TR/xhtml1/DTD/xhtml1-transitional.dtd">
<html xmlns="http://www.w3.org/1999/xhtml" xml:lang="ja" lang="ja">
<head>
<meta http-equiv="Content-Type" content="text/html; charset=utf-8" />
<meta http-equiv="Content-Language" content="ja" />
<meta http-equiv="Content-Script-Type" content="text/javascript" />
<meta http-equiv="Content-Style-Type" content="text/css" />
<meta http-equiv="imagetoolbar" content="no" />
<title>Simple jQuery Modal Window Tutorial | Ķ©ŁńĮ«ŃéĄŃā│ŃāŚŃā½</title>
<link rel="stylesheet" type="text/css" href="/content/lib/global.css" />
<!-- JS -->
<script src="https://ajax.googleapis.com/ajax/libs/jquery/1.2.6/jquery.min.js"></script>
<script type="text/javascript">
$(function(){
//select all the a tag with name equal to modal
$('a[name=modal]').click(function(){
/* hrefÕ▒׵ƦŃéÆÕÅ¢ÕŠŚ */
var id = $(this).attr('href');
/* Ńé╣Ńé»Ńā¬Ńā╝Ńā│Ńü«ķ½śŃüĢŃü©Õ╣ģŃéÆÕÅ¢ÕŠŚ */
var maskHeight = $(document).height();
var maskWidth = $(window).width();
/* Ńé╣Ńé»Ńā¬Ńā╝Ńā│Õģ©õĮōŃéÆŃüŖŃüŖŃüåŃā×Ńé╣Ńé»Ńü«ķ½śŃüĢŃü©Õ╣ģŃéƵīćÕ«Ü */
$('#mask').css({'width':maskWidth,'height':maskHeight});
/* ŃāĢŃé¦Ńā╝ŃāēÕŖ╣µ×£ŃéÆõ╗śŃüæŃéŗ */
//transition effect
$('#mask').fadeIn(1000);
$('#mask').fadeTo("slow",0.8);
/* Ńé”ŃéŻŃā│ŃāēŃé”Ńü«ķ½śŃüĢŃü©Õ╣ģŃéÆÕÅ¢ÕŠŚ */
//Get the window height and width
var winH = $(window).height();
var winW = $(window).width();
/* Ńé”ŃéŻŃā│ŃāēŃé”Ńü«õĖŁÕż«Ńü½ŃāØŃāāŃāŚŃéóŃāāŃāŚŃüÖŃéŗŃéłŃüåĶ©ŁÕ«Ü */
$(id).css('top', winH/2-$(id).height()/2);
$(id).css('left', winW/2-$(id).width()/2);
/* ŃāĢŃé¦Ńā╝ŃāēÕŖ╣µ×£ŃéÆõ╗śŃüæŃéŗ */
$(id).fadeIn(2000);
});
/* ķ¢ēŃüśŃéŗŃā£Ńé┐Ńā│ŃüīŃé»Ńā¬ŃāāŃé»ŃüĢŃéīŃü¤µÖé */
$('.window .close').click(function(){
$('#mask, .window').hide();
});
/* Ńā×Ńé╣Ńé»ŃüīŃé»Ńā¬ŃāāŃé»ŃüĢŃéīŃü¤µÖé */
$('#mask').click(function(){
$(this).hide();
$('.window').hide();
});
});
</script>
<style type="text/css">
/* Z-index of #mask must lower than #boxes .window */
#mask {
position:absolute;
left:0; top:0;
z-index:9000;
background-color:#000;
display:none;
}
.window {
position:absolute;
left:0; top:0;
width:440px; height:200px;
display:none;
z-index:9999;
padding:20px;
}
#dialog {
width:375px; height:203px;
padding:10px;
background-color:#fff;
}
/* õŠŗ2 */
#dialog1 {
width:375px; height:203px;
}
#dialog1 .d-header {
background:url(/content/img/ajax/simple_jquery_modal_window/login-header.png) no-repeat 0 0 transparent;
width:375px; height:150px;
}
#dialog1 .d-header input {
position:relative;
top:60px; left:100px;
width:200px; height:22px;
margin:4px 0 0 0; padding:5px;
border:3px solid #ccc;
font-size:15px;
}
#dialog1 .d-blank {
float:left;
background:url(/content/img/ajax/simple_jquery_modal_window/login-blank.png) no-repeat 0 0 transparent;
width:267px; height:53px;
}
#dialog1 .d-login {
float:left;
width:108px; height:53px;
margin:0; padding:0;
}
#dialog1 .d-login input {
margin:0; padding:0;
}
/* õŠŗ3 */
#dialog2 {
background:url(/content/img/ajax/simple_jquery_modal_window/notice.png) no-repeat 0 0 transparent;
width:326px; height:229px;
padding:50px 0 20px 25px;
}
</style>
</head>
<body>
<div id="wrap">
<h1><a href='http://www.queness.com/post/77/simple-jquery-modal-window-tutorial'>Simple jQuery Modal Window Tutorial</a></h1>
<!-- CODE -->
<h2>õŠŗ1’╝ÜŃéĘŃā│ŃāŚŃā½Ńü¬ŃāóŃā╝ŃāĆŃā½Ńé”ŃéŻŃā│ŃāēŃé”</h2>
<!-- #dialog is the id of a DIV defined in the code below -->
<p><a href="#dialog" name="modal">Simple Window Modal</a></p>
<!-- #customize your modal window here -->
<div id="dialog" class="window">
<b>Testing of Modal Window</b> |
<!-- close button is defined as close class -->
<a href="#" class="close">Close it</a>
</div>
<!-- Do not remove div#mask, because you'll need it to fill the whole screen -->
<div id="mask"></div>
<h2>õŠŗ2’╝ÜŃāŁŃé░ŃéżŃā│ŃāĢŃé®Ńā╝ŃāĀŃéÆŃāóŃā╝ŃāĆŃā½ĶĪ©ńż║</h2>
<p><a href="#dialog1" name="modal">Login Dialog Box</a></p>
<!-- Start of Login Dialog -->
<div id="dialog1" class="window">
<div class="d-header">
<input type="text" value="username" onclick="this.value=''" /><br>
<input type="password" value="Password" onclick="this.value=''" />
</div>
<div class="d-blank"></div>
<div class="d-login"><input type="image" alt="Login" title="Login" src="/content/img/ajax/simple_jquery_modal_window/login-button.png"/></div>
</div>
<!-- End of Login Dialog -->
<h2>õŠŗ3’╝ÜŃāóŃā╝ŃāĆŃā½Ńé”ŃéŻŃā│ŃāēŃé”ŃéÆŃé╣Ńé┐ŃéżŃā¬Ńā│Ńé░</h2>
<p><a href="#dialog2" name="modal">Sticky Note</a></p>
<!-- Start of Sticky Note -->
<div id="dialog2" class="window">
So, with this <b>Simple Jquery Modal Window</b>, it can be in any shapes you want! Simple and Easy to modify : ) <br><br>
<input type="button" value="Close it" class="close"/>
</div>
<!-- End of Sticky Note -->
<!-- / CODE -->
</body>
</html>
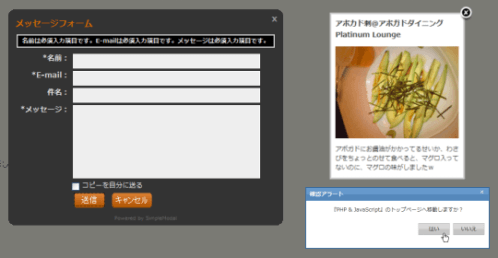
SimpleModal
ŃéĘŃā│ŃāŚŃā½Ńü¬ŃāóŃā╝ŃāĆŃā½Ńé”ŃéŻŃā│ŃāēŃé”ŃéÆńö¤µłÉŃüÖŃéŗĶ╗ĮķćÅŃü«jQueryŃāŚŃā®Ńé░ŃéżŃā│
unknown
SimpleModal v1.2.2
’╝╗CSS’╝Įbasic.cssŃĆücontact.cssŃĆüconfirm.css
Õ¤║µ£¼ńÜäŃü¬ŃāóŃā╝ŃāĆŃā½Ńé”ŃéŻŃā│ŃāēŃé”ŃĆüŃāĪŃā╝Ńā½ķĆüõ┐ĪŃāĢŃé®Ńā╝ŃāĀŃĆüńó║Ķ¬ŹŃéóŃā®Ńā╝ŃāłŃéÆŃāóŃā╝ŃāĆŃā½ĶĪ©ńż║ŃüÖŃéŗjQueryŃāŚŃā®Ńé░ŃéżŃā│ŃĆé
Ńé”ŃéŻŃā│ŃāēŃé”Ńü«Ńé╣Ńé┐ŃéżŃā½Ńü»CSSŃü¦µīćÕ«ÜŃüŚŃü”ŃüäŃüŠŃüÖŃĆé Õ¤║µ£¼ńÜäŃü¬ŃāóŃā╝ŃāĆŃā½Ńé”ŃéŻŃā│ŃāēŃé”Ńü»ŃĆüŃāÜŃā╝ŃéĖÕåģŃü«HTMLŃé│Ńā│ŃāåŃā│ŃāäŃéÆŃāóŃā╝ŃāĆŃā½ĶĪ©ńż║ŃüŚŃü”ŃüäŃüŠŃüÖŃĆé ŃāĪŃā╝Ńā½ķĆüõ┐ĪŃāĢŃé®Ńā╝ŃāĀŃü«ŃāĪŃā╝Ńā½ķĆüõ┐ĪÕŠīŃü«Õć”ńÉåŃü»Õż¢ķā©PHPŃāĢŃéĪŃéżŃā½’╝łdata/contact.php’╝ēŃéÆõĮ┐ńö©ŃüŚŃü”ŃüäŃüŠŃüÖŃĆé ńó║Ķ¬ŹŃéóŃā®Ńā╝ŃāłŃü»JavaScriptŃü«confirmķ¢óµĢ░ŃéÆõĖŖµøĖŃüŹŃüŚŃü”ŃĆüÕÉīµ¦śŃü«Õć”ńÉåŃéÆÕ«¤ĶŻģŃüŚŃü”ŃüäŃüŠŃüÖŃĆé
 Ķ©ŁńĮ«ŃéżŃāĪŃā╝ŃéĖ
<!DOCTYPE html PUBLIC "-//W3C//DTD XHTML 1.0 Transitional//EN" "http://www.w3.org/TR/xhtml1/DTD/xhtml1-transitional.dtd">
<html xmlns="http://www.w3.org/1999/xhtml" xml:lang="ja" lang="ja">
<head>
<meta http-equiv="Content-Type" content="text/html; charset=utf-8" />
<meta http-equiv="Content-Language" content="ja" />
<meta http-equiv="Content-Script-Type" content="text/javascript" />
<meta http-equiv="Content-Style-Type" content="text/css" />
<meta http-equiv="imagetoolbar" content="no" />
<title>SimpleModal | Ķ©ŁńĮ«ŃéĄŃā│ŃāŚŃā½</title>
<link rel="stylesheet" type="text/css" href="/content/lib/global.css" />
<!-- JS -->
<script src="https://ajax.googleapis.com/ajax/libs/jquery/1.2.6/jquery.min.js"></script>
<script type="text/javascript" src="/content/lib/jquery/simplemodal/jquery.simplemodal.js"></script>
<script type="text/javascript" src="/content/lib/jquery/simplemodal/basic.js"></script>
<script type="text/javascript" src="/content/lib/jquery/simplemodal/contact.js"></script>
<script type="text/javascript" src="/content/lib/jquery/simplemodal/confirm.js"></script>
<!-- CSS -->
<link rel="stylesheet" type="text/css" href="/content/lib/jquery/simplemodal/basic.css" />
<link rel="stylesheet" type="text/css" href="/content/lib/jquery/simplemodal/contact.css" />
<link rel="stylesheet" type="text/css" href="/content/lib/jquery/simplemodal/confirm.css" />
</head>
<body>
<div id="wrap">
<h1><a href='http://www.ericmmartin.com/projects/simplemodal/'>SimpleModal v1.2.2</a> | Ķ©ŁńĮ«ŃéĄŃā│ŃāŚŃā½</h1>
<!-- CODE -->
<h2>Õ¤║µ£¼ńÜäŃü¬ŃāóŃā╝ŃāĆŃā½ŃāĆŃéżŃéóŃāŁŃé░</h2>
<p>ŃāÜŃā╝ŃéĖÕåģŃü«HTMLĶ”üń┤ĀŃéÆŃāóŃā╝ŃāĆŃā½ĶĪ©ńż║ŃüŚŃüŠŃüÖŃĆé</p>
<div id='basicModal'>
<input type='button' name='basic' value='Demo' class='basic demo'/>
</div>
<div id="basicModalContent" style='display:none'>
<h1>ŃéóŃā£Ńé½ŃāēÕł║@ŃéóŃā£Ńé¼ŃāēŃāĆŃéżŃāŗŃā│Ńé░ Platinum Lounge</h1>
<p><a href="http://www.flickr.com/photos/22559849@N06/3273696567/" title="ŃéóŃā£Ńé½ŃāēÕł║@ŃéóŃā£Ńé¼ŃāēŃāĆŃéżŃāŗŃā│Ńé░ Platinum Lounge by php_javascript_room, on Flickr"><img src="http://farm4.static.flickr.com/3509/3273696567_ebf4ed4381_m.jpg" width="240" height="180" alt="ŃéóŃā£Ńé½ŃāēÕł║@ŃéóŃā£Ńé¼ŃāēŃāĆŃéżŃāŗŃā│Ńé░ Platinum Lounge" /></a></p>
<p>ŃéóŃā£Ńé¼ŃāēŃü½ŃüŖķåżµ▓╣ŃüīŃüŗŃüŗŃüŻŃü”ŃéŗŃüøŃüäŃüŗŃĆüŃéÅŃüĢŃü│ŃéÆŃüĪŃéćŃüŻŃü©Ńü«ŃüøŃü”ķŻ¤Ńü╣ŃéŗŃü©ŃĆüŃā×Ńé░ŃāŁÕģźŃüŻŃü”Ńü¬ŃüäŃü«Ńü½ŃĆüŃā×Ńé░ŃāŁŃü«Õæ│ŃüīŃüŚŃüŠŃüŚŃü¤’ĮŚ</p>
</div>
<h2>ńó║Ķ¬ŹŃéóŃā®Ńā╝ŃāłŃéÆŃāóŃā╝ŃāĆŃā½ĶĪ©ńż║</h2>
<p>JavaScriptŃü«confirmķ¢óµĢ░ŃéÆõĖŖµøĖŃüŹŃüÖŃéŗŃāóŃā╝ŃāĆŃā½ŃāĆŃéżŃéóŃāŁŃé░Ńü¦ŃüÖŃĆé</p>
<div id='confirmDialog'>
<input type='button' name='confirm' value='Demo' class='confirm demo'/>
</div>
<div id='confirm' style='display:none'>
<a href='#' title='Close' class='modalCloseX simplemodal-close'>x</a>
<div class='header'><span>ńó║Ķ¬ŹŃéóŃā®Ńā╝Ńāł</span></div>
<p class='message'></p>
<div class='buttons'>
<div class='no simplemodal-close'>ŃüäŃüäŃüł</div><div class='yes'>Ńü»Ńüä</div>
</div>
</div>
<!--h2>ŃüŖÕĢÅÕÉłŃüøŃāĢŃé®Ńā╝ŃāĀŃéÆŃāóŃā╝ŃāĆŃā½ĶĪ©ńż║</h2>
<p>Õż¢ķā©ŃāĢŃéĪŃéżŃā½’╝ł/data/contact.php’╝ēŃéÆĶ¬ŁĶŠ╝ŃéōŃü¦ŃāóŃā╝ŃāĆŃā½ĶĪ©ńż║ŃüŚŃüŠŃüÖŃĆé</p>
<div id='contactForm'>
<input type='button' name='contact' value='Demo' class='contact demo'/>
</div-->
<!-- / CODE -->
</div>
</body>
</html>